Author

Sumit Bahl

Browsing

Here we discuss How to Root and Install TWRP Recovery on Samsung Galaxy C9 Pro. Many Galaxy C9 Pro users are already looking for a method to root Galaxy C9 Pro and install TWRP recovery on it. TWRP Recovery helps you to Install a Custom ROM or kernel on your device. To install TWRP Recovery on Samsung Galaxy C9 Pro, first, you need Unlocked Bootloader of Samsung Galaxy C9 Pro. Those who bought C9 Pro and looking for a root method can follow our step-by-step guide to Root and Install TWRP Recovery on Galaxy C9 Pro.

After flashing TWRP Recovery on Galaxy C9 Pro, you can install custom ROMs, flash a custom kernel, take a nandroid backup, install rooted apps and flash supersu to root Samsung Galaxy C9 Pro. Installing a custom recovery on Samsung C9 Pro will wipe the stock recovery and replace it with a new one. Follow below steps to Root and Install TWRP Recovery on Galaxy C9 Pro.

How to Root and Install TWRP Recovery on Samsung Galaxy C9 Pro

To Root and Install TWRP Recovery on C9 Pro, you need TWRP Recovery file, Odin, and SuperSu. All you have to do is place the recovery file on Odin Tool and flash it. The device is a powerful phone with top-notch specs and the device is good enough root and installs custom ROM in it. So Root and Install TWRP Recovery on Samsung Galaxy C9 Pro to explore the power of your device.

Before You Begin

  • This method is only for Samsung Galaxy C9 Pro. Don’t try this on any other device.
  • Follow the steps correctly otherwise, you may brick your device. We Guidegeekz.com is not responsible for any damage to your phone.
  • Charge your device to 60- 70% to prevent it for the accidental shutdown.
  • Take a complete backup of everything important.

Necessary Downloads

  • Download Odin for Samsung Galaxy C9 Pro – Download
  • TWRP Recovery for Samsung Galaxy C9 Pro (C900F/Y) (c9lte) – Download
  • TWRP Recovery for Galaxy C9 Pro (China) (c9ltechn) – Download
  • Download SuperSu to Root Samsung C9 Pro – Download

How to Root and Install TWRP Recovery on Samsung Galaxy C9 Pro

FLASH TWRP RECOVERY ON SAMSUNG C9 PRO

1) First, Enable USB debugging and OEM Unlock option to Unlocked Bootloader of C9 Pro. For that –

  • Go to Settings> About Device.
  • Scroll down and tap on Build number 7 times.
  • Developer mode has been enabled on your device.
  • Now find USB Debugging and OEM Unlocking and Enable it.

Usb debugging and OEM Unlocking

2) Download TWRP Recovery for C9 Pro and save it on your device.

3) Now Download the Odin from above and extract the zip file.

4) Run the Odin file on your PC.

5) Connect your device via data cable to your PC and reboot it into Download/Odin mode.

6) To enter Samsung C9 Pro into download mode –

  • Turn off your phone.
  • Press and hold the Home + Volume Down + Power 
  • You see the warning screen, Press Volume Up to continue.

7) In Download mode, ID: COM port turned blue and added message appears in Odin message box if your device is recognized by Odin.

S7 Odin

8) If ID: COM doesn’t turn blue means the device driver is not correctly installed or USB cable may be faulty.

9) Now click on AP/PDA tab and select the TWRP file .tar.

Odin TWRP

10) Make sure that only F.Reset Time is enabled. (disable Auto-Reboot).

F.reset

11) Click on Start button to start the flashing process. Wait until you see the Pass message on your Odin screen.

Odin Pass message

12) Done! Now boot directly into TWRP mode by Hold Volume Down + Home + Power to get out of Download mode and immediately swap to Volume Up when the screen blanks.

ROOT SAMSUNG Galaxy C9 PRO 

1) You are in TWRP mode now follow below steps to Root C9 Pro.

2) At first boot, it will ask you if you want to allow system modifications, Don’t tap on anything swipe right.

3) Now download SuperSu from above and transfer it to your device via MTP without leaving TWRP.

4) Now click on Install button and select SuperSu to Root Samsung C9 Pro.

5) Swipe to flash supersu.

6) Done Reboot! You successfully Root C9 Pro.

This is the complete guide to Root and Install TWRP Recovery on Samsung Galaxy C9 Pro. If you have any question related to this post, feel free to leave that in the comment section.


Ever witnessed a pop-up message reading ‘Application not installed’? Probably, when you are trying to install or download a .apk file extension App from other App offering sites other than the Google Play Store. Moreover, puts you to watch still till the slow rolling buffer reaches 100%. Yeah, It hurts! but don’t worry we have a solution to Fix App not Installed Error on Android Phone.

As the issue has come out to be very common among Android users, it’s not any more confusing. You need not panic about this error as this is neither a software issue nor a hardware problem. This usually occurs when we try downloading an App which is used by the Android operating system as the file packaging format for the allotment and installation of mobile apps. As the Android Application Package, i.e., .apk is specially designed for Android users, the iOS users are free from this pop-up. Check How to Fix App not Installed Error on Android Phone from below.

How to Fix App not Installed Error on Android Phone

Interrogating the reason behind this error being displayed is important to encounter the root cause of this problem and find a solution to resolve it. There are a number of reasons that end up projecting the error message. Most of these could be because of your faulty actions! Yeah, you heard it right, most of the reasons are an outcome of your unawareness. Check out the reasons and solution to App not Installed Error on Android Phone.

How to Fix App not Installed Error on Android Phone?

Possible Causes and their Solutions –

  • YOUR DEVICE IS RUNNING LOW ON STORAGE! – This is one of the most common reasons which doesn’t allow installation of Apps, which are of larger size than the device’s leftover memory. One must check the maintenance of his android mobile regularly and dispose of the unused Apps from time to time. This extends a lot of the battery life and also helps in the faster working of the mobile. This frees up a lot of storage space and less room for the Apps on your wish-list! You can also delete other storage occupying files, for instance, photos, videos, music files or even the documents which you feel aren’t necessary at the moment.
  • INCORRECT INSTALLATION LOCATION! – It occurs with an alternation in the storage location. This means the certain App which you have tended to download is supposed to be stored only on the internal memory. There are some Apps which can be installed on both internal and external memory. Internal memory is that storage capacity provided with the device. An external storage capacity is applicable only to the Android users, this is, in other words, called a sd card which provides an access memory to the user to enjoy much more storage on his or her mobile. Coming to the error message, this can be resolved by resetting some options back over there in your settings. You need to reset your Device’s app permissions by the following simple steps,
  1. Setting > Apps > All > Menu Key > Reset app permissions or preferences
  2. Application installation location to Automatic.
  3. Now you are all set to enjoy many more new Apps provided by sites other than the Google Play Store.
  • APP PERMISSION ERRORS! – This doesn’t have any right to do solution, but the best option is to wait for a while and give it a try sometime later. Hoping the error to have resolved itself.
  • CORRUPTION OF APP! – This usually arises when you try downloading an App from an unofficial source which may already be corrupted. It could have been a copy obtained from another source. Then it is necessary for you to think twice whether the site offering is trustworthy before letting it into your mobile. If you don’t find the site reliable, then you can switch to the Google Play store, for the same.
  • AN APK SIGNATURE CLASH! – When you attempt to download a file from other sites rather than the Google Play store, the operating system tries to validate the application’s certificate for ensuring that it came from the same developers who own the patents. If this process ends up positively then, the app installs as desired. If there is any negativity or if the certificates don’t match, it results in ‘Application not installed’ message. Ensuring whether the site is a reliable source for downloading Apps will put an end for this discomfort. This is the most common cause and Fix App not Installed Error on Android Phone.
  • CORRUPTED STORAGE ON SD CARD! – This is the reason for most the errors while downloading. If your sd card or device is corrupt by any means then, it denies the installation of any new applications either from the Google Play store or other external sites. This occurs eventually on Android devices. You can format your sd card after transferring all the necessary files to internal storage. The format option is available under the setting options.

This is most common causes and Fix App not Installed Error on Android Phone. If all the above doesn’t seem to work, a simple reboot of the phone may do the trick. You can also try reinserting the battery as we do with all other electronic devices.

A Happy Ending For The Error Message: You are now all set to overcome the error while downloading issue. Albeit, the root cause is more serious and the fix can be more laborious than you imagine, you are at least leftover with options of resolving the issue. If all the other tricks fade away, you are left with wiping your phone as your final resort. Make sure you have copied all your essential information.

Happy installing! 🙂

Here we discuss How to Root and Install TWRP Recovery on Samsung Galaxy J2. Many Galaxy J2 users are already looking for a method to root Galaxy J2 and install TWRP recovery on it. TWRP Recovery helps you to Install a Custom ROM or kernel on your device. To install TWRP Recovery on Samsung Galaxy J2, first, you need Unlocked Bootloader of Samsung Galaxy J2. Those who bought Galaxy J2 and looking for a root method can follow our step-by-step guide to Root and Install TWRP Recovery on Samsung Galaxy J2.

After flashing TWRP Recovery on Galaxy J2, you can install custom ROMs, flash a custom kernel, take a nandroid backup, install rooted apps and flash supersu to root Samsung Galaxy J2. Installing a custom recovery on Samsung Galaxy J2 will wipe the stock recovery and replace it with a new one. Follow below steps to Root and Install TWRP Recovery on Galaxy J2.

How to Root and Install TWRP Recovery on Samsung Galaxy J2 (SM-J200)

To Root and Install TWRP Recovery on Samsung Galaxy J2, you need TWRP Recovery file, Odin, and SuperSu. All you have to do is place the recovery file on Odin Tool and flash it. The device is a powerful phone with top-notch specs and the device is good enough root and installs custom ROM in it. So Root and Install TWRP Recovery on Samsung Galaxy J2 to explore the power of your device.

Before You Begin

  • This method is only for Samsung Galaxy J2 (SM-J200 ). Don’t try this on any other device.
  • Follow the steps correctly otherwise, you may brick your device. We Guidegeekz.com is not responsible for any damage to your phone.
  • Charge your device to 60- 70% to prevent it for the accidental shutdown.
  • Take a complete backup of everything important.

Necessary Downloads

  • Download Odin for Samsung Galaxy J2 – Download
  • TWRP Recovery for Samsung Galaxy J2 (SM-J200) – Download
  • Download SuperSu to Root Samsung Galaxy J2 – Download

HOW TO ROOT AND INSTALL TWRP RECOVERY ON SAMSUNG GALAXY J2

Flash TWRP Recovery on Samsung Galaxy J2

1) First, Enable USB debugging and OEM Unlock option to Unlocked Bootloader of Galaxy J2. For that –

  • Go to Settings> About Device.
  • Scroll down and tap on Build number 7 times.
  • Developer mode has been enabled on your device.
  • Now find USB Debugging and OEM Unlocking and Enable it.

Usb debugging and OEM Unlocking

2) Download TWRP Recovery for Galaxy J2 and save it on your device.

3) Now Download the Odin from above and extract the zip file.

4) Run the Odin file on your PC.

5) Connect your device via data cable to your PC and reboot it into Download/Odin mode.

6) To enter Samsung Galaxy J2 into download mode

  • Turn off your phone.
  • Press and hold the Home + Volume Down + Power buttons.
  • You see the warning screen, Press Volume Up to continue.

7) In Download mode, ID: COM port turned blue and added message appears in Odin message box if your device is recognized by Odin.

S7 Odin

8) If ID: COM doesn’t turn blue means the device driver is not correctly installed or USB cable may be faulty.

9) Now click on AP/PDA tab and select the TWRP file .tar.

Odin TWRP

10) Make sure that only F.Reset Time is enabled. (disable Auto-Reboot).

F.reset

11) Click on Start button to start the flashing process. Wait until you see the Pass message on your Odin screen.

Odin Pass message

12) Done! Now boot directly into TWRP mode by Hold Volume Down + Home + Power to get out of Download mode and immediately swap to Volume Up when the screen blanks.

Root Samsung Galaxy J2 (SM-J200)

1) You are in TWRP mode now follow below steps to Root Galaxy J2.

2) At first boot, it will ask you if you want to allow system modifications, swipe right and enable modifications.

3) Now download SuperSu from above and transfer it to your device via MTP without leaving TWRP.

6) Now click on Install button and select SuperSu to Root Samsung Galaxy J2.

3) Swipe to flash supersu.

4) Done Reboot! You successfully Root Galaxy J2.

This is the complete guide to Root and Install TWRP Recovery on Samsung Galaxy J2. If you have any question related to this post, feel free to leave that in the comment section.

Today we will be providing you a direct link to Download Xiaomi Device Service Tool for all new redmi devices for Windows PC. Some new Xiaomi or Redmi device won’t let you boot into Recovery mode and continue to ask you to connect pcsuite.mi.com. To boot into Recovery mode either you have to unlock bootloader and flash custom Recovery, or you can use Xiaomi Device Service Tool For Windows Pc.

Xiaomi Device Service Tool not only used to boot your device into Recovery or fastboot mode but also used to remove device pattern lock, Hard formatting devices, and get your device information. Xiaomi Mi Service Tool created by Ko Sai and extremely useful for the Xiaomi or Redmi devices. So if you forget your pattern lock or pin password or want to factory reset your Xiaomi or redmi device then Download Xiaomi Device Service Tool For Windows Pc from below and follow the below process.

Download Xiaomi Device Service Tool For Windows Pc

The software is tested on Redmi 4A, and Redmi 4X are the same devices, but you can try this on any Xiaomi Redmi device. Some of the features in the tool will wipe your data, so it is advisable to take a backup before performing any operation. Download Xiaomi Device Service Tool For Windows Pc from below.

Xiaomi Device Service Tool Features

  • Xiaomi Service Tool is used to remove pattern lock.
  • Used to get Device information.
  • Used for device recovery check.
  • Used for formatting, erasing, resetting your device.
  • Also used for boot your device into Recovery or Fastboot mode.

Download Xiaomi Device Service Tool For Windows Pc

[su_button url=”https://drive.google.com/open?id=0B3zr0V7YRX9pb1JlRkZ4YXRsZlk” target=”blank” style=”glass” size=”8″ center=”yes” rel=”nofollow”]Xiaomi Service Tool by Ko Sai[/su_button]

How to Use Xiaomi Device Service Tool

  • Download Xiaomi Service Tool from above and open it.
  • Now turn off your device & enter recovery mode (press & hold Power button & Volume down
    button for about 10 sec).
  • Then connect your device to PC.
  • Now choose any program you want.
  • For Remove Pattern, click on Remove Pattern Password then a command prompt window will open.
  • And it will show that the device has been formatted.
  • Now reboot device & enjoy.

If you ever want to format your device, remove pattern lock, reset your device then download Xiaomi device service tool from above & use it. If anyone has any query related to this post feel free to comment.

Here we share How to Edit Live Photos in iOS 11 on iPhone. Taking photos has dependably been troublesome, particularly in case you’re taking a pic of more than one individual. The moment has passed, and you are now left with a bad shot! At that point, Apple presented Live Photos, which completely changed the way Apple iPhone shares memories to each other. It didn’t make a difference if someone wasn’t grinning or if anyone closed their eyes, you could simply hold down on the photo itself and discover a minute that looked consummate. In any case, Live Photos didn’t accompany any devices to alter or play around with the liveliness angle. Check How to Edit Live Photos in iOS 11 on iPhone from below.

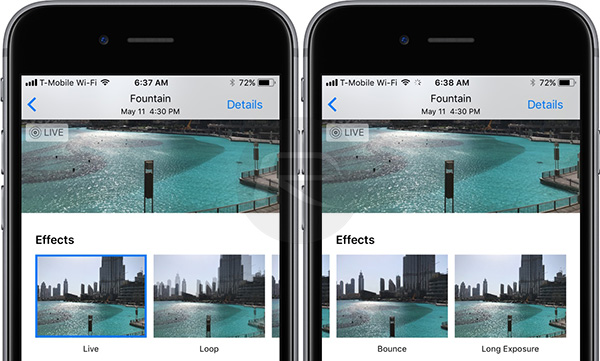
Truly, Apple has done marvelously with the new editing and effects in iOS 11. Altering live shots is supreme fun in the latest iOS 11 as there are numerous ways to give you a chance to influence your pics to look amazing. In addition, you can likewise utilize Markup tools to enhance the shots to your heart’s content!You would now be able to pick the still picture in a Live Photo, trim the animation, add live exposure effects, add a loop, or bounce in iOS 11 on iPhone. Check below guide take live photos on iPhone and How to Edit Live Photos in on iPhone.

How to Edit Live Photos in iOS 11 on iPhone

How to take Live Photos on iPhone

Step 1. To take a Live Photo, open up the Camera app.

Step 2. Enable Live Photos by tapping the icon at the top center of the screen (between HDR and timer)

Step 3. Tap the Shutter button to take your Live Photo.

How to Edit Live Photos in iOS 11 on iPhone

1) Edit Live Photos Using Markup Tool in iOS 11 on iPhone

Step 1. Open Photos application → Choose Live PhotoEdit.

Step 2. Click on Three Dots icon in Live Photo on iPhone

Step 3. Click on Markup. A popup will show up “Markup Turns off Live Photo”, click “OK”.How to Edit Live Photos by Using Markup Tool in iOS 11 on iPhone/iPad

Step 4. Now here are all the editing tools at your disposal. Use them and make your clicks better.

2) Apply Effects to Live Photo on Apple iPhone iOS 11

Step 1. Open the Photos application → Select Live Photo.

Step 2. Next, you need to swipe up on your photo.

Step 3. Presently, you have four alternatives: Live, Loop, Bounce and Long Exposure; Just click the one that you wish to utilize.

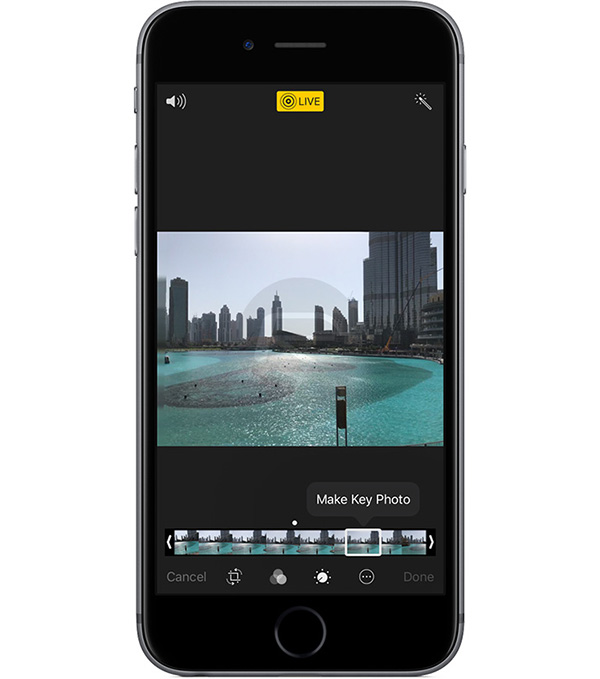
3) Set New Key Photo in Live Photos

Step 1. Fire up the Photos application and choose the Live Photo which you wish to edit first.

Step 2. Next, you need to click the Edit button.

Step 3. Presently, in the scrubber, you need to choose the frame to set as the new Key Photo.

Step 4. At last, click Done to affirm the change.

4) Disable Sound of Live Photo in iOS 11 on iPhone

Step 1. Open Photos application → Select Live Photo → Edit.How to Turn off Live Photos Sound in iOS 11 on iPhone/iPad

Step 2. Click the sound catch at the bottom right corner to mute/unmute sound.

Step 3. Click the Done button to affirm the change.

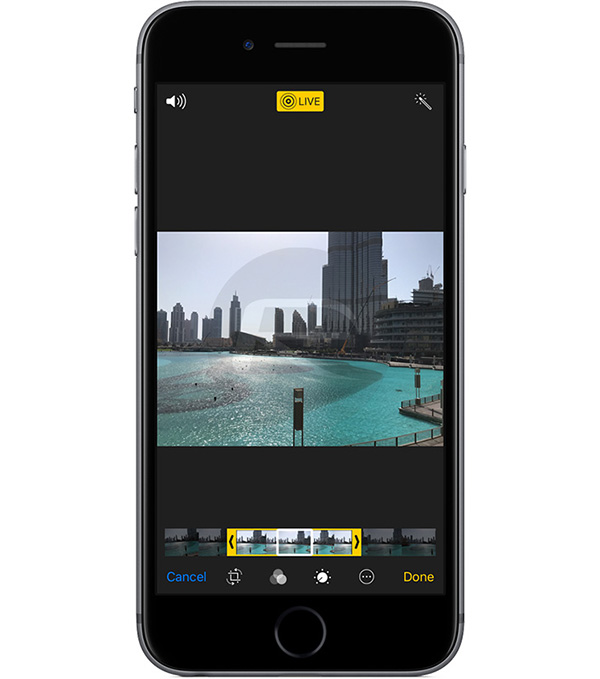
5) Trim Your Live Photo on Apple iPhone iOS 11

Step 1. Open the Photos application → Select Live PhotoEdit.

Step 2. On the scrubber at the base of the screen, you have to slide the left and right handles to calibrate the begin and end points.

Step 3. Click on Done to affirm.

6) Reset Live Photo to Original on Apple iPhone iOS 11

Step 1. Open Photos application → Choose Live PhotoEdit.

How to Revert Live Photos to Original in iOS 11 on iPhone/iPad

Step 2. Click on Revert alternative at the base right corner of the screen and after that click again on Revert to Original.

And that will be all!! Your live shots are reverted back to the defaults.

7) Share Live Photos

Step 1. To share Live Photos, Open Photos app on iPhone

Step 2. Find the Live Photo you want to share (Live Photo will have the word Live in the top left corner of the photo)

Step 3. Tap the Share icon (If you don’t want to share the Live version of the photo, tap the Live button and it will turn to Off)

That’s all for now. If you get any trouble to Edit Live Photos in iOS 11 on iPhone let us know in the comment section.

Today we share How to Download Pixel Launcher 2.0 on your Android Device. Only a few days forth the release of Google’s newest version of Android, users can now Download Pixel Launcher 2.0 and take full advantage of the wide range of features that the new Oreo Launcher provides.

The popular developer, AmirZ has known also for the rootless port of the original Pixel Launcher has yet again surprised all of us enthusiasts with his second iteration, and this time he brings about the newest Android Oreo features in his launcher. You can Download Pixel Launcher 2.0 on your Android Device from below.

Download Pixel Launcher 2.0 on your Android Device

Before we begin, following are the list of new features that the Pixel Launcher 2.0 will allow you to do, check it out!

  • QSB with transparent rectangle, Google Pill and Date/Weather
  • Different colours of notification dots
  • Filter Google Wallpapers and Voice Search from the apps list
  • Use Google Wallpapers to select a wallpaper when available
  • Device profiles, margins, icon counts
  • Disabled partner customization like Motorola’s 4 columns
  • Google Now feed on the left of the normal workspace
  • Google Calendar app icon with the date
  • Pull down for notifications for Nougat devices
  • Oreo theme backported to older OS versions with Pixel Blue accent colour
  • Notification dots backported to Marshmallow
  • Automatically prompts for notification access so you won’t have to dig through settings menus
  • Fix Android 8 checks so Nexus devices can use all new features
  • Show icon shapes on Android 8 without developer settings enabled
  • Pressing the date widget opens the default calendar app
  • Keyboard properly closes when returning to the home screen from any app
  • Symmetrical hotseat
  • Filter Google Now Launcher from the apps list
  • Pinch to overview
  • Samsung Secure Folder compatibility
  • Backport of circle icons

Phew, that’s a load of features in a mere APK file, right! Now, if and when you’re ready, read on to find how you can Download Pixel Launcher 2.0 on your Android Device and make the most out of your Android Nougat or Marshmallow device!

Download Pixel Launcher 2.0 on your Android Device

Procedure

  1. Make sure you don’t have any other previous versions of the Pixel Launcher installed on your Android phone.
  2. Download the APK file attached above, and transfer it onto your non-pixel device.
  3. Locate it on your phone, and tap on it.
  4. If prompted, head over to Settings > Security > Unknown Sources, and check the box.
  5. Return back, and once again tap on the APK file. This time it should allow you to install it.
  6. Tap on ‘Next‘, and finally ‘Install‘.
  7. Voila! Ensure you set the Pixel Launcher 2.0 as your default.

If you have had any issues throughout the procedure, then feel free to leave us a query down below.

After almost a graceful year, we now have a stable build for the much anticipated Xposed Framework for devices running Android Nougat. Some stated the reason for the delay has been caused due to the tiny new aesthetic and fundamental UI tweaks that have changed from Android Marshmallow to Nougat, while many others just blamed the developers for being lazy. Whatever the reason might’ve been, better late than never, we are counting down the Best Xposed Modules for Android Nougat.

It is good to note that Xposed requires your Android Nougat device to be rooted. The entire process of flashing the framework is a bit of a stretch, but with a correct guide and some patience in your hands, you will be able to do wonders. Check below guide for Best Xposed Modules for Nougat

Xposed Modules for Android Nougat

Talking about Modules, they are basically little add-ons to your already-awesome Android device. You have a module to fake your location, another one to block ads, another to turn WhatsApp into a mini-spy app, and so much more. For the sake of simplicity, we have picked our top 5 Xposed Nougat Modules for the layman, for a person who has just finished installing Xposed on his/her Android device, so without any further adieu, let’s begin! Check out 5 Best Xposed Modules for Android Nougat.

5 Best Xposed Modules for Android Nougat

1) Greenify

Although available as an app on the Play Store for non-Xposed and non-rooted users, once you combine the mighty powers of both Xposed and Greenify, you will never crave for extra battery life ever. Greenify intelligently ‘hibernates’ your apps, and you get to choose which ones stay awake in the background and which don’t. This increases the battery capacity of your device by a huge chunk since there is little to none battery drain in the background checking for useless emails and messages.

2) Gravity Box

Next up, Gravity Box is essentially like a mini powerhouse for extending the capabilities of your Android device. It contains various tweaks, both hardware, and software, ranging from the famous Pie controls to hardware key customization. If your Android device doesn’t necessarily support any big and stable Custom ROMs, then definitely give this one a try! No doubt Gravity Box is one of the best Xposed module available for Android Nougat.

Gravity Box

3) WhatsApp Extensions

Easily the most favorite on our list, this module enhances the way you use your WhatsApp account to its fullest. Once installed, you will be able to take total control of your status, read receipts, last seen and much more. Additional features like being able to lock specific chats, zooming in on profile pictures, and being able to set custom wallpapers for each chat really make this module a must-try.

Whatsapp Extension

4) Boot Manager

This module does exactly what it says – it allows you to manage the services that are automatically loaded up when you boot up your smartphone, on a per-app basis. While some OEMs and even Custom ROMs have this feature built in, this module is a lot more reliable and the UI-ugliness does compensate itself with a really powerful set of functions.

Boot Manager

5) Xstana

This last module on our list is surely one of the more eye-catching ones out there. No, this isn’t a fully fledged theme engine, but this can virtually change the entire look of your device’s navigation bar. You can download thousands of themes from the Play Store, and with the help of this module, not only be able to change the layout but the color, the behavior and much more.

Xinsta

That was it for our countdown featuring some of the Best Xposed Modules for Android Nougat. We ask you the same question, if you were to live with only one Xposed Module from this list, what would it be and why? Go on, the comments section is waiting for you!

Read on to find out how you can get iOS 11 Control Center on Any Android Device! Apple’s biggest visual and also functional overhaul with the latest and greatest iOS 11 has been the new Control Center. It not only has a bunch more of toggles to play around with, but also manages to utilize the ‘3D Touch’ functionality a lot better. It is in no shame admitting that for years the Android quick toggles have both been in a terrible place, and always manage to serve less than what they’re capable of.

A developer named LuuTinh decided to evade the same problem once and for all, and now we have a robust working and visually appealing Control Center app for Android as well. This app is named ‘Control Center iOS 11‘ and is available for free on the Google Play Store, that’s right, no money, and no root required for you to try it out!

In the following quick article, we will guide you through some of the app’s best features and will finally leave a download link for you to try it out yourself! Here is How to Get iOS 11 Like Control Center On Any Android Device!

Download Control Center on Any Android Device

Use the following direct link in order to download and install the control center app on your Android device using the Google Play Store. Once downloaded and installed, you will need to grant the app all the permissions it asks for.

[appbox googleplay com.luutinhit.controlcenter]

Features

The app is loaded to the brim with a bunch of useful features. These include the way you trigger the control center. Either by swiping up from the bottom of your screen, or by simply tapping the little grayed out area. You can also change the visual appearance of the control center with options to toggle like the color, size of the icons and the entire UI, add a custom background to meet your visually appealing requirements, and also finally enable or disable a permanent notification badge in your status bar for convenience. Lastly, and what we feel is the best feature of this app is being able to add your favorite apps as a shortcut. This is literally one-upping Apple in its own game.Control Center on Any Android Device

The app is strikingly similar to the original control center as well, and that’s what makes it the best. You can long-press on any toggle to imitate the 3D Touch functionality and get more options with the same. There’s even a tile for you to control your music, brightness, WiFi, Bluetooth and so much more.

Will this replace your native quick toggles? No, but this sure is worth a try, and who knows, Android might finally take some inspiration from Apple this time around!

Android 7.1.1 based OxygenOS 4.1.5 for OnePlus 3/3T starts rolling out via OTA. The new update added new features, fixes bugs and brings the latest security patch. OxygenOS 4.1.5 for OnePlus 3 and OnePlus 3T rolling out via out and users will soon receive the notification on their device. If you are already using the OxygenOS 4.1.3, then you will receive an OTA shortly, we will also provide the OTA File as well as full ROM with that you can manually install OxygenOS 4.1.5 on OnePlus 3/3T. You can download OxygenOS 4.1.5 for OnePlus 3/3T from below. Also Check OxygenOS 4.1.3 oneplus 3 full ROM for OnePlus 3T 

OnePlus 3 already released the nougat update for Oneplus 3 and now you can update OnePlus 3/3T to OxygenOS 4.1.5 which includes many new features. Check below how to Download and Install OxygenOS 4.1.5 for OnePlus 3/3T

Download and Install OxygenOS 4.1.5 for OnePlus 3/3T

OxygenOS 4.1.5 for OnePlus 3T and OnePlus 3 is OTA eligible and will be rolled out once it is ready. If you can’t wait for the OxygenOS 4.1.5 OTA update, then you can manually download OxygenOS 4.1.5 OTA zip file and flash it via ADB Sideload. The update is 1.4GB in size and can be flash from stock recovery. Download OxygenOS 4.1.5 for OnePlus 3/3T from below.

OxygenOS 4.1.5 Features and Changelogs –

  • New additions:
    • Added system push notifications for important information from OnePlus
  • Updates:
    • Updated network settings for select carriers
    • Updated OnePlus Community app to v1.8
    • Updated Android Security Patch level to 1st May 2017
    • Modified WiFi no internet indication icon
  • Bug fixes:
    • Fixed storage issue present on 3rd party file managers
    • Fixed VoLTE issue on certain Jio SIM cards
    • Fixed connection issue on Android Auto
  • Optimizations:
    • Battery
    • WiFi, Bluetooth, and GPS
    • Proximity sensor
    • Camera low light focus
    • Expanded screenshot
  • Other changes:
    • Enhanced system stability

Note:

  • This method only works on OnePlus 3/3T.
  • It will wipe your data so take a complete backup before proceeding.
  • A battery should be 50-60% to prevent accidental shut down.
  • Follow the steps correctly otherwise, you may brick your device. We Guidegeekz.com is not responsible for any damage to your phone.

DOWNLOAD OXYGENOS 4.1.5 FOR ONEPLUS 3/3T

  • OxygenOS 4.1.3 to OxygenOS 4.1.5 OTA for OnePlus 3 – Download
  • OxygenOS 4.1.4 to OxygenOS 4.1.5 OTA for OnePlus 3 – Download
  • Full OxygenOS 4.1.5 zip file for OnePlus 3 –Download
  • OxygenOS 4.1.3 to OxygenOS 4.1.5 OTA for OnePlus 3T –Download
  • OxygenOS 4.1.4 to OxygenOS 4.1.5 OTA for OnePlus 3T –Download
  • Full OxygenOS 4.1.5 zip file for OnePlus 3T –Download

INSTALL OXYGENOS 4.1.5 ON ONEPLUS 3/3T

1) Download OxygenOS 4.1.5 OTA zip file from above and save it inside the folder where ADB files are installed.

2) Reboot your phone into Recovery Mode by turn off the phone and holding the Power and Volume down buttons.

3) Now in recovery, choose “Install from ADB” and tap OK to confirm.

4) You see a screen with “You are in sideload mode”.

5) Connect your device to PC/Mac and run the following command.

For Windows: adb sideload file name.zip For Mac/Linux:./adb sideload file name.zip

6) Now wait for a while for the device to update.

7) Done! Your device will automatically reboot to OxygenOS 4.1.5.

Follow the above guide to Install OxygenOS 4.1.5 on OnePlus 3/3T or alternately you can flash the full ROM via TWRP Recovery. If you have any question related to this post, feel free to leave that in the comment section.

Android 7.1.1 based OxygenOS 4.1.3 for OnePlus 3/3T starts rolling out via OTA. The new update added many new features and brings the latest security patch. OxygenOS 4.1.3 for OnePlus 3 and OnePlus 3T rolling out via out and users will soon receive the notification on their device. If you are already using the OxygenOS 4.1.1, then you will receive an OTA shortly, otherwise we will also provide the OTA File as well as full ROM with that you can manually install OxygenOS 4.1.3 on OnePlus 3/3T. You can download OxygenOS 4.1.3 for OnePlus 3/3T from below. Also Check OxygenOS 4.1.1 full ROM for OnePlus 3T 

OnePlus 3 already released the nougat update for Oneplus 3 and now you can update OnePlus 3/3T to OxygenOS 4.1.3 which includes many new features. Check below how to Download and Install OxygenOS 4.1.3 for OnePlus 3/3T.

Download and Install OxygenOS 4.1.3 for OnePlus 3/3T

OxygenOS 4.1.3 for OnePlus 3T and OnePlus 3 is OTA eligible and will be rolled out once it is ready. If you can’t wait for the OxygenOS 4.1.3 OTA update, then you can manually download OxygenOS 4.1.3 OTA zip file and flash it via ADB Sideload. The update is 1.4GB in size and can be flash from stock recovery. Download OxygenOS 4.1.3 for OnePlus 3/3T from below.

OxygenOS 4.1.3 Features and Changelogs –

  • Upgraded Android 7.1.1
  • Added expanded screenshots
  • Improved picture taking of moving objects with blur reduction
  • Improved video stability when recording
  • Improved WiFI connectivity
  • Improved bluetooth connectivity
  • Fixed Instagram swiping bug
  • Fixed hardware buttons malfunction bug
  • Increased system stability
  • General bug fixes

Note:

  • This method only works on OnePlus 3/3T.
  • It will wipe your data so take a complete backup before proceeding.
  • A battery should be 50-60% to prevent accidental shut down.
  • Follow the steps correctly otherwise, you may brick your device. We Guidegeekz.com is not responsible for any damage to your phone.

DOWNLOAD OXYGENOS 4.1.3 FOR ONEPLUS 3/3T

  • OxygenOS 4.1.1 to OxygenOS 4.1.3 OTA for OnePlus 3 – Coming Soon
  • Full OxygenOS 4.1.3 zip file for OnePlus 3 –Download, Mirror
  • OxygenOS 4.1.1 to OxygenOS 4.1.3 OTA for OnePlus 3T –Download
  • Full OxygenOS 4.1.3 zip file for OnePlus 3T –Download, Mirror

INSTALL OXYGENOS 4.1.3 ON ONEPLUS 3/3T

1) Download OxygenOS 4.1.3 OTA zip file from above and save it inside the folder where ADB files are installed.

2) Reboot your phone into Recovery Mode by turn off the phone and holding the Power and Volume down buttons.

3) Now in recovery, choose “Install from ADB” and tap OK to confirm.

4) You see a screen with “You are in sideload mode”.

5) Connect your device to PC/Mac and run the following command.

For Windows: adb sideload file name.zip
For Mac/Linux:./adb sideload file name.zip

6) Now wait for a while for the device to update.

7) Done! Your device will automatically reboot to OxygenOS 4.1.3.

Follow the above guide to Install OxygenOS 4.1.3 on OnePlus 3/3T or alternately you can flash the full ROM via TWRP Recovery. If you have any question related to this post, feel free to leave that in the comment section.