Author

Sumit Bahl

Browsing

The latest MIUI 12.5 update for Mi 11 starts rolling out via OTA. The update is based on Android 11 and brings lots of new features and improvements. Follow the below guide to Download MIUI 12.5.1.0 Global Stable ROM for Mi 11.

MIUI 12.5.1.0 Global Stable ROM for Mi 11 is a stable version and can be flashed via Recovery or via Fastboot. You can wait for the OTA or download MIUI 12.5.1.0 for Mi 11 from below to Update Mi 11 to MIUI 12.5 manually.

You can Download Mi 11 MIUI 12.5 ROM from below and also manually check for the update by going to Settings -> About Phone -> System updates -> Check for update. Download MIUI 12.5.1.0 Stable ROM for Mi 11 from below.

MIUI 12.5.1.0 Changelogs

  • All-new Notes.
  • New: Dynamic layouts bring the typography in Notes to a new level.
  • New: Excerpts save text, URLs, and images to Notes in a few simple taps.
  • New: A gesture shortcut now allows you to create notes, tasks, and excerpts anywhere.
  • New: Press and hold a sketch to adjust the strokes automatically.
  • New: New tools for doodling and sketching.
  • New: Compose mind maps with complex structures.
System
  • Optimization: MIUI became lighter, faster, and more durable.
  • New: With custom device model adjustments, any phone becomes faster after the upgrade.
  • New: With 20 times more rendering power, there are now few limits to what you can see on your screen.
  • New: Response to gestures is now instant.

Note:-

  • This Firmware file is only for Mi 11. Don’t try this on any other device.
  • Follow the steps correctly otherwise you may brick your device. We are not responsible for any damage to your phone.
  • It may erase your data, so it is advisable to take a complete backup of your phone for a safer side.
  • Ensure that your phone has at least 50-60% charged to prevent the accidental shutdown in-between the process.

Download MIUI 12.5.1.0 Global Stable ROM for Mi 11

  • MIUI 12.5.1.0 Recovery ROM for Mi 11 – Download
  • MIUI 12.5.1.0 Fastboot ROM for Mi 11 – Download

How to Install MIUI 12.5.1.0 Global Stable ROM on Mi 11 –

To install MIUI 12.5.1.0 update for Mi 11 download either Recovery ROM or Fastboot ROM from above and use the below method to install this on your device.

Method 1 – Recovery Mode

Recovery Mode

  1. Download MIUI 12.5 Recovery ROM for Mi 11 from above and save it on your device.
  2. Now launch the ‘Updater‘ app on your device.
  3. Click on the three-dot menu (‘…’ icon) at the top-right corner, and select the ‘choose update package‘.
  4. Browse through the files and select the package ending with .zip extension.
  5. Done. Your device will reboot on the latest version.

Method 2 – Fastboot Mode

1) First, Download Mi Flash Tool, extract it and install it on your PC.

2) Now download MIUI 12.5 Fastboot ROM for Mi 11 for your device.

3) Now boot your device into Fastboot mode by pressing the ‘Volume Down + Power‘ button.

4) Connect your device to the PC via a micro USB cable.

5) Now extract the Fastboot ROM and copy its path on the PC.

6) Now open MI Flash Tool and Paste the address bar of the ROM file folder path copied from above.
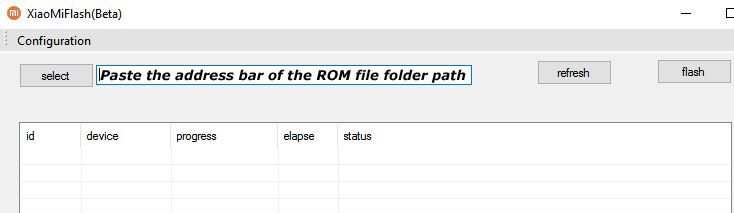
Mi Flash

7) First, click on the ‘Refresh‘ button (It will automatically recognize your device) and then click on the ‘Flash‘ button to flash MIUI 12 ROM on your Devices.
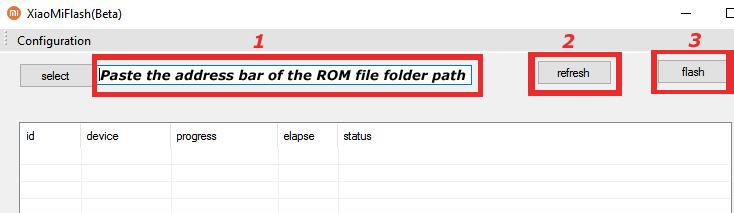
Mi Flash

8) Wait for some time to complete the process.

9) Done. Your device will boot on the latest version.

Wrapping Up:

Download MIUI 12.5.1.0 Global Stable ROM for Mi 11 and flash it to update it manually. Comment below if you have any doubts.

Have any questions? Do let us know that in the comments below. Stay connected with us via Facebook and Twitter to read more such helpful posts.

Latest MIUI 12.0.8.0 update for Redmi Note 9 starts rolling out via OTA. The update is based on Android 10 and brings few improvement and fixes bug. Follow the below guide to Download MIUI 12.0.8.0 Global Stable ROM for Redmi Note 9.

MIUI 12.0.8.0 Global Stable ROM for Redmi Note 9 is a stable version and can be flashed via Recovery or via Fastboot. You can wait for the OTA or download MIUI 12.0.8.0 for Redmi Note 9 from below to Update Redmi Note 9 Pro to Android 10 manually.

You can Download Redmi Note 9 MIUI 12.0.8.0.QJOINXM ROM from below and also manually check for the update by going to Settings -> About Phone -> System updates -> Check for update. Download MIUI 12.0.8.0 Stable ROM for Redmi Note 9 from below.

Note:-

  • This Firmware file is only for Redmi Note 9. Don’t try this on any other device.
  • Follow the steps correctly otherwise you may brick your device. We are not responsible for any damage to your phone.
  • It may erase your data, so it is advisable to take a complete backup of your phone for a safer side.
  • Ensure that your phone has at least 50-60% charged to prevent the accidental shutdown in-between the process.

Download MIUI 12.0.8.0 Global Stable ROM for Redmi Note 9

  • MIUI 12.0.8.0 OTA for Redmi Note 9 – Download
  • MIUI 12.0.8.0 Recovery ROM for Redmi Note 9 – Download
  • MIUI 12.0.8.0 Fastboot ROM for Redmi Note 9 – Coming Soon

How to Install MIUI 12.0.8.0 Global Stable ROM on Redmi Note 9 –

To install MIUI 12.0.8.0 update for Redmi Note 9 download either Recovery ROM or Fastboot ROM from above and use the below method to install this on your device.

Method 1 – Recovery Mode

Recovery Mode

  1. Download MIUI 12 Recovery ROM for Redmi Note 9 from above and save it on your device.
  2. Now launch the ‘Updater‘ app on your device.
  3. Click on the three-dot menu (‘…’ icon) at the top-right corner, and select the ‘choose update package‘.
  4. Browse through the files and select the package ending with .zip extension.
  5. Done. Your device will reboot on the latest version.

Method 2 – Fastboot Mode

1) First, Download Mi Flash Tool, extract it and install it on your PC.

2) Now download MIUI 12 Fastboot ROM for Redmi Note 9 for your device.

3) Now boot your device into Fastboot mode by pressing the ‘Volume Down + Power‘ button.

4) Connect your device to PC via micro USB cable.

5) Now extract the Fastboot ROM and copy its path on the PC.

6) Now open MI Flash Tool and Paste the address bar of the ROM file folder path copied from above.

Mi Flash

7) First, click on the ‘Refresh‘ button (It will automatically recognize your device) and then click on the ‘Flash‘ button to flash MIUI 12 ROM on your Devices.

Mi Flash

8) Wait for some time to complete the process.

9) Done. Your device will boot on the latest version.

Wrapping Up:

If you want to update Redmi Note 9 to the latest version, then you can follow the above process. Download MIUI 12.0.8.0 Global Stable ROM for Redmi Note 9 and flash it to update it manually. Comment below if you have any doubts.

The latest OxygenOS 11.0.1.1 update starts rolling out for the OnePlus 7 series. The new OxygenOS 11.0.1.1 update for OnePlus 7 series brings May 2021 security patches, improved system stability, and fixes bug such as improving the swiping experience of the Shelf, improving the loading speed of pictures in the Gallery, as well as other targeted fixes in the Phone app, the camera, and even network fixes as well, including Wi-Fi and 4G stability. Download OxygenOS 11.0.1.1 for OnePlus 7, 7 Pro, 7T, and 7T Pro from below.

The OxygenOS 11.0.1.1 for OnePlus 7, 7 Pro, 7T, and 7T Pro is rolling out via OTA (over-the-air) in a phase-wise manner and many users already getting the update. You can wait for the OTA updates, or you can Update Oneplus 7 to OxygenOS 11.0.1.1 manually with the below method.

The new OxygenOS 11.0.1.1 for OnePlus 7, 7 Pro, 7T, and 7T Pro brings a few improvements to the device. We provide you the OxygenOS 11.0.1.1 OTA file which you can flash on your device. So if you want to update your OnePlus to the latest version then Download OxygenOS 11.0.1.1 ROM for OnePlus 7, 7 Pro, 7T, and 7T Pro from below. Check below what’s new in OxygenOS 11.0.1.1

OxygenOS 11.0.1.1 Features and Changelogs –

  • System
    • Improved the system fluency
    • Fixed the occasional issue that Google Fi SIM card cannot accept incoming calls
    • Updated Android security patch to 2021.05
  • Shelf
    • Improved the swiping experience of Shelf
  • Gallery
    • Improved the loading speed of previewing pictures
  • Phone
    • Fixed the occasional issue that incoming call interface delays to display
    • Fixed the occasionally abnormal display issue when making a call
  • Camera
    • Fixed the occasional issue that the mirror effect fails to work
    • Fixed the abnormal issue with the camera when zooming in macro mode
    • Fixed the abnormal issue with some buttons when taking pictures continuously in Nightscape mode
  • Network
    • Improved 4G network communication
    • Improved the stability of Wi-Fi connection

Note:-

  • This method is only for OxygenOS 11.0.1.1.
  • Full ROM can be flashed via TWRP as well.
  • Follow the steps correctly otherwise, you may brick your device. We Guidegeekz.com is not responsible for any damage to your phone.
  • Charge your device to 60- 70% to prevent it from the accidental shutdown.
  • Take a complete backup of everything important.

Download OxygenOS 11.0.1.1 for OnePlus 7, 7 Pro, 7T, and 7T Pro

  • OxygenOS 11.0.1.1 update for OnePlus 7 – OTA, Full ROM
  • Download OxygenOS 11.0.1.1 ROM for OnePlus 7T India – OTA, Full ROM
  • OxygenOS 11.0.1.1 update for OnePlus 7 Pro – OTA, Full ROM
  • Download OxygenOS 11.0.1.1 ROM for OnePlus 7T Pro India – OTA, Full ROM
  • Download OxygenOS 11.0.1.1 OTA for OnePlus 7T Pro Global – OTA, Full ROM

How to Install OxygenOS 11.0.1.1 update on OnePlus 7, 7 Pro, 7T, and 7T Pro

For Non-Rooted Users

Method 1

  1. First, enable the USB debugging option from the setting ->developer option. To enable Developer Options, go to About phone and tap the Build Number 7 times.
  2. Download ADB and Fastboot and install them on your PC.
  3. Download OxygenOS 11.0.1.1 OTA from above Copy ROM to a folder where adb installed.
  4. Now Turn Off your phone and boot into the recovery mode.
  5. Choose Apply update from ADB
  6. Now Connect your phone to your Laptop/PC
  7. On ROM folder press shift+right click and click on the open command here.
  8. Now check your connection status by typing the below command
    adb devices
    if your device is listed, you’re ready to flash the ROM
  9. Now Install OxygenOS 11.0.1.1 OTA on the OnePlus 7T by typing the below command
    adb sideload File-Name.zip 
  10. Now, wait until the process completes, and then Reboot the phone.
  11. Done!

Method 2

  1. Download OxygenOS 11.0.1.1 OTA zip file from above and save it on your internal phone memory.
  2. Now Switch off your device and boot into the Recovery mode.
  3. To boot the OnePlus 7 series into recovery mode press and hold ‘Power + Volume Down’ button.
  4. Now your phone boot into the Stock recovery.
  5. Now Select ‘Apply Update’ and select ‘Choose from Internal Storage
  6. Browse the OTA zip file which you download and save on your phone before.
  7. Select the zip file, and it will Install OxygenOS 11.0.1.1 OTA update file on your OnePlus 7.
  8. Now wait until the process complete and then reboot your device.
  9. Done.

For Rooted Users

  1. First Unlock your device bootloader and Install TWRP on your Device. Skip this step if already installed TWRP.
  2. Reboot your device into Recovery mode and create a Nandroid backup (Recommended) of your device for the safer side, if anything goes wrong.
  3. Now wipe your cache files from Goto Wipe>Advanced Wipe>Select Wipe cache and Dalvik cache and swipe to confirm it.
  4. Now, Go to Install and locate the Full Rom Zip & swipe to Install the ROM file
  5. Now Flash the Magisk again to maintain the root (Optional).
  6. Wipe Dalvik & Cache again.
  7. Done! Reboot System and Enjoy.

Wrapping Up:

That’s all this is the complete guide to Download OxygenOS 11.0.1.1 for the OnePlus 7 series. Have any questions? Do let us know that in the comments below. Stay connected with us via Facebook and Twitter to read more such helpful posts.

The latest Android 12 beta update for TCL 20 Pro 5G is now available. The latest Android update brings with it a bunch of new features and privacy updates. The latest Developer Preview updates are already out and available for Pixel, Asus, and Xiaomi smartphones. TCL also partnered with Google and brings the latest Android 12 beta update for TCL 20 Pro 5G.

TCL 20 Pro 5G Android 12 beta update brings the revamp material design but some features may still be under development. The update may not be available via OTA so if you are interested and want to update TCL 20 Pro 5G to Android 12, then follow the below steps to Download and Install Android 12 beta on TCL 20 Pro 5G.

Known Issues

  1. Cannot set screen lock.
  2. Will auto disconnect after pair BT device, so cannot use the Bluetooth function.
  3. Will popup “Wireless emergency alerts FC” when press “Wireless emergency alerts” in the “Safety & emergency” screen.
  4. Wi-Fi cannot connect to VPN AP.
  5. “Tap to wake” function cannot work.
  6. Network may register to 3G default, and after select LTE network mode, it can register to 4G. 5G is unavailable.
  7. Sometimes cannot display thumbnail after capture.
  8. Cannot display thumbnail after record video and cannot view record video,photos not display videos.
  9. Will display no network icon after turn off mobile data.
  10. The Brightness level display 0% as default, and after display abnormal when user adjust it.

Download Android 12 Beta for TCL 20 Pro 5G

The Android 12 Beta build is available for TCL 20 Pro 5G. Once you download the ROM, you can flash it via Local OTA Update. Download Android 12 Beta for TCL 20 Pro 5G from below.

  • Download Android 12 ROM for TCL 20 Pro 5G – Download
  • Download TCL USB Driver – Download
  • Download TPST Tool – Download
  • Download T810_Model_DLL_Setup – Download

Note: –

  • The update will wipe your device completely. It is highly recommended that you back up your phone data before proceeding.
  • Keep in mind that this is an early access build, which means there will be bugs and software issues, and it could brick your device.
  • Charge your device to 60- 70% to prevent it from the accidental shutdown.

How to Install Android 12 beta on TCL 20 Pro 5G

You can easily Install Android 12 beta on TCL 20 Pro 5G via Local OTA Update. To flash Android 12 beta ROM on TCL 20 Pro 5G, you also need to have a Windows PC.

  1. Download TCL PST Tool (TPST), TCL USB Driver, and T810 DLL setup from above and Install it on your PC.
  2. Download TCL Android 12 Beta firmware from the above.
  3. Run TPST Tool and click the “Load” menu and select the mode T810 to load it.
  4. Connect your device to the PC via USB cable.
  5. Boot your device into Download mode by turning off your device and long press Volume up and Volume down at the same time, when See warning screen, release Volume down to switch to download mode.
  6. The tool will detect the COM port.
  7. Click the “Refurbish” button in the TPST tool to enter the feature
  8. Click the “Browse” button, it will pop up a window, you can select an SW file to download.
  9. In the “Select Software image file” screen, select the firmware file and click OK.
  10. Select “XML LOG”, and click “Browse” to select a new XML log directory to save it.
  11. Click the “Start Refurbish” button
  12. Wait a few minutes, you can see as follows, Download success.

Wrapping Up:

This is the easiest way to Download and Install Android 12 beta on TCL 20 Pro 5G.  If you flashed Android 12 to your TCL 20 Pro 5G, let us know your experience with this update.

Have any questions? Do let us know that in the comments below. Stay connected with us via Facebook and Twitter to read more such helpful posts.
The latest OxygenOS 10.3.11 starts rolling out for the OnePlus 6/6T. The new OxygenOS 10.3.11 update for OnePlus 6/6T brings May 2021 security patches and fixed known issues and improved system stability. Download OxygenOS 10.3.11 for OnePlus 6/6T from below.

The OxygenOS 10.3.11 for OnePlus 6/6T is rolling out via OTA (over-the-air) in a phase-wise manner and many users already getting the update. You can wait for the OTA updates, or you can Update Oneplus 6T to OxygenOS 10.3.11 manually with the below method.

The new OxygenOS 10.3.11 update for the OnePlus 6T brings a few improvements to the device. We provide you the OxygenOS 10.3.11 OTA file which you can flash on your device. So if you want to update your OnePlus to the latest version then Download OxygenOS 10.3.11 for the OnePlus 6/6T from below. Check below what’s new in OxygenOS 10.3.11.

OxygenOS 10.3.11 Features and Changelogs –

  • System

    • Updated Android security patch to 2021.05
    • Fixed known issues and improved system stability

Note:-

  • This method is only for the OxygenOS 10.3.11.
  • Full ROM can be flashed via TWRP as well.
  • Follow the steps correctly otherwise, you may brick your device. We Guidegeekz.com is not responsible for any damage to your phone.
  • Charge your device to 60- 70% to prevent it from the accidental shutdown.
  • Take a complete backup of everything important.

Download OxygenOS 10.3.11 for OnePlus 6/6T

  • OxygenOS 10.3.11 update for OnePlus 6 – Download
  • Download OxygenOS 10.3.11 OTA for OnePlus 6T – Download

How to Install OxygenOS 10.3.11 Update on OnePlus 6/6T

For Non-Rooted Users

Method 1

  1. First, enable the USB debugging option from the setting ->developer option. To enable Developer Options, go to About phone and tap the Build Number 7 times.
  2. Download ADB and Fastboot and install them on your PC.
  3. Download OxygenOS 10.3.11 OTA from above Copy ROM to a folder where adb installed.
  4. Now Turn Off your phone and boot into the recovery mode.
  5. Choose Apply update from ADB
  6. Now Connect your phone to your Laptop/PC
  7. On ROM folder press shift+right click and click on the open command here.
  8. Now check your connection status by typing the below command
    adb devices
    if your device is listed, you’re ready to flash the ROM
  9. Now Install OxygenOS 10.3.11 OTA on the OnePlus 6T by typing the below command
    adb sideload File-Name.zip 
  10. Now, wait until the process completes, and then Reboot the phone.
  11. Done!

Method 2

  1. Download OxygenOS 10.3.11 OTA zip file from above and save it on your internal phone memory.
  2. Now Switch off your device and boot into the Recovery mode.
  3. To boot the OnePlus 6T into recovery mode press and hold ‘Power + Volume Down’ button.
  4. Now your phone boot into the Stock recovery.
  5. Now Select ‘Apply Update’ and select ‘Choose from Internal Storage
  6. Browse the OTA zip file which you download and save on your phone before.
  7. Select the zip file, and it will Install OxygenOS 10.3.11 OTA update file on your OnePlus 6T.
  8. Now wait until the process complete and then reboot your device.
  9. Done.

For Rooted Users

  1. First Unlock your device bootloader and Install TWRP on your Device. Skip this step if already installed TWRP.
  2. Reboot your device into Recovery mode and create a Nandroid backup (Recommended) of your device for the safer side, if anything goes wrong.
  3. Now wipe your cache files from Goto Wipe>Advanced Wipe>Select Wipe cache and Dalvik cache and swipe to confirm it.
  4. Now, Go to Install and locate the Full Rom Zip & swipe to Install the ROM file
  5. Now Flash the Magisk again to maintain the root (Optional).
  6. Wipe Dalvik & Cache again.
  7. Done! Reboot System and Enjoy.

Wrapping Up:

That’s all this is the complete guide to Download OxygenOS 10.3.11 for the OnePlus 6/6T. Have any questions? Do let us know that in the comments below. Stay connected with us via Facebook and Twitter to read more such helpful posts.

The latest Android 12 beta update for iQOO 7 Legend is now available. The latest Android update brings with it a bunch of new features and privacy updates. The latest Developer Preview updates are already out and available for Pixel, Asus, and Xiaomi smartphones. Vivo also partnered with Google and brings the latest Android 12 beta update for iQOO 7 Legend.

iQOO 7 Legend Android 12 beta update brings the revamp material design but some features may still be under development. The update may not be available via OTA so if you are interested and want to update iQOO 7 Legend to Android 12, then follow the below steps to Download and Install Android 12 beta on iQOO 7 Legend.

Download Android 12 Beta for iQOO 7 Legend

The Android 12 Beta build is available for Vivo iQOO 7 Legend. Once you download the ROM, you can flash it via Local OTA Update. Download Android 12 Beta for iQOO 7 Legend from below.

  • Download Android 12 ROM for iQOO 7 Legend – Download

Note: –

  • The update will wipe your device completely. It is highly recommended that you back up your phone data before proceeding.
  • Keep in mind that this is an early access build, which means there will be bugs and software issues, and it could brick your device.
  • Charge your device to 60- 70% to prevent it from the accidental shutdown.

How to Install Android 12 beta on iQOO 7 Legend

You can easily Install Android 12 beta on Vivo iQOO 7 Legend via Local OTA Update. To flash Android 12 beta ROM on iQOO 7 Legend, you also need to have a Windows PC.

  1. Download Vivo Android 12 Beta firmware from the above.
  2. Rename the file to “update.zip”.
  3. Put the update.zip file in the root directory of your internal phone memory.
  4. Go to “Settings->System update->Local Upgrade
  5. Browse the OTA zip file which you download on your phone before.
  6. Click on the installation package and choose “update now
  7. Now, wait until the process completes and then reboot your device.
  8. Done.

Wrapping Up:

This is the easiest way to Download and Install Android 12 beta on iQOO 7 Legend.  If you flashed Android 12 to your Vivo iQOO 7 Legend, let us know your experience with this update.

Have any questions? Do let us know that in the comments below. Stay connected with us via Facebook and Twitter to read more such helpful posts.

ZTE recently brings the Android 12 beta update for the ZTE Axon 30 Ultra 5G. The latest ZTE Axon 30 Ultra 5G update brings a bunch of new features and privacy updates. Since Android 12 Beta is an early build, there will be bugs and software problems, making it unsuitable for everyday use. If you update your device and facing issues or don’t like the update for any reason, then you can easily revert Axon 30 Ultra 5G to a lower version. You can follow the below guide to Downgrade ZTE Axon 30 Ultra 5G From Android 12 to Android 11.

Android 12 is still in the development stage and might contain bugs, thus would not be as stable as the regular stable version for daily usage. With this update ZTE is looking to get feedback from the users (for potential bugs and reporting them) for faster development and release of the stable Android 12 update. However, if you feel that the update isn’t yet polished enough for your daily usage, then you can downgrade your Axon 30 Ultra 5G back to stable Android 11 software.

Note: –

  • Downgrading ZTE Axon 30 Ultra 5G to Android 11 will wipe your device completely. It is highly recommended that you back up your phone data before proceeding.
  • Follow the steps correctly otherwise you may brick your device. We are not responsible for any damage to your phone.
  • To avoid an unwanted shutdown in the middle of the operation, make sure your phone is at least 50% charged.

Download ZTE Axon 30 Ultra 5G Rollback Package

If you want to roll back ZTE Axon 30 Ultra 5G from Android 12 to Android 11, then Download ZTE Axon 30 Ultra 5G Rollback Package from below.

  • Download ZTE Axon 30 Ultra 5G Android 11 zip file – Download

How to Downgrade ZTE Axon 30 Ultra 5G From Android 12 to Android 11

To Downgrade Axon 30 Ultra 5G From Android 12 to Android 11, all you need a stable Zenfone 8 Android 11 image file and a computer with a working USB cable to connect your device to the computer. Follow the below steps to downgrade Axon 30 Ultra 5G to Android 11.

  1. Download the Android 11 zip package from the above and extract it.
  2. After extracting, you will find the “update.zip” file in the folder.
  3. Put the update.zip file in the root directory of your internal phone memory.
  4. Go to “Settings -> System and update-> System update
  5. Browse the OTA zip file which you download on your phone before.
  6. Click on the installation package and choose “upgrade -> System upgrade.”
  7. Now, wait until the process completes and then reboot your device.
  8. Done.

Wrapping Up:

This is the easiest way to Downgrade ZTE Axon 30 Ultra 5G From Android 12 to Android 11. If you have any questions, let us know that in the comments below. Stay connected with us via Facebook and Twitter to read more such helpful posts.

The latest Android 12 beta update for ZTE Axon 30 Ultra 5G is now available. The latest Android update brings with it a bunch of new features and privacy updates. The latest Developer Preview updates are already out and available for Pixel, Asus, and Xiaomi smartphones. ZTE also partnered with Google and brings the latest Android 12 beta update for Axon 30 Ultra 5G.

ZTE Axon 30 Ultra 5G Android 12 beta update brings the revamp material design but some features may still be under development. The update may not be available via OTA so if you are interested and want to update ZTE Axon 30 Ultra 5G to Android 12, then follow the below steps to Download and Install Android 12 beta on ZTE Axon 30 Ultra 5G.

Download Android 12 Beta for ZTE Axon 30 Ultra 5G

The Android 12 Beta build is available for ZTE Axon 30 Ultra 5G. Once you download the ROM, you can flash it via Local OTA Update. Download Android 12 Beta for ZTE Axon 30 Ultra 5G from below.

  • Download Android 12 ROM for ZTE Axon 30 Ultra 5G – Download

Note: –

  • The update will wipe your device completely. It is highly recommended that you back up your phone data before proceeding.
  • Keep in mind that this is an early access build, which means there will be bugs and software issues, and it could brick your device.
  • Charge your device to 60- 70% to prevent it from the accidental shutdown.

Known Issues

  •  Users can not set Pattern or PIN or Password in the settings-security-screen lock. After rebooting, the device will reboot repeatedly. After several times reboot, the device will enter into recovery mode. “Factory data reset” will fix the problem
  • The default browser can not access the internet occasionally. 3rd party browser should be fine

How to Install Android 12 beta on ZTE Axon 30 Ultra 5G

You can easily Install Android 12 beta on Axon 30 Ultra 5G via Local OTA Update. To flash Android 12 beta ROM on ZTE Axon 30 Ultra 5G, you also need to have a Windows PC.

  1. Download the Android 12 upgrade zip package from the above and extract it.
  2. After extracting, you will find the “update.zip” file in the folder.
  3. Put the update.zip file in the root directory of your internal phone memory.
  4. Go to “Settings -> System and update-> System update
  5. Browse the OTA zip file which you download on your phone before.
  6. Click on the installation package and choose “upgrade -> System upgrade.”
  7. Now, wait until the process completes and then reboot your device.
  8. Done.

Wrapping Up:

This is the easiest way to Download and Install Android 12 beta on ZTE Axon 30 Ultra 5G.  If you flashed Android 12 to your ZTE Axon 30 Ultra 5G, let us know your experience with this update.

Have any questions? Do let us know that in the comments below. Stay connected with us via Facebook and Twitter to read more such helpful posts.

The latest OxygenOS 11.2.1.2 for OnePlus 9R starts rolling out. The new OxygenOS 11.2.1.2 update for OnePlus 9R brings May 2021 security patches and a ton of bug fixes and improvements. The update also comes with improvements for overall users’ experience in OnePlus Games, improved the picture preview smoothness for the Gallery app, and camera stability as well as shooting performance. Download OxygenOS 11.2.1.2 for OnePlus 9R from below.

The OxygenOS 11.2.1.2 for OnePlus 9R is rolling out via OTA (over-the-air) in a phase-wise manner and many users already getting the update. You can wait for the OTA updates, or you can Update Oneplus 9R to OxygenOS 11.2.1.2 manually with the below method.

The new OxygenOS 11.2.1.2 update for the OnePlus 9R brings many changes (Check the complete changelogs from below). We provide you the OxygenOS 11.2.1.2 OTA file which you can flash on your device. So if you want to update your OnePlus to the latest version then Download OxygenOS 11.2.1.2 for the OnePlus 9R from below. Check below what’s new in OxygenOS 11.2.1.2.

OxygenOS 11.2.1.2 Features and Changelogs –

  • System
    • Fixed the abnormal silent notification issue after muting the media volume
    • Fixed UI issues in Freeform Windows
    • Fixed general issues and improved system stability
    • Updated Android security patch to 2021.05
  • Notes
    • Fixed the issue that newly saved notes can’t sync to the Shelf in time
  • OnePlus Games
    • Improved the overall user experience
  • Gallery
    • Improved picture preview smoothness
  • Camera
    • Improved the camera stability and shooting performance
    • Fixed the abnormal image issue under Nightscape mode

Note:-

  • This method is only for the OnePlus 9R.
  • Full ROM can be flashed via TWRP as well.
  • Follow the steps correctly otherwise, you may brick your device. We Guidegeekz.com is not responsible for any damage to your phone.
  • Charge your device to 60- 70% to prevent it from the accidental shutdown.
  • Take a complete backup of everything important.

Download OxygenOS 11.2.1.2 for OnePlus 9R

  • OxygenOS 11.2.1.2 update for OnePlus 9R OTA link – Download
  • OxygenOS 11.2.1.2 Full ROM for OnePlus 9R – Download

How to Install OxygenOS 11.2.1.2 Update on OnePlus 9R

For Non-Rooted Users

Method 1

  1. First, enable the USB debugging option from the setting ->developer option. To enable Developer Options, go to About phone and tap the Build Number 7 times.
  2. Download ADB and Fastboot and install them on your PC.
  3. Download OxygenOS 11.2.1.2 OTA from above Copy ROM to a folder where adb installed.
  4. Now Turn Off your phone and boot into the recovery mode.
  5. Choose Apply update from ADB
  6. Now Connect your phone to your Laptop/PC
  7. On ROM folder press shift+right click and click on the open command here.
  8. Now check your connection status by typing the below command
    adb devices
    if your device is listed, you’re ready to flash the ROM
  9. Now Install OxygenOS 11.2.1.2 OTA on the OnePlus 9R by typing the below command
    adb sideload File-Name.zip 
  10. Now, wait until the process completes, and then Reboot the phone.
  11. Done!

Method 2

  1. Download OxygenOS 11.2.1.2 OTA zip file from above and save it on your internal phone memory.
  2. Now Switch off your device and boot into the Recovery mode.
  3. To boot the OnePlus 9R into recovery mode press and hold ‘Power + Volume Down’ button.
  4. Now your phone boot into the Stock recovery.
  5. Now Select ‘Apply Update’ and select ‘Choose from Internal Storage
  6. Browse the OTA zip file which you download and save on your phone before.
  7. Select the zip file, and it will Install OxygenOS 11.2.1.2 OTA update file on your OnePlus 9R.
  8. Now wait until the process complete and then reboot your device.
  9. Done.

For Rooted Users

  1. First Unlock your device bootloader and Install TWRP on your Device. Skip this step if already installed TWRP.
  2. Reboot your device into Recovery mode and create a Nandroid backup (Recommended) of your device for the safer side, if anything goes wrong.
  3. Now wipe your cache files from Goto Wipe>Advanced Wipe>Select Wipe cache and Dalvik cache and swipe to confirm it.
  4. Now, Go to Install and locate the OOS 11.2.1.2 Full Rom Zip & swipe to Install the ROM file
  5. Now Flash the Magisk again to maintain the root (Optional).
  6. Wipe Dalvik & Cache again.
  7. Done! Reboot System and Enjoy.

Wrapping Up:

That’s all this is the complete guide to Download OxygenOS 11.2.1.2 for OnePlus 9R (OTA + Full ROM). Have any questions? Do let us know that in the comments below. Stay connected with us via Facebook and Twitter to read more such helpful posts.

Asus recently brings the Android 12 beta update for the Asus Zenfone 8. The latest Zenfone 8 update brings a bunch of new features and privacy updates. Since Android 12 Beta is an early build, there will be bugs and software problems, making it unsuitable for everyday use. If you update your device and facing issues or don’t like the update for any reason, then you can easily revert Zenfone 8 to a lower version. You can follow the below guide to Downgrade Asus Zenfone 8 From Android 12 to Android 11.

Android 12 is still in the development stage and might contain bugs, thus would not be as stable as the regular stable version for daily usage. With this update Asus is looking to get the feedback from the users (for potential bugs and reporting them) for faster development and release of the stable Android 12 update. However, if you feel that the update isn’t yet polished enough for your daily usage, then you can downgrade your Zenfone 8 back to stable Android 11 software.

Note: –

  • Downgrading Zenfone 8 to Android 11 will wipe your device completely. It is highly recommended that you back up your phone data before proceeding.
  • Follow the steps correctly otherwise you may brick your device. We are not responsible for any damage to your phone.
  • To avoid an unwanted shutdown in the middle of the operation, make sure your phone is at least 50% charged.

Download Asus Zenfone 8 Rollback Package

If you want to roll back Asus Zenfone 8 from Android 12 to Android 11, then Download Asus Zenfone 8 Rollback Package from below.

  • Download Zenfone 8 Android 11 image file – Download

How to Downgrade Asus Zenfone 8 From Android 12 to Android 11

To Downgrade Zenfone 8 From Android 12 to Android 11, all you need a stable Zenfone 8 Android 11 image file and a computer with a working USB cable to connect your device to the computer. Follow below steps to downgrade Zenfone 8 to Android 11.

  1. Download Android 11 image file for Zenfone 8 from above and extract it.
  2. Boot your device into fastboot mode by hold down the Power and Volume Up buttons until the device reboots.
  3. Connect your Zenfone 8 to your PC via a USB cable.
  4. Now run the below script to flash stable Android 11 on Zenfone 8.
    1. Windows – If you are using Windows then Double click the update_image.bat file.
    2. Ubuntu – If you are using Ubuntu then Execute update_image.sh.
    3. MacOS – If you are using Mac then Execute update_image_for_mac.sh.
  5. Now, wait until the process completes.
  6. When the flash update finishes, a ‘Download Complete’ message will appear on the terminal.
  7. Hit the Enter key on the keyboard to restart your Zenfone 8.
  8. Done!

Wrapping Up:

This is the easiest way to Downgrade Asus Zenfone 8 From Android 12 to Android 11. If you have any questions, let us know that in the comments below. Stay connected with us via Facebook and Twitter to read more such helpful posts.