Author

Sumit Bahl

Browsing

Good news for Redmi Note 10S users, the latest MIUI 12.5.9.0 update for Redmi Note 10S starts rolling out via OTA. The update is based on Android 11 and brings lots of new features and improvements. Follow the below guide to Download MIUI 12.5.9.0 Global Stable ROM for Redmi Note 10S.

MIUI 12.5.9.0 Global Stable ROM for Redmi Note 10S is a stable version and can be flashed via Recovery or via Fastboot. You can wait for the OTA or download MIUI 12.5.9.0 for Redmi Note 10S from below.

You can Download Redmi Note 10S MIUI 12.5 ROM from below and also manually check for the update by going to Settings -> About Phone -> System updates -> Check for update. Download MIUI 12.5.9.0 ROM for Redmi Note 10S from below.

Note:-

  • This Firmware file is only for Redmi Note 10S. Don’t try this on any other device.
  • Follow the steps correctly otherwise you may brick your device. We are not responsible for any damage to your phone.
  • It may erase your data, so it is advisable to take a complete backup of your phone for a safer side.
  • Ensure that your phone has at least 50-60% charged to prevent the accidental shutdown in between the process.

Download MIUI 12.5.9.0 Global Stable ROM for Redmi Note 10S

  • MIUI 12.5.9.0 OTA for Redmi Note 10S – Download
  • MIUI 12.5.9.0 Recovery Redmi Note 10S – Download
  • MIUI 12.5.9.0 Fastboot ROM for Redmi Note 10S – Download

How to Install MIUI 12.5.9.0 Global Stable ROM on Redmi Note 10S –

To install MIUI 12.5.9.0 update for Redmi Note 10S download either Recovery ROM or Fastboot ROM from above and use the below method to install this on your device.

Method 1 – Recovery Mode

Recovery Mode

  1. Download Android 11 ROM for Redmi Note 10S from above and save it on your device.
  2. Now launch the ‘Updater‘ app on your device.
  3. Click on the three-dot menu (‘…’ icon) at the top-right corner, and select the ‘choose update package‘.
  4. Browse through the files and select the package ending with .zip extension.
  5. Done. Your device will reboot on the latest version.

Method 2 – Fastboot Mode

1) First, Download Mi Flash Tool, extract it, and install it on your PC.

2) Now download MIUI 12.5 ROM for Redmi Note 10S for your device.

3) Now boot your device into Fastboot mode by pressing the ‘Volume Down + Power‘ button.

4) Connect your device to the PC via a micro USB cable.

5) Now extract the Fastboot ROM and copy its path on the PC.

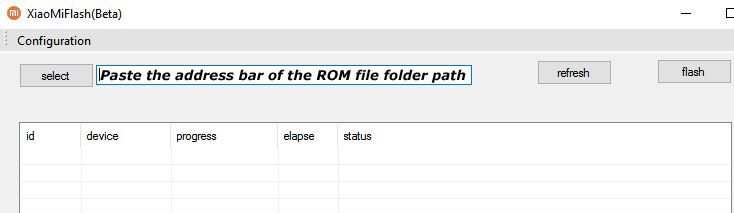
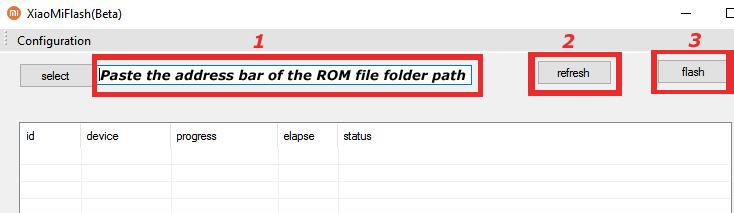
6) Now open MI Flash Tool and Paste the address bar of the ROM file folder path copied from above.

Mi Flash

7) First, click on the ‘Refresh‘ button (It will automatically recognize your device) and then click on the ‘Flash‘ button to flash MIUI 12 ROM on your Devices.

Mi Flash

8) Wait for some time to complete the process.

9) Done. Your device will boot on the latest version.

Wrapping Up:

If you want to update Redmi Note 10S to MIUI 12.5, then you can follow the above process. Download MIUI 12.5.9.0 Global Stable ROM for Redmi Note 10S and flash it to update it manually. Comment below if you have any doubts.

Have any questions? Do let us know that in the comments below. Stay connected with us via Facebook and Twitter to read more such helpful posts.

The latest MIUI 12.5 update for POCO F3 starts rolling out via OTA. The update is based on Android 11 and brings lots of new features and improvements. Follow the below guide to Download MIUI 12.5.1.0 Global Stable ROM for POCO F3.

MIUI 12.5.1.0 Global Stable ROM for POCO F3 is a stable version and can be flashed via Recovery or via Fastboot. You can wait for the OTA or download MIUI 12.5.1.0 for POCO F3 from below to Update POCO F3 to Android 11 manually.

You can Download POCO F3 MIUI 12.5 ROM from below and also manually check for the update by going to Settings -> About Phone -> System updates -> Check for update. Download MIUI 12.5 ROM for POCO F3 from below.

POCO F3 MIUI 12.5.1.0 Changelog –

-System

  • New: With custom device model adjustments, any phone becomes faster after the upgrade.
  • New: Response to gestures is now instant.
  • New: With 20 times more rendering power, there are now few limits to what you can see on your screen.
  • Optimization: MIUI became lighter, faster, and more durable.

-Notes

  • New: Dynamic layouts bring the typography in Notes to a new level.
  • New: Compose mind maps with complex structures.
  • New: New tools for doodling and sketching.
  • New: Press and hold a sketch to adjust the strokes automatically.
  • New: A gesture shortcut now allows you to create notes, tasks, and excerpts anywhere.
  • New: Excerpts save text, URLs, and images to Notes in a few simple taps.
  • All-new Notes.

-Xiaomi Cloud

  • New: Location info can be now reported automatically before the device is powered off

Note:-

  • This Firmware file is only for POCO F3. Don’t try this on any other device.
  • Follow the steps correctly otherwise you may brick your device. We are not responsible for any damage to your phone.
  • It may erase your data, so it is advisable to take a complete backup of your phone for a safer side.
  • Ensure that your phone has at least 50-60% charged to prevent the accidental shutdown in between the process.

Download MIUI 12.5.1.0 Global Stable ROM for POCO F3

How to Install MIUI 12.5.1.0 Global Stable ROM on POCO F3 –

To install MIUI 12.5.1.0 update for POCO F3 download either Recovery ROM or Fastboot ROM from above and use the below method to install this on your device.

Method 1 – Recovery Mode

Recovery Mode

  1. Download Android 11 ROM for POCO F3 from above and save it on your device.
  2. Now launch the ‘Updater‘ app on your device.
  3. Click on the three-dot menu (‘…’ icon) at the top-right corner, and select the ‘choose update package‘.
  4. Browse through the files and select the package ending with .zip extension.
  5. Done. Your device will reboot on the latest version.

Method 2 – Fastboot Mode

1) First, Download Mi Flash Tool, extract it, and install it on your PC.

2) Now download MIUI 12.5 ROM for POCO F3 for your device.

3) Now boot your device into Fastboot mode by pressing the ‘Volume Down + Power‘ button.

4) Connect your device to the PC via a micro USB cable.

5) Now extract the Fastboot ROM and copy its path on the PC.

6) Now open MI Flash Tool and Paste the address bar of the ROM file folder path copied from above.

Mi Flash

7) First, click on the ‘Refresh‘ button (It will automatically recognize your device) and then click on the ‘Flash‘ button to flash MIUI 12 ROM on your Devices.

Mi Flash

8) Wait for some time to complete the process.

9) Done. Your device will boot on the latest version.

Wrapping Up:

If you want to update POCO F3 to MIUI 12.5, then you can follow the above process. Download MIUI 12.5.1.0 Global Stable ROM for POCO F3 and flash it to update it manually. Comment below if you have any doubts.

Have any questions? Do let us know that in the comments below. Stay connected with us via Facebook and Twitter to read more such helpful posts.

The latest OxygenOS 11.2.6.6 for the OnePlus 9/9 pro starts rolling out. The new OxygenOS 11.2.6.6 update for the OnePlus 9 series brings improves the charging experience, reduces power consumption, optimizes the rear camera performance, and also fixes some known issues. Download OxygenOS 11.2.6.6 for OnePlus 9/9 pro from below.

The OxygenOS 11.2.6.6 for OnePlus 9/9 pro is rolling out via OTA (over-the-air) in a phase-wise manner and many users already getting the update. You can wait for the OTA updates, or you can Update Oneplus 9 to OxygenOS 11.2.6.6 manually with the below method.

The new OxygenOS 11.2.6.6 update for the OnePlus 9/9 pro brings many changes (Check the complete changelogs from below). We provide you the OxygenOS 11.2.6.6 OTA file which you can flash on your device. So if you want to update your OnePlus to the latest version then Download OxygenOS 11.2.6.6 for the OnePlus 9/9 pro from below. Check below what’s new in OxygenOS 11.2.6.6.

OxygenOS 11.2.6.6 Features and Changelogs –

  • System
    • Improved charging experience
    • Optimized power consumption
    • Fixed known issues and improved stability
  • Camera
    • Improved the hidden operation logic of the camera‘s top bar
    • Optimized the noise reduction and sharpening effect of the rear camera
    • Improved the focusing experience and brightness constancy in indoor scenes
    • Improved the accuracy of auto white balance of the rear camera
  • Network
    • Improved network performance

Note:-

  • This method is only for the OnePlus 9/9 pro.
  • Full ROM can be flashed via TWRP as well.
  • Follow the steps correctly otherwise, you may brick your device. We Guidegeekz.com is not responsible for any damage to your phone.
  • Charge your device to 60- 70% to prevent it from accidental shutdown.
  • Take a complete backup of everything important.

Download OxygenOS 11.2.6.6 for OnePlus 9/9 pro

  • OxygenOS 11.2.6.6 update for OnePlus 9 – OTA, Full ROM (India)
  • OxygenOS 11.2.6.6 ROM for OnePlus 9 pro – OTA, Full ROM (India)

How to Install OxygenOS 11.2.6.6 Update on OnePlus 9/9 pro

For Non-Rooted Users

Method 1

  1. First, enable the USB debugging option from the setting ->developer option. To enable Developer Options, go to About phone and tap the Build Number 7 times.
  2. Download ADB and Fastboot and install them on your PC.
  3. Download OxygenOS 11.2.6.6 OTA from above Copy ROM to a folder where adb installed.
  4. Now Turn Off your phone and boot into recovery mode.
  5. Choose Apply update from ADB
  6. Now Connect your phone to your Laptop/PC
  7. On ROM folder press shift+right click and click on the open command here.
  8. Now check your connection status by typing the below command
    adb devices
    if your device is listed, you’re ready to flash the ROM
  9. Now Install OxygenOS 11.2.6.6 OTA on the OnePlus 9 series by typing the below command
    adb sideload File-Name.zip 
  10. Now, wait until the process completes, and then Reboot the phone.
  11. Done!

Method 2

  1. Download OxygenOS 11.2.6.6 OTA zip file from above and save it on your internal phone memory.
  2. Now Switch off your device and boot into the Recovery mode.
  3. To boot the OnePlus 9 into recovery mode press and hold ‘Power + Volume Down’ button.
  4. Now your phone boot into the Stock recovery.
  5. Now Select ‘Apply Update’ and select ‘Choose from Internal Storage
  6. Browse the OTA zip file which you download and save on your phone before.
  7. Select the zip file, and it will Install OxygenOS 11.2.6.6 OTA update file on your OnePlus 9.
  8. Now wait until the process complete and then reboot your device.
  9. Done.

For Rooted Users

  1. First Unlock your device bootloader and Install TWRP on your Device. Skip this step if already installed TWRP.
  2. Reboot your device into Recovery mode and create a Nandroid backup (Recommended) of your device for the safer side, if anything goes wrong.
  3. Now wipe your cache files from Goto Wipe>Advanced Wipe>Select Wipe cache and Dalvik cache and swipe to confirm it.
  4. Now, Go to Install and locate the OOS 11.2.6.6 Full Rom Zip & swipe to Install the ROM file
  5. Now Flash the Magisk again to maintain the root (Optional).
  6. Wipe Dalvik & Cache again.
  7. Done! Reboot System and Enjoy.

Wrapping Up:

That’s all this is the complete guide to Download OxygenOS 11.2.6.6 for OnePlus 9/9 pro (OTA + Full ROM). Have any questions? Do let us know that in the comments below. Stay connected with us via Facebook and Twitter to read more such helpful posts.

Good news for Mi 10 Lite users, the latest MIUI 12.5 update for Mi 10 Lite starts rolling out via OTA. The update is based on Android 11 and brings lots of new features and improvements. Follow the below guide to Download MIUI 12.5.1.0 Global Stable ROM for Mi 10 Lite.

MIUI 12.5.1.0 Global Stable ROM for Mi 10 Lite is a stable version and can be flashed via Recovery or via Fastboot. You can wait for the OTA or download MIUI 12.5.1.0 for Mi 10 Lite from below to Update Mi 10 Lite to Android 11 manually.

You can Download Mi 10 Lite MIUI 12.5 ROM from below and also manually check for the update by going to Settings -> About Phone -> System updates -> Check for update. Download MIUI 12.5 ROM for Mi 10 Lite from below.

Note:-

  • This Firmware file is only for Mi 10 Lite. Don’t try this on any other device.
  • Follow the steps correctly otherwise you may brick your device. We are not responsible for any damage to your phone.
  • It may erase your data, so it is advisable to take a complete backup of your phone for a safer side.
  • Ensure that your phone has at least 50-60% charged to prevent the accidental shutdown in between the process.

Download MIUI 12.5.1.0 Global Stable ROM for Mi 10 Lite

  • MIUI 12.5.1.0 OTA for Mi 10 Lite – Download
  • MIUI 12.5.1.0 Recovery ROM for Mi 10 Lite – Download
  • MIUI 12.5.1.0 Fastboot ROM for Mi 10 Lite – Download

How to Install MIUI 12.5.1.0 Global Stable ROM on Mi 10 Lite –

To install MIUI 12.5.1.0 update for Mi 10 Lite download either Recovery ROM or Fastboot ROM from above and use the below method to install this on your device.

Method 1 – Recovery Mode

Recovery Mode

  1. Download Android 11 ROM for Mi 10 Lite from above and save it on your device.
  2. Now launch the ‘Updater‘ app on your device.
  3. Click on the three-dot menu (‘…’ icon) at the top-right corner, and select the ‘choose update package‘.
  4. Browse through the files and select the package ending with .zip extension.
  5. Done. Your device will reboot on the latest version.

Method 2 – Fastboot Mode

1) First, Download Mi Flash Tool, extract it, and install it on your PC.

2) Now download MIUI 12.5 ROM for Mi 10 Lite for your device.

3) Now boot your device into Fastboot mode by pressing the ‘Volume Down + Power‘ button.

4) Connect your device to the PC via a micro USB cable.

5) Now extract the Fastboot ROM and copy its path on the PC.

6) Now open MI Flash Tool and Paste the address bar of the ROM file folder path copied from above.

Mi Flash

7) First, click on the ‘Refresh‘ button (It will automatically recognize your device) and then click on the ‘Flash‘ button to flash MIUI 12 ROM on your Devices.

Mi Flash

8) Wait for some time to complete the process.

9) Done. Your device will boot on the latest version.

Wrapping Up:

If you want to update Mi 10 Lite to MIUI 12.5, then you can follow the above process. Download MIUI 12.5.1.0 Global Stable ROM for Mi 10 Lite and flash it to update it manually. Comment below if you have any doubts.

Have any questions? Do let us know that in the comments below. Stay connected with us via Facebook and Twitter to read more such helpful posts.

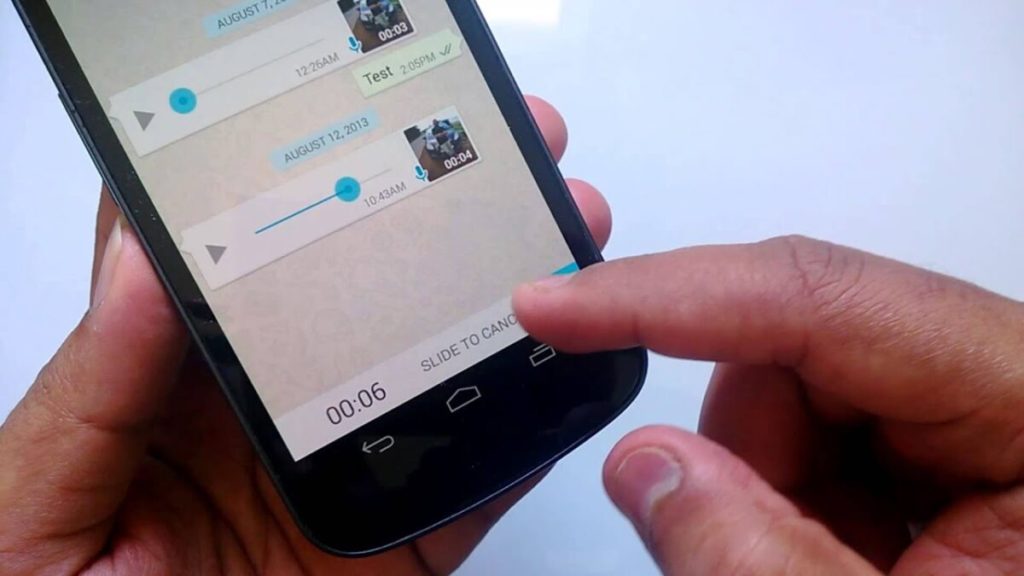
WhatsApp is the world’s most popular instant messaging app where millions of people share images and videos with friends, family, colleagues, and loved ones. Using WhatsApp to send voice messages is a great way to save time. You record, send, and then leave. But it’s not always a good choice to listen to audio messages if you are on the street or sending them in the group. A solution for those situations would be to Convert WhatsApp Voice Message Into Text.

The process to convert WhatsApp voice notes into text is called Transcription. With the official WhatsApp app, you can’t transcribe WhatsApp voice messages. However, with some third-party alternatives like Transcriber for WhatsApp, you can easily Convert WhatsApp Voice Message Into Text.

How to Convert WhatsApp Voice Message Into Text on Android

How to Convert WhatsApp Voice Message into Text

To transcribe WhatsApp voice messages on Android, you need to download and install Transcriber for WhatsApp app on your device. After installing the app, you have to share any Audio with the app and it will convert WhatsApp audio messages into text. The app supports more than 22 languages.

The Wit.ai services are used by the Transcriber app to generate text from a voice message. Open it to configure its settings after installing the app and you are ready to use it. Check How to Convert WhatsApp Voice Message Into Text from below.

  1. First, download and Install Transcriber For WhatsApp App from Google Playstore.
  2. Open the app and configure it. In Settings, choose the language of voice messages you usually receive.
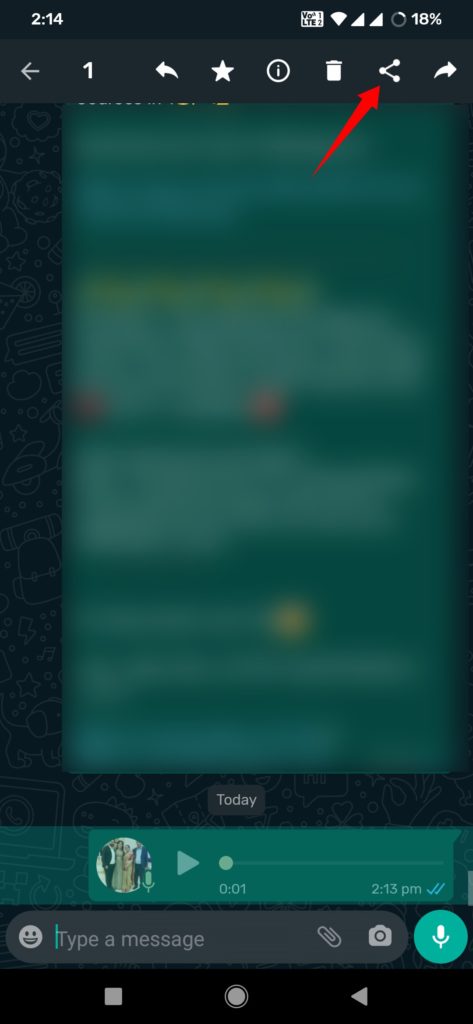
  3. Open the WhatsApp conversation where you wish to convert the voice message. To pick a voice message, tap and hold it.
  4. Tap and hold the message, then select the Share option from the top menu.
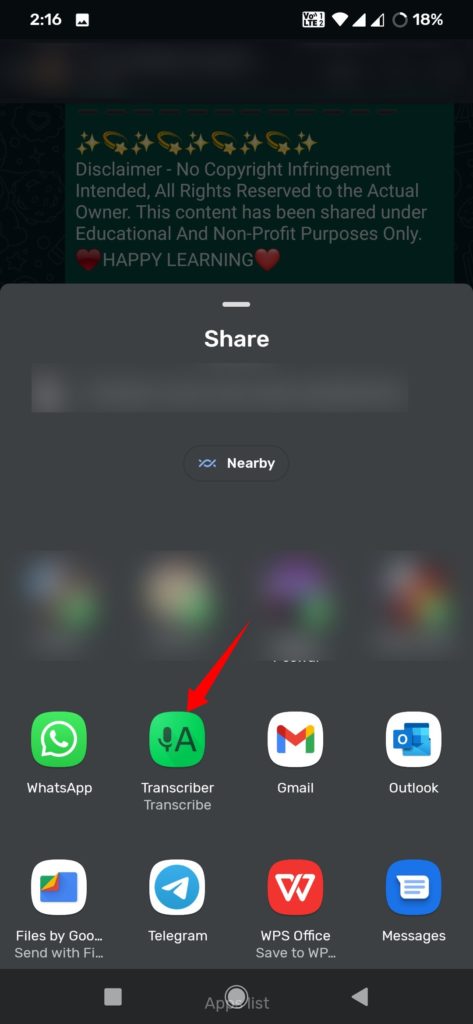
  5. From the list of options that appear, select “Transcriber”.
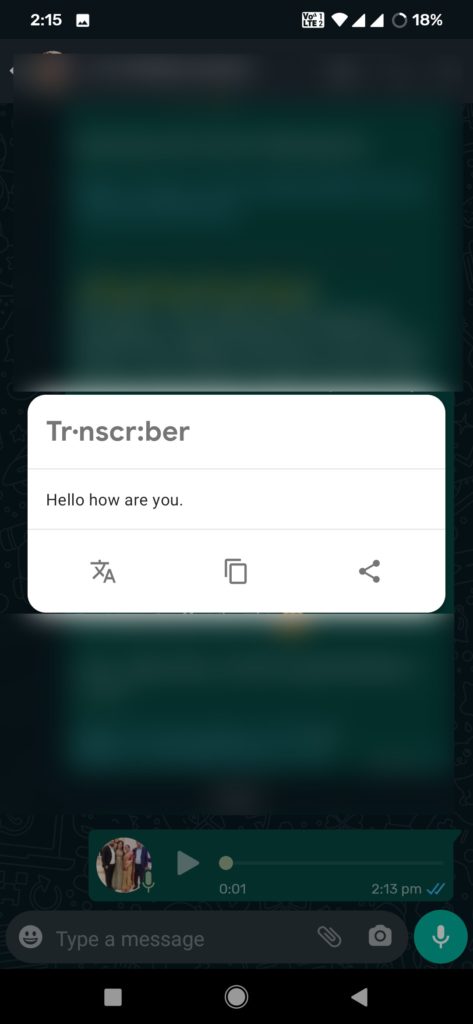
  6. The audio from the voice note will now be immediately converted to text and displayed on the screen.

Wrapping Up: Transcribe WhatsApp voice messages

This transcription app is very useful when you cannot listen to a voice message. The app convert WhatsApp audio messages and give results at the moment.

Have any questions? Do let us know that in the comments below. Stay connected with us via Facebook and Twitter to read more such helpful posts.

One of the major limitations of online purchases was the requirement of a smartphone and an internet connection. However, with the introduction of Bhim UPI payments, the USSD platform was improved to allow cashless transactions without the use of cellphones or active Internet connections. Anyone with a bank account, registered mobile number, and a debit card can Make UPI Payments Without Internet.

With USSD-based mobile banking, anyone can send and receive money via UPI without any data connection. It is a 24-hour payment system and compatible with both smartphones and feature phones. Users must, however, register on the BHIM app by validating their mobile number in order to perform offline transfers. Users must then link their bank accounts and generate a UPI PIN in order to conduct transactions.

With a USSD-based *99# offline mobile payment service, users can send money to a phone number, saved beneficiary, virtual payment address, bank account (IFSC), or a mobile phone number (MMID). Users must then provide any of the beneficiary’s above data, as well as a sum ranging from Rs. 1 to Rs. 20000. Users must use their UPI PIN to verify the transaction.

Services available under *99#

  • Send Money – The user can use this option to send money to any other person through UPI, IFSC, or MMID.
  • Request Money – Customers can use this option to collect money by entering their UPI ID or the mobile number of a UPI registered customer.
  • Check Balance – The user can check the balance of his or her account using this option.
  • My Profile – Users can use this option to find out about their UPI details, change their language, and manage their UPI IDs and beneficiaries.
  • Pending Transaction – Users can check pending UPI requests using this option (if any)
  • Transaction – The user can check out the last five UPI transactions by using this option.
  • UPI PIN – Users can set or alter their UPI PIN using this feature.

How to Make UPI Payments Without Internet on Your Phone

To make offline UPI payments, users need to dial *99# using the mobile number linked to the BHIM app. Users will then be able to send money, receive money, check their balance, profile, pending requests, transactions, and change their UPI PIN. Check How to Make UPI Payments Without Internet on Your Phone from below.

  1. First, dial *99# on your phone and select your preferred language and send.
  2. A welcome screen will appear where you need your bank’s name or the first 4 letters of your bank IFSC code.
  3. Choose your bank account from the options provided.
  4. Enter the last six digits of your debit card and expiry date separated by a single space.
  5. Now create your new UPI PIN and re-enter to confirm it.
  6. Your UPI is now active, and you can check the balance of your account by entering your UPI PIN again.
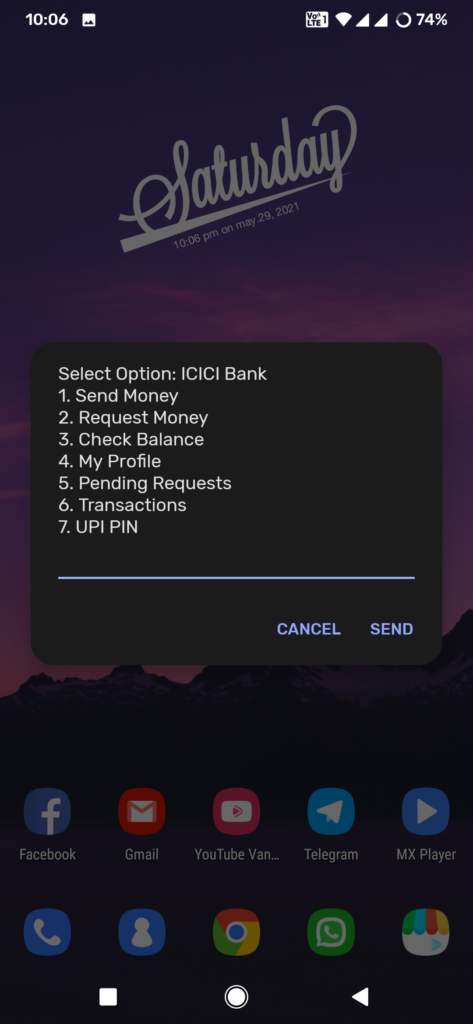
  7. Now enter *99# again, a menu screen will appear, with seven options: Send Money, Request Money, Check Balance, My Profile, Pending Requests, Transactions, and UPI Pin.
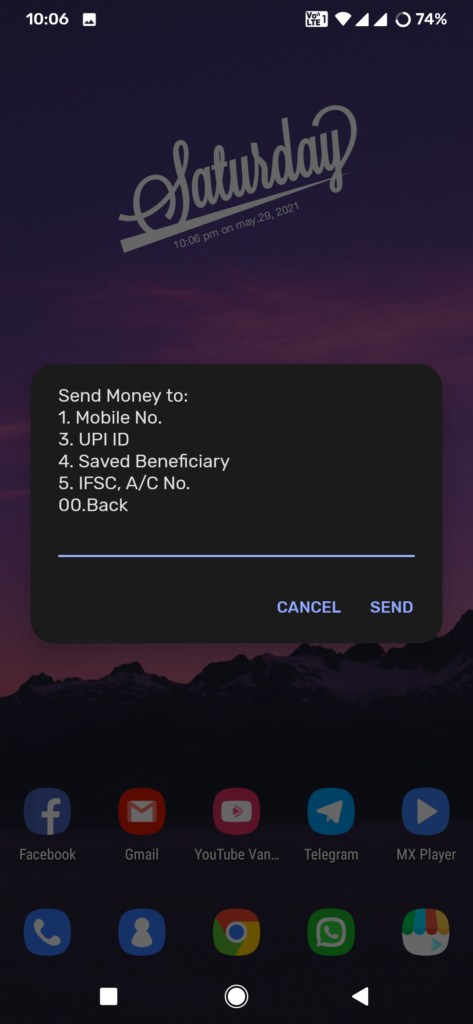
  8. Select ‘Send Money’ from the available options by replying with 1. You’ll now be able to send money using your phone number, UPI ID, or account number, and IFSC code. To make a payment, choose your preferred option.
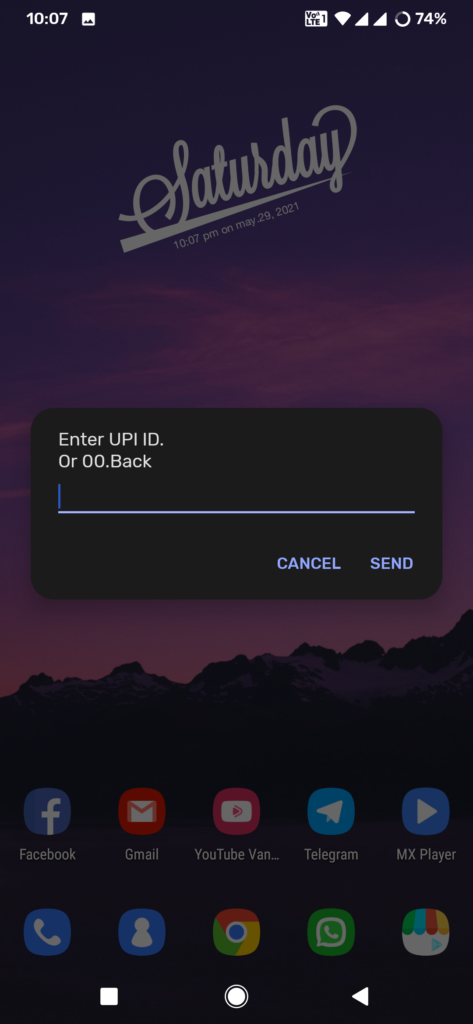
  9. Select option 3 to send money using UPI and enter the person’s UPI ID.
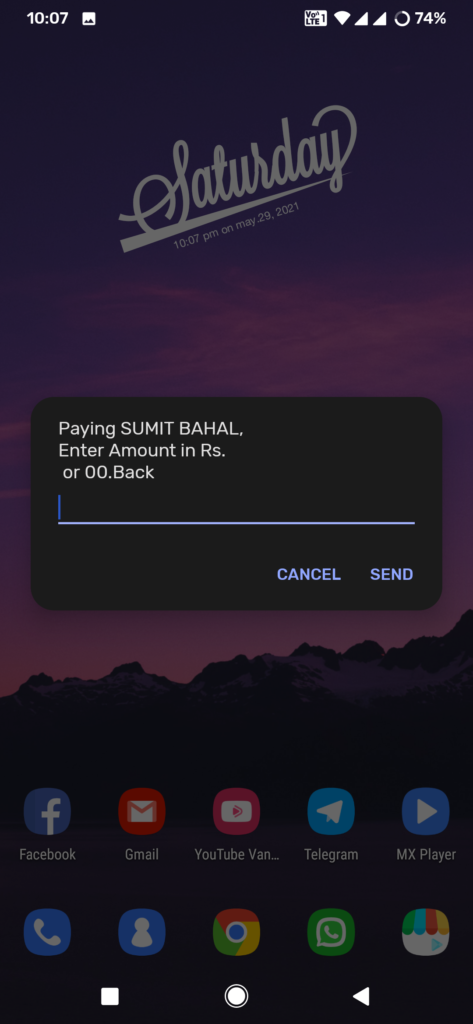
  10. Now reply with the exact amount in rupees you intend to send (you’ll also see the name of the beneficiary).
  11. Enter your UPI pin and click send.
  12. On your screen, you’ll now see the transaction status as well as the reference ID.
  13. It will also ask you to save the recipient for future use or exit.

Wrapping Up: Make Offline UPI Payments

With USSD mobile banking, you can Make UPI Payments Without Internet or smartphone. This service is currently available from 51 banks and supports all GSM service providers. It is available in 12 languages, including Hindi and English.

YouTube users who want ad-free viewing, background playback, picture-in-picture mode, and other premium features without spending the money, should try YouTube Vanced. It provides all these premium features for free. You can check the below guide to Download and Install YouTube Vanced on Android.

YouTube Vanced is a modded version of the official YouTube app. It adds a number of features to the default YouTube app, including built-in adblocking, background and screen off playback, dark themes, auto-repeat mode, and much more. YouTube Vanced works on almost all devices and even on those devices that don’t have Google services and the Play Store like Huawei or Honor phones.

YouTube Vanced is not available on PlayStore as it violates the terms and conditions of YouTube. However, it doesn’t make the app illegal. It doesn’t alter the content of YouTube and neither promotes piracy. The only wrong thing YouTube Vanced does is the blocking of ads. Here we share YouTube Vanced Features, download links for YouTube Vanced, and tutorial on How to Install YouTube Vanced on rooted and non-rooted Android devices.

YouTube Vanced Features

YouTube Vanced brings lots of features including a dark theme, audio background play, auto-repeat, and the most important one ad-free experience. Check all features of YouTube Vanced from below.

  • Based on YouTube API — The vanced looks exactly like the original YouTube app even the Core UI and Functionalities are exactly the same.
  • Adfree Videos – It blocks all Youtube video ads.
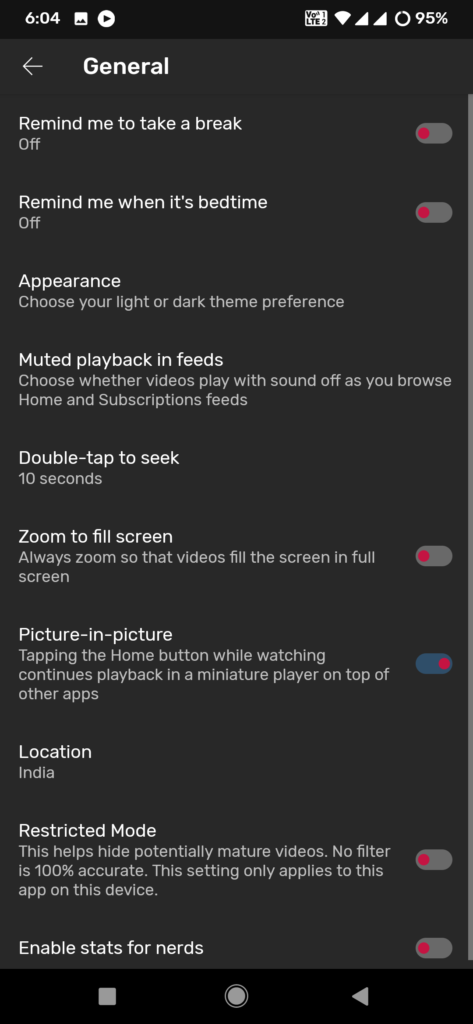
  • Background Playback – This allows you to play videos in the background or in Picture in Picture. It lets’ you play videos and music in the background even with the phone screen off.
  • Easy Swipe Contol – Like other video players, it provides swipe controls to control brightness and volume.
  • Dark Theme – The app has an option of an AMOLED black and Dark theme to reduce eye and battery strain.
  • Auto-repeat – An auto-repeat feature allows you to enjoy videos or a song on loop.
  • Override Maximum Resolution – You can override the default Youtube resolution as high or low as you want.
  • HDR and Codec Support – It allows you to override Codec options such as forcing H264 for old devices or VP9, this also allows you to force HDR playback or turn off 60fps if you prefer a cinematic experience.
  • Other – It also offers features like pinch to zoom, change default playback speed, and much more.

YouTube Vanced Changelogs:

Update: 15th June 2021

The Latest Youtube Vanced v16.20.35 has been released that fixed brightness in swipe controls, fixed preferred video quality in portrait/vertical videos and broken buffer settings, bring back old video quality menu, permanently unlocked “made for kids” playback in mini-player, and more. Download Youtube Vanced v16.20.35 apk with the vanced manager below.

Youtube Vanced v16.29.39 Changelog:

  • Bumped base -SPONSORBLOCK (thanks to cane):
  • fixed buttons after watching shorts
  • Preview category added
  • added length of the video without segments next to the total time
  • added stats to SB settings
  • made segment categories color customizable
  • added support for importing-exporting settings KNOWN ISSUES:
  • casting to Chromecast is still broken on non-root due to microG, it will need to be patched upstream first. Switch to root version or use stock youtube for now (vanced does not block casting ads anyway)
  • Swipe down to refresh (it’s a litho bug)

Vanced Manager (v2.6.2)

Changelog:

  • Fixed root installer for some users
  • App now checks for magisk and displays an error message if it’s not detected
  • Various optimizations

Download YouTube Vanced for Android

Two versions of YouTube Vanced are available, one is for rooted devices and one is for non-rooted devices. There are lots of fake YouTube Vanced APK available on the internet that’s why you should download YouTube Vanced app from a trusted source or from the official YouTube Vanced website. Download YouTube Vanced for Android in 2022 from below.

  • YouTube Vanced Official Website – Official website (Check this website for latest update)
  • Download YouTube Vanced Manager v2.6.2 apk – Download
  • YouTube Vanced Non-root variant apk – Install it from Vanced manager
  • Download YouTube Vanced Root variant apk – Install it from Vanced manager

Which Vanced to choose: Root or Non-root?

There isn’t much of a difference between the root and non-root builds in terms of user experience. The root variant of YouTube Vanced seamlessly replaces the official YouTube app. However, the non-root variant of YouTube Vanced can be installed as a separate app. Unless you really need to replace the stock YouTube app on your phone, we recommend sticking with the non-root version.

How to Install YouTube Vanced on Android in 2022

Here we show you the two ways of installing YouTube Vanced on Android devices. The first one is to Install Youtube Vanced on Non-rooted Android devices and the other one is to Install Youtube Vanced on rooted devices.

How to install YouTube Vanced on a non-rooted device

You can easily install YouTube Vanced Non-root variant with Vanced Manager. After installing the Vanced manager you can simply choose non-root to install the YouTube Vanced non-root variant. Follow the below steps to Install YouTube Vanced on a Non-rooted Android device.

How to install YouTube Vanced on a non-rooted device

  1. Download the latest Vanced Manager from above and install it on your device.
  2. Open the app and select “nonroot” during the initial configuration wizard.
  3. Tap “Install” next to MicroG (To log in to the app) and give permission to install apps from unknown sources.
  4. MicroG will be downloaded, and once it is completed, press on ‘Install’ again.
  5. Once MicroG is installed on your device, tap on ‘Install’ next to Vanced.
  6. Once finished, select your preferred theme and preferred language and tap “FINISH”.
  7. Vanced will now begin to download, and you will need to tap on ‘Install’ after it is complete.
  8. Done, you have successfully installed YouTube Vanced on your non-rooted Android device.

How to install YouTube Vanced on a Rooted device

If you install YouTube Vanced on a rooted Android device, it will replace the original Youtube. You can choose the root option and has to grant the root permission while installing the app. Follow the below steps to Install YouTube Vanced on Rooted Android device.
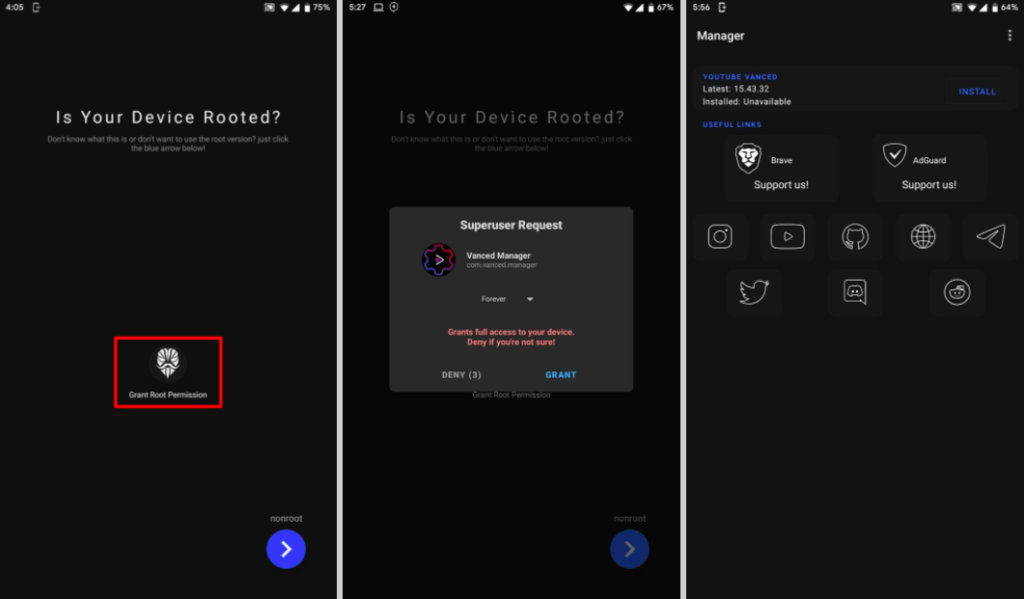
How to install YouTube Vanced on Rooted device

  1. Download the latest Vanced Manager from above and install it on your device.
  2. When you open the Vanced Manager, a pop-up will appear asking for superuser permission. Grant superuser access to the app.
  3. To install YouTube Vanced over the official YouTube APK, you’ll need to disable signature verification in the framework.
    • You can now tap the “Guide” button to open an external site and disable signature verification by following the instructions there.
    • To systemless edit the Android framework, you can use a Magisk Module like Smali Patcher.
  4. After you’ve disabled signature verification, select your theme and language by tapping the “Install” buttons.
  5. Done, YouTube Vanced replaced the official YouTube app and will be installed as a system app.

How To Connect YouTube Vanced with Google account

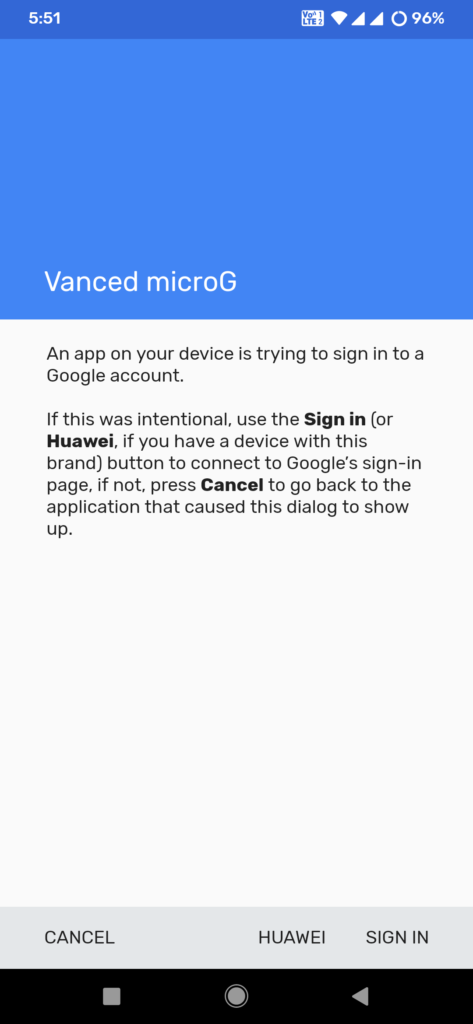
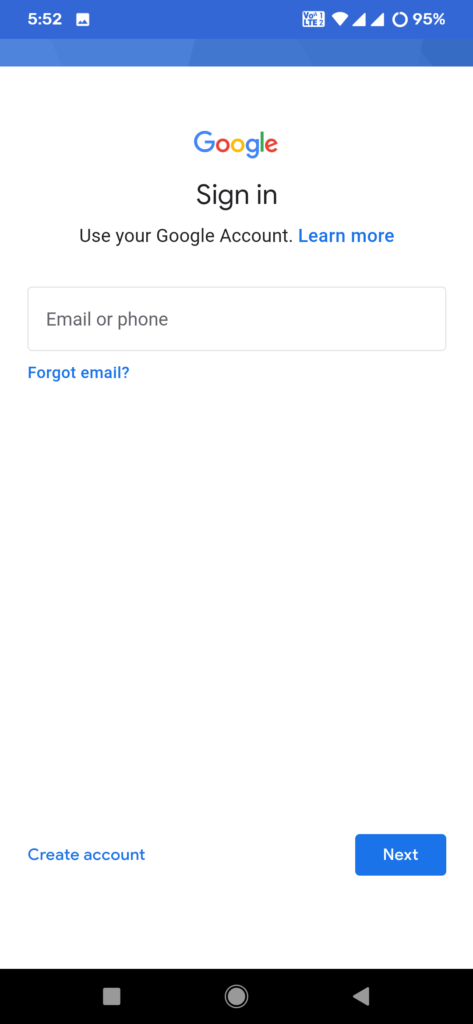
To Connect YouTube Vanced with a Google account, you need to install MicroG. MicroG is a FLOSS framework that allows Google Play Services applications to run on systems without Google Play Services. You can easily install MicroG from the Vanced manager and after installing MicroG and Vanced, follow the below steps to Sign in to YouTube Vanced.

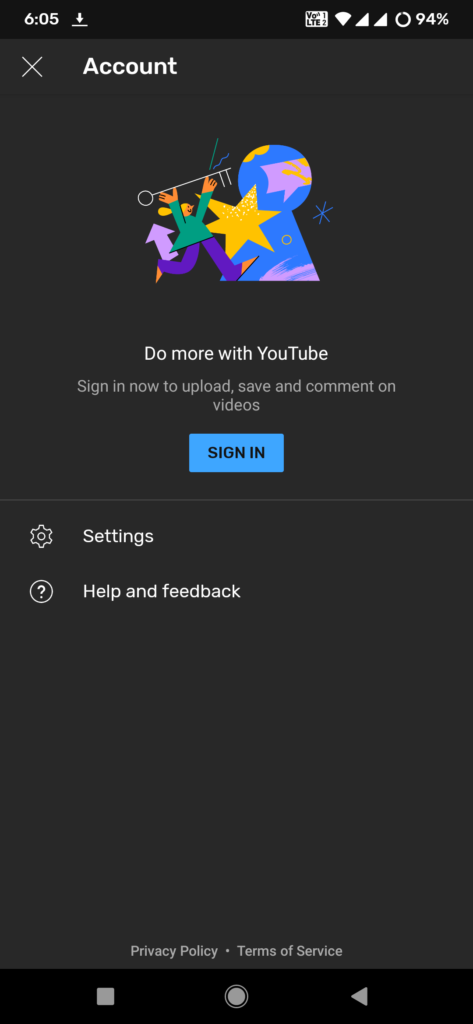
  1. To sign in, open the app, hit the Profile button, and then tap Sign in.
  2. Click Add Account and you will be taken into the Vanced login page.
  3. Now you’ll redirect to the Google sign-in screen, where you can enter your Google credentials.
  4. If you are Huawei/Honor user, click Huawei and enter the details.
  5. Done, your YouTube Vanced now connects with your Google Account.

Wrapping Up: YouTube Vanced Installation

If you want an ad-free YouTube experience with all the YouTube premium features, you should download and install YouTube Vanced on Android.

Have any questions? Do let us know that in the comments below. Stay connected with us via Facebook and Twitter to read more such helpful posts.

The latest OxygenOS 11.1.1.3 for OnePlus Nord starts rolling out. The new OxygenOS 11.1.1.3 update for OnePlus Nord brings May 2021 security patches and a ton of bug fixes and improvements. Download OxygenOS 11.1.1.3 for OnePlus Nord from below.

The OxygenOS 11.1.1.3 for OnePlus Nord is rolling out via OTA (over-the-air) in a phase-wise manner and many users already getting the update. You can wait for the OTA updates, or you can Update OnePlus Nord to OxygenOS 11.1.1.3 manually with the below method.

The new OxygenOS 11.1.1.3 update for the OnePlus Nord brings many changes (Check the complete changelogs from below). We provide you the OxygenOS 11.1.1.3 OTA file which you can flash on your device. So if you want to update your OnePlus to the latest version then Download OxygenOS 11.1.1.3 for the OnePlus Nord from below. Check below what’s new in OxygenOS 11.1.1.3.

OxygenOS 11.1.1.3 Features and Changelogs –

  • System
    • Fixed the issue that the card coupon is not available as a widget
    • Fixed the issue that missed calls are marked as call answered on another device in call logs
    • Fixed known issues and improved system stability
    • Updated Android security patch to 2021.05
  • Network
    • Improved the speed of Wi-Fi connection
  • Camera
    • Fixed the abnormal preview display issue in Nightscape Tripod mode
    • Fixed the issue that Camera becomes unresponsive when setting profile photo in Contact
    • Fixed the frame drops issue with videos taken by Camera
    • ‘Fixed the occasional issue that Flash effect may fail in some scenarios
    • Fixed the delay issue when switching to the front camera under Time-lapse mode
  • File Manager
    • Fixed abnormal display issue while copying files to OTG storage

Note:-

  • This method is only for the OnePlus Nord.
  • Full ROM can be flashed via TWRP as well.
  • Follow the steps correctly otherwise, you may brick your device. We Guidegeekz.com is not responsible for any damage to your phone.
  • Charge your device to 60- 70% to prevent it from the accidental shutdown.
  • Take a complete backup of everything important.

Download OxygenOS 11.1.1.3 for OnePlus Nord

  • OxygenOS 11.1.1.3 update for OnePlus Nord OTA link – Global, EU, India
  • OxygenOS 11.1.1.3 Full ROM for OnePlus Nord – Global, EU, India

How to Install OxygenOS 11.1.1.3 Update on OnePlus Nord

For Non-Rooted Users

Method 1

  1. First, enable the USB debugging option from the setting ->developer option. To enable Developer Options, go to About phone and tap the Build Number 7 times.
  2. Download ADB and Fastboot and install them on your PC.
  3. Download OxygenOS 11.1.1.3 OTA from above Copy ROM to a folder where adb installed.
  4. Now Turn Off your phone and boot into the recovery mode.
  5. Choose Apply update from ADB
  6. Now Connect your phone to your Laptop/PC
  7. On ROM folder press shift+right click and click on the open command here.
  8. Now check your connection status by typing the below command
    adb devices
    if your device is listed, you’re ready to flash the ROM
  9. Now Install OxygenOS 11.1.1.3 OTA on the OnePlus Nord by typing the below command
    adb sideload File-Name.zip 
  10. Now, wait until the process completes, and then Reboot the phone.
  11. Done!

Method 2

  1. Download OxygenOS 11.1.1.3 OTA zip file from above and save it on your internal phone memory.
  2. Now Switch off your device and boot into the Recovery mode.
  3. To boot the OnePlus Nord into recovery mode press and hold ‘Power + Volume Down’ button.
  4. Now your phone boot into the Stock recovery.
  5. Now Select ‘Apply Update’ and select ‘Choose from Internal Storage
  6. Browse the OTA zip file which you download and save on your phone before.
  7. Select the zip file, and it will Install OxygenOS 11.1.1.3 OTA update file on your device.
  8. Now wait until the process complete and then reboot your device.
  9. Done.

For Rooted Users

  1. First Unlock your device bootloader and Install TWRP on your Device. Skip this step if already installed TWRP.
  2. Reboot your device into Recovery mode and create a Nandroid backup (Recommended) of your device for the safer side, if anything goes wrong.
  3. Now wipe your cache files from Goto Wipe>Advanced Wipe>Select Wipe cache and Dalvik cache and swipe to confirm it.
  4. Now, Go to Install and locate the OOS 11.1.1.3 Full Rom Zip & swipe to Install the ROM file
  5. Now Flash the Magisk again to maintain the root (Optional).
  6. Wipe Dalvik & Cache again.
  7. Done! Reboot System and Enjoy.

Wrapping Up:

That’s all this is the complete guide to Download OxygenOS 11.1.1.3 for OnePlus Nord (OTA + Full ROM). Have any questions? Do let us know that in the comments below. Stay connected with us via Facebook and Twitter to read more such helpful posts.

The latest Android 11 based MIUI 12.0.10.0 update for Redmi Note 10 starts rolling out via OTA. The update brings a few improvements and fixes bugs. Follow the below guide to Download MIUI 12.0.10.0 Global Stable ROM for Redmi Note 10.

MIUI 12.0.10.0 Global Stable ROM for Redmi Note 10 is a stable version and can be flashed via Recovery or via Fastboot. You can download MIUI 12.0.10.0 for Redmi Note 10 from below.

You can Download Redmi Note 10 MIUI 12.0.10.0.RKGMIXM ROM from below and also manually check for the update by going to Settings -> About Phone -> System updates -> Check for update. Download MIUI 12.0.10.0 Stable ROM for Redmi Note 10 from below.

Note:-

  • This Firmware file is only for Redmi Note 10. Don’t try this on any other device.
  • Follow the steps correctly otherwise you may brick your device. We are not responsible for any damage to your phone.
  • It may erase your data, so it is advisable to take a complete backup of your phone for a safer side.
  • Ensure that your phone has at least 50-60% charged to prevent the accidental shutdown in between the process.

Download MIUI 12.0.10.0 Global Stable ROM for Redmi Note 10

  • Redmi Note 10 MIUI 12.0.10.0 OTA update – Download
  • MIUI 12.0.10.0 Recovery ROM for Redmi Note 10 – Download
  • MIUI 12.0.10.0 Fastboot ROM for Redmi Note 10 – Coming Soon

How to Install MIUI 12.0.10.0 Global Stable ROM on Redmi Note 10 –

To install MIUI 12.0.10.0 update for Redmi Note 10 download either Recovery ROM or Fastboot ROM from above and use the below method to install this on your device.

Method 1 – Recovery Mode

Recovery Mode

  1. Download Recovery ROM for Redmi Note 10 from above and save it on your device.
  2. Now launch the ‘Updater‘ app on your device.
  3. Click on the three-dot menu (‘…’ icon) at the top-right corner, and select the ‘choose update package‘.
  4. Browse through the files and select the package ending with .zip extension.
  5. Done. Your device will reboot on the latest version.

Method 2 – Fastboot Mode

1) First, Download Mi Flash Tool, extract it, and install it on your PC.

2) Now download Fastboot ROM for Redmi Note 10 for your device.

3) Now boot your device into Fastboot mode by pressing the ‘Volume Down + Power‘ button.

4) Connect your device to the PC via a micro USB cable.

5) Now extract the Fastboot ROM and copy its path on the PC.

6) Now open MI Flash Tool and Paste the address bar of the ROM file folder path copied from above.

Mi Flash

7) First, click on the ‘Refresh‘ button (It will automatically recognize your device) and then click on the ‘Flash‘ button to flash MIUI 12 ROM on your Devices.

Mi Flash

8) Wait for some time to complete the process.

9) Done. Your device will boot on the latest version.

Wrapping Up:

Download MIUI 12.0.10.0 Global Stable ROM for Redmi Note 10 and flash it to update it manually. Comment below if you have any doubts.

Good news for Redmi Note 9 users, Xiaomi released the Android 11 update for Redmi Note 9 users via OTA. The update is currently rolled out for Mi Pilots only and It is unlikely that users who are not part of the Mi Pilot Testing program will be able to install it. However, it shouldn’t be long before a wider steady rollout takes place. You can Download Redmi Note 9 Android 11 Update from below.

The MIUI 12.0.1.0 Global Stable ROM for Redmi Note 9 is a stable Android 11 version and can be flashed via Recovery or via Fastboot. You can wait for the OTA or download MIUI 12.0.1.0 for Redmi Note 9 from below to Update Redmi Note 9 to Android 11 manually.

You can Download Redmi Note 9 MIUI 12.0.1.0.RJOMIXM ROM from below and also manually check for the update by going to Settings -> About Phone -> System updates -> Check for update. Download MIUI 12.0.1.0 Stable ROM for Redmi Note 9 from below.

Note:-

  • This Firmware file is only for Redmi Note 9 (Mi Pilot). Don’t try this on any other device.
  • Follow the steps correctly otherwise you may brick your device. We are not responsible for any damage to your phone.
  • It may erase your data, so it is advisable to take a complete backup of your phone for a safer side.
  • Ensure that your phone has at least 50-60% charged to prevent the accidental shutdown in-between the process.

Download Redmi Note 9 Android 11 Update

  • MIUI 12.0.1.0 Recovery ROM for Redmi Note 9 – Download (Mi Pilot)
  • MIUI 12.0.1.0 Fastboot ROM for Redmi Note 9 – Coming Soon

How to Install Android 11 on Redmi Note 9 –

To install Android 11 update for Redmi Note 9 download either Recovery ROM or Fastboot ROM from above and use the below method to install this on your device.

Method 1 – Recovery Mode

Recovery Mode

  1. Download Android 11 ROM for Redmi Note 9 from above and save it on your device.
  2. Now launch the ‘Updater‘ app on your device.
  3. Click on the three-dot menu (‘…’ icon) at the top-right corner, and select the ‘choose update package‘.
  4. Browse through the files and select the package ending with .zip extension.
  5. Done. Your device will reboot on the latest version.

Method 2 – Fastboot Mode

1) First, Download Mi Flash Tool, extract it and install it on your PC.

2) Now download Android 12 update for Redmi Note 9 for your device.

3) Now boot your device into Fastboot mode by pressing the ‘Volume Down + Power‘ button.

4) Connect your device to PC via micro USB cable.

5) Now extract the Fastboot ROM and copy its path on the PC.

6) Now open MI Flash Tool and Paste the address bar of the ROM file folder path copied from above.

Mi Flash

7) First, click on the ‘Refresh‘ button (It will automatically recognize your device) and then click on the ‘Flash‘ button to flash MIUI 12 ROM on your Devices.

Mi Flash

8) Wait for some time to complete the process.

9) Done. Your device will boot on the latest version.

Wrapping Up:

If you want to update Redmi Note 9 to Android 11, then you can follow the above process. Download MIUI 12.0.1.0 Global Stable ROM for Redmi Note 9 and flash it to update it manually. Comment below if you have any doubts.