Author

Sumit Bahl

Browsing

The latest OxygenOS 11.0.10.10 for the OnePlus 8T starts rolling out. The new OxygenOS 11.0.10.10 update for OnePlus 8T brings the latest August 2021 patches along with a host of new features, and improvements. Download OxygenOS 11.0.10.10 for OnePlus 8T from below.

The update is rolling out via OTA (over-the-air) and many users already getting OxygenOS 11.0.10.10 for OnePlus 8T. The update is incremental and rolls out in a phase-wise manner. You can wait for the OTA updates or update Oneplus 8T to OxygenOS 11.0.10.10 manually with the below method.

The new OxygenOS 11.0.10.10 for OnePlus 8T brings many changes (Check the complete changelogs from below). We provide you the OxygenOS 11.0.10.10 OTA file which you can flash on your device. So if you want to update your OnePlus to the latest version then Download OxygenOS 11.0.10.10 for OnePlus 8T from below. Check below what’s new in OxygenOS 11.0.10.10

OxygenOS 11.0.10.10 Features and Changelogs –

  • System
    • Newly adapted OnePlus Buds Pro and brought new powerful features
    • Newly added the screenshot feature for AOD
    • Fixed the failed issue of Navigation gestures in some screens
    • Improved system stability and fixed known issues
    • Updated Android security patch to 2021.08
  • Camera
    • Optimized the portrait mode effect of the front camera
  • OnePlus Store
    • An intuitive and convenient way to manage your OnePlus account, get easy-to-access support, discover exciting members-only benefits, and shop for OnePlus products. (Please note that it can be uninstalled)
  • Ambient Display
    • Newly added Bitmoji AOD, co-designed with Snapchat, which will liven up the ambient display with your personal Bitmoji avatar. Your avatar will update throughout the day based on your activity and things happening around you (Path: Settings – Customization – Click on Ambient display – Bitmoji)

Note:-

  • This method is only for the OnePlus 8T.
  • Full ROM can be flashed via TWRP as well.
  • Follow the steps correctly otherwise, you may brick your device. We Guidegeekz.com is not responsible for any damage to your phone.
  • Charge your device to 60- 70% to prevent it from accidental shutdown.
  • Take a complete backup of everything important.

Download OxygenOS 11.0.10.10 for OnePlus 8T

  • OxygenOS 11.0.10.10 update for OnePlus 8T OTA link – Download (Europe)
  • OxygenOS 11.0.10.10 Full ROM for OnePlus 8T – Download

How to Install OxygenOS 11.0.10.10 Update on OnePlus 8T

For Non-Rooted Users

Method 1

  1. First, enable the USB debugging option from the setting ->developer option. To enable Developer Options, go to About phone and tap the Build Number 7 times.
  2. Download ADB and Fastboot and install them on your PC.
  3. Download OxygenOS 11.0.10.10 OTA from above Copy ROM to a folder where adb installed.
  4. Now Turn Off your phone and boot into recovery mode.
  5. Choose Apply update from ADB
  6. Now Connect your phone to your Laptop/PC
  7. On ROM folder press shift+right click and click on the open command here.
  8. Now check your connection status by typing the below command
    adb devices
    if your device is listed, you’re ready to flash the ROM
  9. Now Install OxygenOS 11.0.10.10 OTA on OnePlus 8Tby typing the below command
    adb sideload File-Name.zip 
  10. Now, wait until the process completes and then Reboot the phone.
  11. Done!

Method 2

  1. Download OxygenOS 11.0.10.10 OTA zip file from above and save it on your internal phone memory.
  2. Now Switch off your device and boot into the Recovery mode.
  3. To boot the OnePlus 8T into recovery mode press and hold the ‘Power + Volume Down button.
  4. Now your phone boot into the Stock recovery.
  5. Now Select ‘Apply Update’ and select ‘Choose from Internal Storage
  6. Browse the OTA zip file which you download and save on your phone before.
  7. Select the zip file, and it will Install OxygenOS 11.0.10.10 OTA update file on your OnePlus 8T.
  8. Now wait until the process complete and then reboot your device.
  9. Done.

For Rooted Users

  1. First Unlock your device bootloader and Install TWRP on your Device. Skip this step if already installed TWRP.
  2. Reboot your device into Recovery mode and create a Nandroid backup (Recommended) of your device for the safer side, if anything goes wrong.
  3. Now wipe your cache files from Goto Wipe>Advanced Wipe>Select Wipe cache and Dalvik cache and swipe to confirm it.
  4. Now, Go to Install and locate the OOS 11.0.10.10 Full Rom Zip & swipe to Install the ROM file
  5. Now Flash the Magisk again to maintain the root (Optional).
  6. Wipe Dalvik & Cache again.
  7. Done! Reboot System and Enjoy.

Wrapping Up:

That’s all this is the complete guide to Download OxygenOS 11.0.10.10 for OnePlus 8T (OTA + Full ROM). Have any questions? Do let us know that in the comments below. Stay connected with us via Facebook and Twitter to read more such helpful posts.

The latest OxygenOS 11.0.8.8 for the OnePlus 8/8 pro starts rolling out. The new OxygenOS 11.0.8.8 update for the OnePlus 8 brings the latest August 2021 patches along with a host of new features, and improvements. Download OxygenOS 11.0.8.8 for OnePlus 8/8 pro from below.

The OxygenOS 11.0.8.8 for OnePlus 8/8 pro is rolling out via OTA (over-the-air) in a phase-wise manner and many users already getting the update. You can wait for the OTA updates, or you can Update Oneplus 8 to OxygenOS 11.0.8.8 manually with the below method.

The new OxygenOS 11.0.8.8 update for the OnePlus 8/8 pro brings many changes (Check the complete changelogs from below). We provide you the OxygenOS 11.0.8.8 OTA file which you can flash on your device. So if you want to update your OnePlus to the latest version then Download OxygenOS 11.0.8.8 for the OnePlus 8/8 pro from below. Check below what’s new in OxygenOS 11.0.8.8.

OxygenOS 11.0.8.8 Features and Changelogs –

  • System
    • Newly adapted OnePlus Buds Pro and brought new powerful features
    • Newly added the screenshot feature for AOD
    • Fixed the failed issue of Navigation gestures in some screens
    • Improved system stability and fixed known issues
    • Updated Android security patch to 2021.08
  • Camera
    • Optimized the portrait mode effect of the front camera
  • OnePlus Store
    • An intuitive and convenient way to manage your OnePlus account, get easy-to-access support, discover exciting members-only benefits, and shop for OnePlus products. (Please note that it can be uninstalled)
  • Ambient Display
    • Newly added Bitmoji AOD, co-designed with Snapchat, which will liven up the ambient display with your personal Bitmoji avatar. Your avatar will update throughout the day based on your activity and things happening around you (Path: Settings – Customization – Click on Ambient display – Bitmoji)

Note:-

  • This method is only for the OnePlus 8/8 pro.
  • Full ROM can be flashed via TWRP as well.
  • Follow the steps correctly otherwise, you may brick your device. We Guidegeekz.com is not responsible for any damage to your phone.
  • Charge your device to 60- 70% to prevent it from an accidental shutdown.
  • Take a complete backup of everything important.

Download OxygenOS 11.0.8.8 for OnePlus 8/8 pro

  • OxygenOS 11.0.8.8 update for OnePlus 8 – OTAFull ROM (Europe)
  • OxygenOS 11.0.8.8 ROM for OnePlus 8 pro – OTAFull ROM (Europe)

How to Install OxygenOS 11.0.8.8 Update on OnePlus 8/8 pro

For Non-Rooted Users

Method 1

  1. First, enable the USB debugging option from the setting ->developer option. To enable Developer Options, go to About phone and tap the Build Number 7 times.
  2. Download ADB and Fastboot and install them on your PC.
  3. Download OxygenOS 11.0.8.8 OTA from above Copy ROM to a folder where adb installed.
  4. Now Turn Off your phone and boot into recovery mode.
  5. Choose Apply update from ADB
  6. Now Connect your phone to your Laptop/PC
  7. On ROM folder press shift+right click and click on the open command here.
  8. Now check your connection status by typing the below command
    adb devices
    if your device is listed, you’re ready to flash the ROM
  9. Now Install OxygenOS 11.0.8.8 OTA on the OnePlus 8 series by typing the below command
    adb sideload File-Name.zip 
  10. Now, wait until the process completes, and then Reboot the phone.
  11. Done!

Method 2

  1. Download OxygenOS 11.0.8.8 OTA zip file from above and save it on your internal phone memory.
  2. Now Switch off your device and boot into the Recovery mode.
  3. To boot the OnePlus 8 into recovery mode press and hold ‘Power + Volume Down’ button.
  4. Now your phone boot into the Stock recovery.
  5. Now Select ‘Apply Update’ and select ‘Choose from Internal Storage
  6. Browse the OTA zip file which you download and save on your phone before.
  7. Select the zip file, and it will Install OxygenOS 11.0.8.8 OTA update file on your OnePlus 8.
  8. Now wait until the process complete and then reboot your device.
  9. Done.

For Rooted Users

  1. First Unlock your device bootloader and Install TWRP on your Device. Skip this step if already installed TWRP.
  2. Reboot your device into Recovery mode and create a Nandroid backup (Recommended) of your device for the safer side, if anything goes wrong.
  3. Now wipe your cache files from Goto Wipe>Advanced Wipe>Select Wipe cache and Dalvik cache and swipe to confirm it.
  4. Now, Go to Install and locate the OOS 11.0.8.8 Full Rom Zip & swipe to Install the ROM file
  5. Now Flash the Magisk again to maintain the root (Optional).
  6. Wipe Dalvik & Cache again.
  7. Done! Reboot System and Enjoy.

Wrapping Up:

That’s all this is the complete guide to Download OxygenOS 11.0.8.8 for OnePlus 8/8 pro (OTA + Full ROM). Have any questions? Do let us know that in the comments below. Stay connected with us via Facebook and Twitter to read more such helpful posts.
Fitbit fitness trackers can keep track of everything you do throughout the day, including your activity, exercise, diet, weight, and sleep. It helps you get in shape, stay motivated, and understand how minor changes can add up to large results.

Fitbit’s activity data is more accurate than Google Fit’s since Fitbit tracks activities with a fitness tracker or smartwatch. If you’re an Android user, you might wish to sync your data with Google Fit as well. Fortunately, there is an easy way to Sync Fitbit Data with Google Fit.

Synchronizing your data with the Fitbit app or Google fit app is important. It will make it easier for you to access and correctly monitor all of that data, as well as manually recording things your Fitbit can’t. It is very easy to connect Fitbit to Google Fit, it will let you view and sync data from both apps on a single platform.

How to Sync Fitbit Data with Google Fit

Before we begin, I’ll assume you have a Fitbit device and account, as well as a Google account through which you use Google Fit.

Follow the step-by-step guide for connecting and transfer data from Fitbit to Google Fit. Connecting Google Fit and Fitbit helps you to view data from both apps on a single platform. To sync Fitbit with Google Fit, follow the steps below.

Method 1: Using FitToFit App

FitToFit is a simple and straightforward app that allows you to transfer your fitness data from Fitbit to Google Fit. The data is retrieved from your Fitbit account and inserted into Google Fit. You must first log in with your Fitbit account and then connect to your Google account, into which the data from Fitbit should be inserted.

Step 1: Download FitToFit App

  1. Download and install the FitToFit App from Playstore.
  2. Open the app and tap Login with Fitbit from the bottom of the screen.FitToFit App

Step 2: Sign-In To FitToFit App

  1. Sign-in into FitToFit App with your Fitbit login email and password.
  2. Once you logged in, you will be asked which data you want the app to sync. Select Allow All (or tick mark against the data you want to share).
  3. After selecting the data, click Allow.Sign-In To FitToFit App

Step 3: Select Your Google Fit Account

  1. It’s time to choose the Google account you want this data synced with.
  2. Tap on the Google account registered with Google Fit App as you signed in.

Step 4: Transfer Data 

  1. Now tap on the “Transfer Data” icon and select a period to transfer data from Fitbit to Google Fit.
  2. The above step will transfer all Fitbit data to Google Fit.FitToFit App

Step 5: Additional Settings

  1. You must enable AutoSync at the settings.
  2. To set that got to App settings and Enable “Sync data automatically”.

Method 2 – Using Health Sync

With an app called “Health Sync,” you can use Fitbit for fitness tracking and sync all your data over to Google Fit. Before you get started, you’ll need both Fitbit and Google Fit installed on your Android smartphone. Make sure you’re signed in to Fitbit under the same account you used to set up your smartwatch.

Step 1: Download Health Sync

  1. Download and install Health Sync on your Android phone.
  2. Open the app, and then tap “OK” to begin the “First Usage Actions.”

Step 2: Choose Sync Direction

  1. The app will now ask you to determine the sync direction between the services you wish to sync.
  2. Tap on Fitbit as your base sync source.
  3. Tap Google Fit as your sync destination and then tap “OK.”

Step 3: Initialize Connection

  1. On the “Initialization Actions” screen, tap “Check Google Fit Connection.”
  2. Now choose a Google account for Google Fit and authorize Health Sync’s use of your Fitbit account.
  3. Once initialization is complete, you can choose which fields you’d like to sync by tapping on the respective checkboxes.
  4. Now tap the Sync Status button to check if everything is working.

Wrapping Up: Sync Google Fit with Fitbit

The apps listed above are a terrific way to combine all of your Fitbit data and get a nice overview in Google Fit. When you connect your Fitbit to Google Fit, you’ll be able to see the most accurate data in the Google Fit App.

Have any questions? Do let us know that in the comments below. Stay connected with us via Facebook and Twitter to read more such helpful posts.

Christmas can be so much fun, but the preparation can be quite overwhelming – and if you are the lucky one to host Christmas dinner, even more so! There are many design choices to be made before you start decorating for the festive season – what will your décor theme be, will it be minimalist or maximalist in its execution, and how do you keep your sanity while trying to do this in a way that is fun for everyone? The good news is that you can sit back and breathe – let’s look at this process step by step and see what the best approach is. 

Your home is a blank slate

Until you start decorating, everything is potential! A great suggestion is to take some pictures of walls, surfaces, and outside areas that you would like to decorate, and use these photos to refer back to when you are out buying décor supplies, Christmas tree decorations, and other elements you would like to incorporate into your overall look. A lack of planning can result in busy too many decorations, or too few, and either way, you will end up either having wasted money or not being able to do what you set out to do. 

When you start looking at your home from a perspective of decorating, and not out of habit, you will be amazed at how differently you suddenly see things!

What decorations should I definitely invest in?

Many people see Christmas lights and a Christmas tree as the cornerstone of Christmas decorations. There are many schools of thought around Christmas tree decorations, where some people prefer to keep it structured with store-bought decorations, while others like the quirkiness of homemade decorations, and might incorporate ornaments made by friends and family, to give their tree that personal touch.

Others prefer to incorporate elements of nature into their décor, using pinecones, berries, evergreen foliage, and even nuts to decorate their homes with, as a tribute to the display nature treats us to at the end of the year. The style you choose doesn’t really matter, but what is important, is that you stick to a theme once you’ve chosen one, to prevent your overall look from becoming haphazard. 

Is a real or artificial Christmas tree better? 

Smaller spaces often benefit from an artificial Christmas tree, as you will be able to buy one according to a size that is suitable for your home. The lighting, paint color, and architecture of the room will also influence how the tree appears, so take that into consideration, especially with artificial trees, where the colors can often appear differently. 

Many people argue that a natural tree is a way to go, but make your decision based on all the factors in your life, to ensure that the tree you choose is suited to your circumstances and lifestyle. 

How do I make my décor look like a single theme?

Thing brings a Christmas décor scheme together quite like Christmas lights. Not only can you use them to make your tree appear brighter and more festive, but you can also use it on trees, furniture, banisters, and any other surface you would like to decorate! 

You can even consider buying your lights in different colors, or, if you are going for an artificial tree anyway, why not consider getting a pre-lit one? These smart little trees have LED lights built into the branches, which means you won’t have to spend more on buying your strings of lights separately. Sometimes, it’s the little things that count!

What is the best type of light? 

In your search for the right set of Christmas lights, you might encounter LED and incandescent options. The way these different types of lights consume power is very different, so take that into account when you decide. 

It is best advised not to mix the different types, as they consume power differently, and linking an incandescent string to an LED string could result in power supply issues. Incandescent bulbs burn at a much warmer temperature, and use more power, while Led lights use a fraction of the power and burn a lot cooler. Less power means that you can link more LED lights without overloading your system and causing the power to trip. Food for thought when trying to make the right choice!

The latest Android 11 based MIUI 12.5.1.0 update for Redmi 9 Prime starts rolling out via OTA. The update is based on Android 11 and brings lots of new features, improvements, and August 2021 Security patches. Follow the below guide to Download MIUI 12.5.1.0 India Stable ROM for Redmi 9 Prime.

MIUI 12.5.1.0 India Stable ROM for Redmi 9 Prime is a stable version and can be flashed via Recovery or via Fastboot. You can download MIUI 12.5.1.0 for Redmi 9 Prime from below.

You can Download Redmi 9 Prime MIUI 12.5.1.0.RJCINXM ROM from below and also manually check for the update by going to Settings -> About Phone -> System updates -> Check for update. Download MIUI 12.5.1.0 Stable ROM for Redmi 9 Prime from below.

Changelogs:

[System]

  • New: Response to gestures is now instant.
  • New: With 20 times more rendering power, there are now few limits to what you can see on your screen.
  • New: With custom device model adjustments, any phone becomes faster after the upgrade.
  • Optimization: MIUI became lighter, faster, and more durable.
  • Updated Android Security Patch to August 2021. Increased system security.
  • Stable MIUI based on Android 11

[Notes]

  • New: Compose mind maps with complex structures.
  • New: New tools for doodling and sketching.
  • New: Press and hold a sketch to adjust the strokes automatically.
  • New: A gesture shortcut now allows you to create notes, tasks, and excerpts anywhere.
  • New: Excerpts save text, URLs, and images to Notes in a few simple taps.
  • New: Dynamic layouts bring the typography in Notes to a new level.
  • All-new Notes.

Note:-

  • This Firmware file is only for Redmi 9 Prime. Don’t try this on any other device.
  • Follow the steps correctly otherwise you may brick your device. We are not responsible for any damage to your phone.
  • It may erase your data, so it is advisable to take a complete backup of your phone for a safer side.
  • Ensure that your phone has at least 50-60% charged to prevent the accidental shutdown in-between the process.

Download MIUI 12.5.1.0 India Stable ROM for Redmi 9 Prime

  • MIUI 12.5.1.0 OTA update for Redmi 9 Prime – Download
  • MIUI 12.5.1.0 Recovery ROM for Redmi 9 Prime – Download (Mi Pilot Only)
  • MIUI 12.5.1.0 Fastboot ROM for Redmi 9 Prime – Coming Soon

How to Install MIUI 12.5.1.0 India Stable ROM on Redmi 9 Prime –

To install MIUI 12.5.1.0 update for Redmi 9 Prime download either Recovery ROM or Fastboot ROM from above and use the below method to install this on your device.

Method 1 – Recovery Mode

Recovery Mode

  1. Download MIUI 12.5 ROM for Redmi 9 Prime from above and save it on your device.
  2. Now launch the ‘Updater‘ app on your device.
  3. Click on the three-dot menu (‘…’ icon) at the top-right corner, and select the ‘choose update package‘.
  4. Browse through the files and select the package ending with .zip extension.
  5. Done. Your device will reboot on the latest version.

Method 2 – Fastboot Mode

1) First, Download Mi Flash Tool, extract it and install it on your PC.

2) Now download Fastboot ROM for Redmi 9 Prime for your device.

3) Now boot your device into Fastboot mode by pressing the ‘Volume Down + Power‘ button.

4) Connect your device to the PC via a micro USB cable.

5) Now extract the Fastboot ROM and copy its path on the PC.

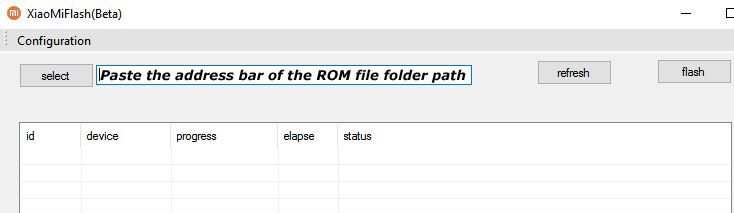
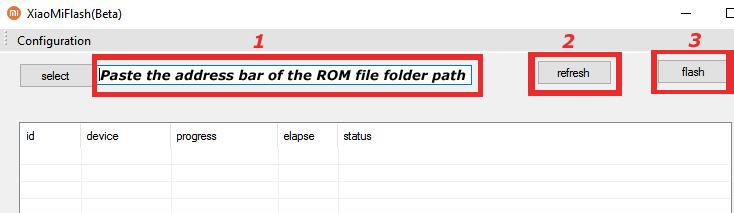
6) Now open MI Flash Tool and Paste the address bar of the ROM file folder path copied from above.

Mi Flash

7) First, click on the ‘Refresh‘ button (It will automatically recognize your device) and then click on the ‘Flash‘ button to flash MIUI 12 ROM on your Devices.

Mi Flash

8) Wait for some time to complete the process.

9) Done. Your device will boot on the latest version.

Wrapping Up:

Download MIUI 12.5.1.0 India Stable ROM for Redmi 9 Prime and flash it to update it manually. Comment below if you have any doubts.

The latest OxygenOS 11.3.A.09 for OnePlus Nord 2 starts rolling out. The new OxygenOS 11.3.A.09 update for OnePlus Nord 2 improves the camera performance, fixes a bug that didn’t let users enable Wi-Fi hotspot, optimizes the Gallery app UI, and speeds up the loading of image previews. Download OxygenOS 11.3.A.09 for OnePlus Nord 2 from below.

The OxygenOS 11.3.A.09 for OnePlus Nord 2 is rolling out via OTA (over-the-air) in a phase-wise manner and many users already getting the update. You can wait for the OTA updates, or you can Update OnePlus Nord 2 to OxygenOS 11.3.A.09 manually with the below method.

The new OxygenOS 11.3.A.09 update for the OnePlus Nord 2 brings many changes (Check the complete changelogs from below). We provide you the OxygenOS 11.3.A.09 OTA file which you can flash on your device. So if you want to update your OnePlus to the latest version then Download OxygenOS 11.3.A.09 for the OnePlus Nord 2 from below. Check below what’s new in OxygenOS 11.3.A.09.

OxygenOS 11.3.A.09 Features and Changelogs –

  • System
    • Optimized the notification feature of the Community app
    • Improved system stability and fixed, known issues
  • Camera
    • Further optimized the HDR feature experience
    • Further improved the camera performance
  • Network
    • Fixed the issue of unable to enable the Wi-Fi hotspot
  • Gallery
    • Optimized the UI effect, bringing a better experience
    • Improved the loading speed of previewing pictures

Note:-

  • This method is only for the OnePlus Nord 2.
  • Full ROM can be flashed via TWRP as well.
  • Follow the steps correctly otherwise, you may brick your device. We Guidegeekz.com is not responsible for any damage to your phone.
  • Charge your device to 60- 70% to prevent it from an accidental shutdown.
  • Take a complete backup of everything important.

Download OxygenOS 11.3.A.09 for OnePlus Nord 2

  • OxygenOS 11.3.A.09 OTA update for OnePlus Nord 2 – Download
  • OxygenOS 11.3.A.09 Full ROM for OnePlus Nord 2 – Download

How to Install OxygenOS 11.3.A.09 Update on OnePlus Nord 2

For Non-Rooted Users

Method 1

  1. First, enable the USB debugging option from the setting ->developer option. To enable Developer Options, go to About phone and tap the Build Number 7 times.
  2. Download ADB and Fastboot and install them on your PC.
  3. Download OxygenOS 11.3.A.09 OTA from above Copy ROM to a folder where adb installed.
  4. Now Turn Off your phone and boot into recovery mode.
  5. Choose Apply update from ADB
  6. Now Connect your phone to your Laptop/PC
  7. On ROM folder press shift+right click and click on the open command here.
  8. Now check your connection status by typing the below command
    adb devices
    if your device is listed, you’re ready to flash the ROM
  9. Now Install OxygenOS 11.3.A.09 OTA on the OnePlus Nord 2 by typing the below command
    adb sideload File-Name.zip 
  10. Now, wait until the process completes, and then Reboot the phone.
  11. Done!

Method 2

  1. Download the OxygenOS 11.3.A.09 OTA zip file from above and save it on your internal phone memory.
  2. Now Switch off your device and boot into the Recovery mode.
  3. To boot the OnePlus Nord 2 into recovery mode press and hold ‘Power + Volume Down’ button.
  4. Now your phone boot into the Stock recovery.
  5. Now Select ‘Apply Update’ and select ‘Choose from Internal Storage
  6. Browse the OTA zip file which you download and save on your phone before.
  7. Select the zip file, and it will Install OxygenOS 11.3.A.09 OTA update file on your device.
  8. Now wait until the process complete and then reboot your device.
  9. Done.

For Rooted Users

  1. First Unlock your device bootloader and Install TWRP on your Device. Skip this step if already installed TWRP.
  2. Reboot your device into Recovery mode and create a Nandroid backup (Recommended) of your device for the safer side, if anything goes wrong.
  3. Now wipe your cache files from Goto Wipe>Advanced Wipe>Select Wipe cache and Dalvik cache and swipe to confirm it.
  4. Now, Go to Install and locate the OOS 11.3.A.09 Full Rom Zip & swipe to Install the ROM file
  5. Now Flash the Magisk again to maintain the root (Optional).
  6. Wipe Dalvik & Cache again.
  7. Done! Reboot System and Enjoy.

Wrapping Up:

That’s all this is the complete guide to Download OxygenOS 11.3.A.09 for OnePlus Nord 2 (OTA + Full ROM). Have any questions? Do let us know that in the comments below. Stay connected with us via Facebook and Twitter to read more such helpful posts.

Android 12, the major OS update of Google, is introducing the “Material You” Dynamic Theme, which automatically changes the color of Chrome to match your phone’s wallpaper. Google recently updated the dynamic color flag on Chrome for Android with full support for dynamic colors. If you’re eager to experiment, you can try out the new theming feature by Enable Material You Theme in Google Chrome.

Material You design for Google Chrome currently is an experimental feature, and it is available in the latest version of Chrome Canary build. Material You brings the browser theming UI for its New Tab page, Discover Feed, directly from colors found in the wallpaper on a given device.

How to Enable Material You Theme in Google Chrome

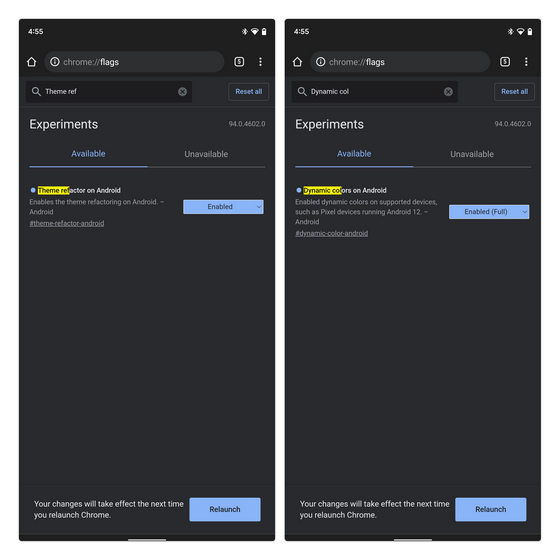
You can activate the wallpaper-based theme on Canary via two flags. You need to Enable two flags by navigating to the “chrome://flags” URL and entering the correct terms in the search bar. Specifically, by searching first for “theme-refactor-android” and then “dynamic-color-android.”

Here’s how to run Android 12’s Material You Dynamic Theme for Google Chrome before it rolls out.

  • Open Chrome flags (chrome://flags).
  • Paste the following URLs into Chrome’s address bar and change the value from Default to Enabled.
    chrome:flags#theme-refactor-android
  • Now, paste the following URLs into Chrome’s address bar and change the value from Default to Enabled (full).
    chrome:flags#dynamic-color-android
  • Now, restart your browser by tapping on the Relaunch button. (If you don’t see any changes, you might have to restart the browser once again.)
  • You will now notice that Chrome’s UI elements follow Material You design style.Enable Material You Theme in Google Chrome

Wrapping Up: Enable Android 12’s ‘Material You’ Dynamic Theme

The feature is still a work in progress as some elements, such as the context menu, don’t yet match the color of your wallpaper. Still, if you want to try, you can Enable Material You Theme in Google Chrome for Android by downloading Chrome Canary’s latest version.

Today we discuss How To Install Google Play Store On HarmonyOS 2.0. Huawei recently released HarmonyOS 2.0 that offers cross-device communication and promises many features for performance and security. HarmonyOS 2.0 has already been rollout to many Huawei devices. But when you flash HarmonyOS 2.0 ROM, you won’t see any Play Store app in it.

As there are no Google Play services and Play store on HarmonyOS, many users are confused about whether they should shift to HarmonyOS or not. You can’t use Play services or Google’s apps, such as Gmail, Google Maps, and YouTube. Also, you won’t be able to install any apps on your device from Play Store officially. However, you can sideload Android apps or even Install Google Playstore on HarmonyOS 2.0 devices easily.

How to Install Google Play Store On HarmonyOS 2.0

The initial version of HarmonyOS 2.0 does not come with Google apps and services. If you are looking for Gapps on your HarmonyOS 2.0 ROM, then you can follow one of the below-mentioned methods.

Method 1: Using OurPlay

OurPlay app perfectly solves all the needs of GMS installation on Huawei devices running on HarmonyOS. If you are upgrading to HarmonyOS, you can easily Install Gapps On HarmonyOS 2.0 by installing a simple app named OurPlay, which contains all Google apps and you can install any app with a single click. OurPlay App works perfectly on HarmonyOS 2.0. Download the OurPlay app from below to install Playstore on HarmonyOS.

  • Download OurPlay app for HarmonyOS and install it on your device.
  • Open the app and tap on the “Green” button and grant the necessary permissions.
  • Once you’re on the OurPlay page, it’ll automatically start downloading Google Play Store app.
  • Now, tap on the Google Play Store app icon within the Ourplay app and sign in to your existing Google account.
  • Done!

Method 2: Using Googleifier

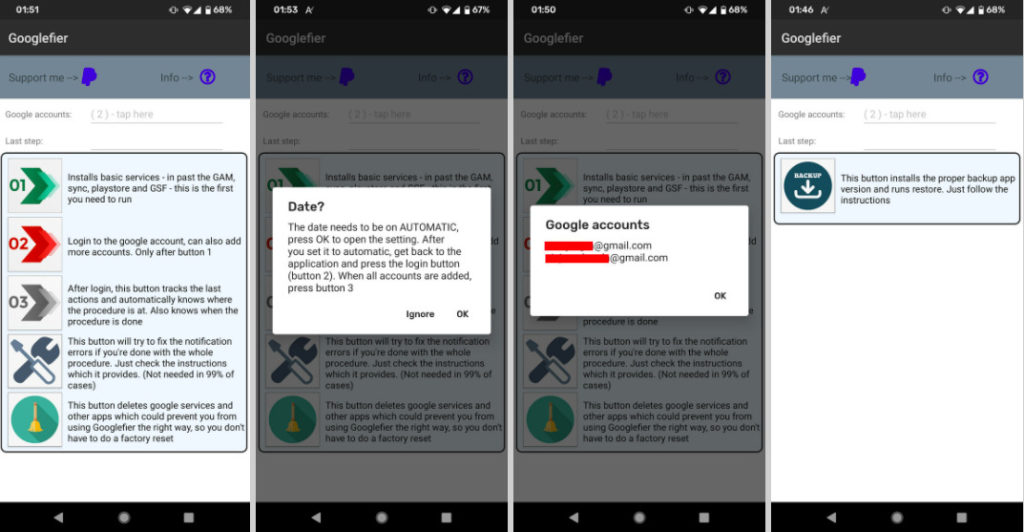
Googlefier lets you easily install Google apps on Huawei devices running on Harmony OS. During the installation process, Googlefier will first replace your existing backup app and restore LZPlay, which is the GMS installation app. Googlefier will install all basic services on your device. The Googlefier app currently supports only Huawei/Honor phones running EMUI 10. It may or may not work on Harmony OS.

  • First, download Googlefier for Harmony OS and install it on your device.
  • After installation, open the app and gives the app all required permissions.
  • Follow the instructions on the screen. The app will then replace the existing backup app and restore LZPlay.
  • Now, sign in to your Google account when asking, and you are good to go.
  • Once you install Google Play Store on Harmony OS, you can uninstall the Googlefier app from your phone.Install Google Play Store on HarmonyOS 2.0

Method 3: Using Google Installer

The quickest way to install Google services on HarmonyOS 2.0 is to Install Google Installer 3.0 on the device. This process doesn’t need root and easily Installs Google Play Store On HarmonyOS 2.0. Download the below file to Install Google Play services On HarmonyOS 2.0.

  1. First, Download Google installer v3.0 apk from above and save it on your device.
  2. Now enable the Unknown Sources. To enable Unknown Sources, go to phone settings –> Additional Setting and enable the Unknown Sources.
  3. Now open the file manager and browse for the GoogleInstaller.apk file.
  4. To install Google Installer on your phone just click on apk and run the file.
  5. Open the Google Installer app after the installation is complete.
  6. Now click on the blue button. This will install all the Google play services on your device.Google Installer 3.0
  7. Done! This will Install Google Play Store and Play Services On HarmonyOS 2.0.
  8. Reboot your device after installing Google Play services.

Wrapping Up: Get Google Play services on HarmonyOS

So this is the complete guide Download Gapps for HarmonyOS 2.0 and how to manually Install Google Play Store On HarmonyOS 2.0 devices. Have any questions? Do let us know that in the comments below. Stay connected with us via Facebook and Twitter to read more such helpful posts.

The latest MIUI 12.0.16.0 update for Redmi 9C starts rolling out via OTA. The update brings the August 2021 security patch. Follow the below guide to Download MIUI 12.0.16.0 Global Stable ROM for Redmi 9C.

MIUI 12.0.16.0 Global Stable ROM for Redmi 9C is a stable version and can be flashed via Recovery or via Fastboot. You can wait for the OTA or download MIUI 12.0.16.0 for Redmi 9C from below.

You can Download Redmi 9C MIUI 12.0.16.0.QCRMIXM ROM from below and also manually check for the update by going to Settings -> About Phone -> System updates -> Check for update. Download MIUI 12.0.16.0 Stable ROM for Redmi 9C from below.

Changelog

– [System]

  • Updated Android Security Patch to August 2021. Increased system security.

Note:-

  • This Firmware file is only for Redmi 9C. Don’t try this on any other device.
  • Follow the steps correctly otherwise you may brick your device. We are not responsible for any damage to your phone.
  • It may erase your data, so it is advisable to take a complete backup of your phone for a safer side.
  • Ensure that your phone has at least 50-60% charged to prevent the accidental shutdown in-between the process.

Download MIUI 12.0.16.0 Global Stable ROM for Redmi 9C

  • MIUI 12.0.16.0 OTA for Redmi 9C – Download
  • MIUI 12.0.16.0 Recovery ROM for Redmi 9C – Download
  • MIUI 12.0.16.0 Fastboot ROM for Redmi 9C – Coming Soon

How to Install MIUI 12.0.16.0 Global Stable ROM on Redmi 9C –

To install MIUI 12.0.16.0 update for Redmi 9C download either Recovery ROM or Fastboot ROM from above and use the below method to install this on your device.

Method 1 – Recovery Mode

Recovery Mode

  1. Download MIUI 12 Recovery ROM for Redmi 9C from above and save it on your device.
  2. Now launch the ‘Updater‘ app on your device.
  3. Click on the three-dot menu (‘…’ icon) at the top-right corner, and select the ‘choose update package‘.
  4. Browse through the files and select the package ending with .zip extension.
  5. Done. Your device will reboot on the latest version.

Method 2 – Fastboot Mode

1) First, Download Mi Flash Tool, extract it and install it on your PC.

2) Now download MIUI 12 Fastboot ROM for Redmi 9C for your device.

3) Now boot your device into Fastboot mode by pressing the ‘Volume Down + Power‘ button.

4) Connect your device to the PC via a micro USB cable.

5) Now extract the Fastboot ROM and copy its path on the PC.

6) Now open MI Flash Tool and Paste the address bar of the ROM file folder path copied from above.

Mi Flash

7) First, click on the ‘Refresh‘ button (It will automatically recognize your device) and then click on the ‘Flash‘ button to flash MIUI 12 ROM on your Devices.

Mi Flash

8) Wait for some time to complete the process.

9) Done. Your device will boot on the latest version.

Wrapping Up:

Download MIUI 12.0.16.0 Global Stable ROM for Redmi 9C and flash it to update it manually. Comment below if you have any doubts.

The latest Android 11 based MIUI 12.5.2.0 update for Mi 9T Pro starts rolling out via OTA. The update brings July 2021 security patch. Follow the below guide to Download MIUI 12.5.2.0 Global Stable ROM for Mi 9T Pro.

MIUI 12.5.2.0 Global Stable ROM for Mi 9T Pro is a stable version and can be flashed via Recovery or via Fastboot. You can wait for the OTA or download MIUI 12.5.2.0 for Mi 9T Pro from below.

You can Download Mi 9T Pro MIUI 12.5.2.0.RFKMIMX ROM from below and also manually check for the update by going to Settings -> About Phone -> System updates -> Check for update. Download MIUI 12.5.2.0 ROM for Mi 9T Pro from below.

Changelog:

[System]

  • Optimization: Updated Android Security Patch to July 2021. Increased system security.

Note:-

  • This Firmware file is only for Mi 9T Pro. Don’t try this on any other device.
  • Follow the steps correctly otherwise you may brick your device. We are not responsible for any damage to your phone.
  • It may erase your data, so it is advisable to take a complete backup of your phone for a safer side.
  • Ensure that your phone has at least 50-60% charged to prevent the accidental shutdown in-between the process.

Download MIUI 12.5.2.0 Global Stable ROM for Mi 9T Pro

  • MIUI 12.5.2.0 Recovery ROM for Mi 9T Pro – Download
  • MIUI 12.5.2.0 Fastboot ROM for Mi 9T Pro – Download

How to Install MIUI 12.5.2.0 Global Stable ROM on Mi 9T Pro –

To install MIUI 12.5.2.0 update for Mi 9T Pro download either Recovery ROM or Fastboot ROM from above and use the below method to install this on your device.

Method 1 – Recovery Mode

Recovery Mode

  1. Download MIUI 12.5 ROM for Mi 9T Pro from above and save it on your device.
  2. Now launch the ‘Updater‘ app on your device.
  3. Click on the three-dot menu (‘…’ icon) at the top-right corner, and select the ‘choose update package‘.
  4. Browse through the files and select the package ending with .zip extension.
  5. Done. Your device will reboot on the latest version.

Method 2 – Fastboot Mode

1) First, Download Mi Flash Tool, extract it and install it on your PC.

2) Now download MIUI 12.5 ROM for Mi 9T Pro for your device.

3) Now boot your device into Fastboot mode by pressing the ‘Volume Down + Power‘ button.

4) Connect your device to the PC via a micro USB cable.

5) Now extract the Fastboot ROM and copy its path on the PC.

6) Now open MI Flash Tool and Paste the address bar of the ROM file folder path copied from above.

Mi Flash

7) First, click on the ‘Refresh‘ button (It will automatically recognize your device) and then click on the ‘Flash‘ button to flash MIUI 12 ROM on your Devices.

Mi Flash

8) Wait for some time to complete the process.

9) Done. Your device will boot on the latest version.

Wrapping Up:

Download MIUI 12.5.2.0 Global Stable ROM for Mi 9T Pro and flash it to update it manually. Comment below if you have any doubts.

Have any questions? Do let us know that in the comments below. Stay connected with us via Facebook and Twitter to read more such helpful posts.