Author

Sumit Bahl

Browsing

The latest security patch update for Mi A2 Lite starts rolling out via OTA. The update increased system stability and reduced system lag. Follow the below guide to Download Mi A2 Lite Global Stable V11.0.21.0 ROM.

The update is a stable version and can be flashed via Recovery or via Fastboot. You can wait for the OTA or download Mi A2 Lite v11.0.21.0 from below to update it manually.

You can Download Mi A2 Lite 11.0.21.0.QDLMIXM ROM from below and also manually check for the update by going to Settings -> About Phone -> System updates -> Check for update. Download Mi A2 Lite Global Stable V11.0.21.0 ROM from below.

Note:-

  • This Firmware file is only for Mi A2 Lite. Don’t try this on any other device.
  • Follow the steps correctly otherwise you may brick your device. We are not responsible for any damage to your phone.
  • It may erase your data, so it is advisable to take a complete backup of your phone for a safer side.
  • Ensure that your phone has at least 50-60% charged to prevent the accidental shutdown in-between the process.

Download Mi A2 Lite Global Stable V11.0.21.0 ROM

  • Download Mi A2 Lite V11.0.21.0 OTA ROM – Download
  • Download Mi A2 Lite V11.0.21.0 Recovery ROM – Download
  • Download Mi A2 Lite V11.0.21.0 Fastboot ROM – Download

How to Install Mi A2 Lite Global Stable V11.0.21.0 ROM –

To install the latest update on Mi A2 Lite download either Recovery ROM or Fastboot ROM from above and use the below method to install this on your device.

Method 1 – Recovery Mode

Recovery Mode

  1. Download recovery ROM from above and save it on your device.
  2. Now launch the ‘Updater‘ app on your device.
  3. Click on the three-dot menu (‘…’ icon) at the top-right corner, and select the ‘choose update package‘.
  4. Browse through the files and select the package ending with .zip extension.
  5. Done. Your device will reboot on the latest version.

Method 2 – Fastboot Mode

1) First, Download Mi Flash Tool, extract it, and install it on your PC.

2) Now download Fastboot ROM for your device.

3) Now boot your device into Fastboot mode by pressing the ‘Volume Down + Power‘ button.

4) Connect your device to the PC via a micro USB cable.

5) Now extract the Fastboot ROM and copy its path on the PC.

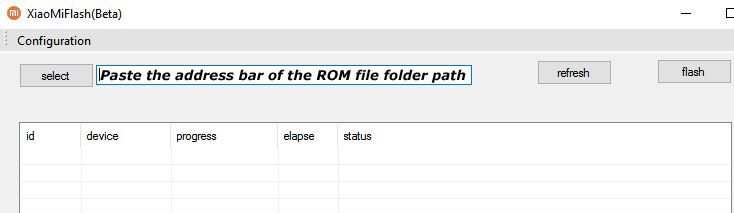
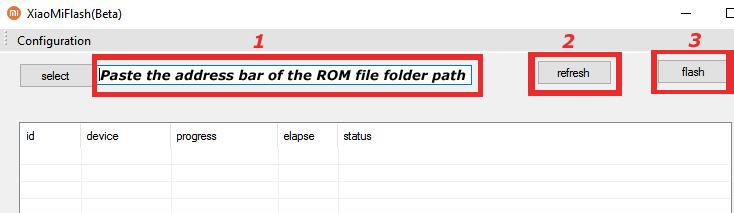
6) Now open MI Flash Tool and Paste the address bar of the ROM file folder path copied from above.

Mi Flash

7) First, click on the ‘Refresh‘ button (It will automatically recognize your device) and then click on the ‘Flash‘ button to flash the ROM on your Devices.

Mi Flash

8) Wait for some time to complete the process.

9) Done. Your device will boot on the latest version.

Wrapping Up:

Download Mi A2 Lite Global Stable V11.0.21.0 ROM and flash it to update it manually. Comment below if you have any doubts. Stay connected with us via Facebook and Twitter to read more such helpful posts.

Video editing is getting extremely popular, and almost everyone wants to learn how to do it. People record videos for fun or work and then share them on social media. Even budget smartphones can shoot fantastic videos, but when it comes to editing, they fall short. To make the video more impressive, you’ll need powerful video editing software. Here, we have compiled a list of the Best Video Editing Apps for Android.

A good Android video editing app is often faster, more efficient, and more intuitive than desktop software, they make it easy to do video editing tasks wherever you are. There are tonnes of apps on the Play Store that edit videos that are social media-ready. And, in this article, we’ll look at some of the best free Android video editing apps.

7 Best Video Editing Apps for Android

We have identified the best video editing apps for Android that can edit your clips to perfection. Most of these apps offer a good set of features like merging clips, text overlays, multi-track music, visual effects, stickers, photo filters, transitions, and sound effects. Check out Best Video Editor Apps for Android from below.

1) KineMaster

KineMaster

It’s one of the most powerful Android video editing apps available on the Playstore. Its drag-and-drop feature makes it simple to import a variety of media assets. KineMaster provides an incredible level of editing and flexibility for quickly creating outstanding videos. You can use various transitions or insert text blocks or subtitles between video parts.

KineMaster is completely free to use, however upgrading to KineMaster Premium unlocks even more capabilities. KineMaster’s paid subscription removes the watermark and provides an ad-free experience. Here are some of the features of Kinemaster.

Features:

  • Import and export project files, download and re-edit projects from the Get Projects menu (NEW).
  • Create amazing visual effects by reversing, speeding up, adding slow-mo, and applying blending modes. 
  • Combine and edit videos, images, stickers, special effects, text, and more and add music, voiceovers, sound effects, and voice changers.
  • Use color filters and color adjustments to make your video stand out. It contains color adjustment tools to correct and enhance videos and images. 
  • Save your videos in 4K 2160p at 30FPS.
  • More than 2,500 downloadable transitions, effects, videos & images, stickers, fonts, and animations from the KineMaster Asset Store

Download KineMaster App

2) Filmora Go Video Editor

Filmora

Filmora is a full-featured video editor with powerful tools that is simple to use. Making memes, producing a video with images, pictures, music, stickers, and sound effects, and editing video for YouTube, Instagram, Tik Tok, Facebook, Messenger, Whatsapp, Twitter, and other platforms is simple and enjoyable with this video editor.

You may perform all basic tasks such as trimming and cutting, rendering, and so on. It also has the ability to play backward, create square (1:1) videos for Instagram, and 16:9 videos for YouTube. To improve the appearance of your video, you can trim it, add text and emojis, effects, transitions, and even animations.

To enhance the overall look of your videos, there are filters, presets, and themes to select from. A watermark is also included in Filmora Go, which may be removed by purchasing the paid version.

Features: 

  • Extensive collection of templates and effects and offer over 1000 music.
  • Photos and videos can be imported on YouTube, Facebook Feed and Stories, Instagram Feed, Stories, and more.
  • Clips can be previewed in real-time.
  • Crop video and Export it in HD quality.
  • Supports videos of any aspect ratio, 1:1 for an Instagram story, 16:9 for you YouTube video, 9:16 for Tik Tok video, 5:4 and 4:5 as well
  • You can adjust the direction, speed, and orientation of the layer as it moves from point to point. Using keyframes to make your videos more interesting and outstanding.

Download Filmora Go Video Editor Android App

3) Magisto

Magisto

It’s a straightforward video editing tool for Android that can convert your video clips into music videos in three easy steps. Choose your photos and movies, then add music and a title to your project. This tool is ideal for people who don’t want to devote a lot of time to video editing but still want a cool look.

It finds the best sections of your video using powerful Artificial Intelligence technology. It applies video editing techniques including object detection, stabilization, filters, and effects. The result is a visually appealing video that outperforms the usual slideshow or video collage.

Features: 

  • Create beautiful moving photo slideshows or video collages even if you don’t have any video clips.
  •  Customize your video by adding text, choosing fonts, changing orientation, and using different colors.
  •  Add some fun to your videos with hundreds of colorful stickers at your disposal.
  • Quickly create professional-looking videos thanks to Magisto’s AI-driven smart editor. It will edit your media intelligently and add beautiful graphics, effects, filters, and music in a way that tells a story.
  • Easily share your scroll-stopping videos on social media, via messaging apps, email, or anywhere else.

Download Magisto App

4) PowerDirector

PowerDirector

PowerDirector is hands down the most feature-rich video editing tool for Android, as well as having the most professional effects and transitions. You have complete control over what you create and how you edit it.

In addition, you may download additional effects, animated texts, stock movies, pictures, and many more in your own PowerDirector store. The user interface of the app has clean and  It contains all essential tools for video editing, including filters, effects, harvests, transitions, PIP, etc.

The free version includes most of the functions, however upgrading to the premium version removes watermarks and adverts, as well as allowing users to download videos in 1080 and 4K quality.

Features: 

  •  Edit and export videos in up to 4K resolution. 
  •  Produce eye-catching intros with animated titles.
  • Fix shaky cam footage with video stabilizer, it produces fast forward or slow-motion videos with speed adjustment.
  •  Experiment with quirky audio effects in voice changer replaces the background with green screen editor by using chroma-key.
  • Create spectacular double exposure effects from video overlays and blending modes.

Download PowerDirector App

5) Quik

Quik is the official GoPro app that can be used for editing videos on Android. It will automatically edit the videos in your library, detect the most exciting moments, and add background music. Later, you can crop your videos, apply effects, add text, and sync everything to the beat of any music instantly.

This app is free, but you can upgrade to obtain more themes and effects, as well as the ability to automatically upload photographs and videos to the cloud, with in-app purchases.

Features:

  • Add photos and videos from anywhere
  • You can Play with color and light, trim video length, reverse video, add slow-motion effects, add stickers, and more to take your video to the next level.
  • Take ultimate control of video speed—super slow motion video, fast or freeze—at multiple segments in a clip.
  • Beat-sync your edits automatically with royalty-free music tracks.
  • Premium Themes

https://play.google.com/store/apps/details?id=com.gopro.smarty

6) Inshot 

InShot is one of the best options if you’re looking for a video editor for Android that doesn’t leave a watermark. It features a simple interface, and the ads do not interfere with your work. You must watch an ad to remove the watermark from your video.

If you’re looking for a video editing app for social media, Inshot is a great option. It’s primarily intended for creating social media clips, and it’s one of the greatest video editing tools for the job. It features pre-built canvas sizes for a variety of platforms, like IGTV and TikTok, for example.

Features:

  • It has features like a Video cutter, a Video splitter, Video merger, and slideshow maker.
  • Crop video to remove watermark or any unwanted part.
  • Add InShot featured music, India dream music or use your own beat songs. You can also upload extract music you like from other videos.
  • Add movie-style video filters and cool effects such as Glitch, Stop Motion, Old TV, RGB, etc.
  • Adjust video speed with video filters and video effects. Fast/Slow motion full-screen movie maker app.
  •  Unique filters & colorful backgrounds, blur background and 1000+ stickers, add funny memes to your photos.

Download InShot Android App

7) Movavi Clips

Movavi Clips

Movavi Clips is a simple app that makes editing videos on your phone a breeze. This app includes all of the tools you’ll need to create a video for any reason, whether professional or personal. There are aspect ratio layouts that match square videos (1:1) and stories (9:16), as well as 4:5 and 16:9 frames, making it ideal for Instagram videos.

It features a variety of editing capabilities, such as cropping and rotating, as well as unique color filters, transitions, and themed stickers to add to your videos. You can use music from the free built-in library and photos from your albums to create a stunning slideshow.

Features:

  • All basic editing tools including crop, merge videos, color filters, transitions, multiple effects, Split and combine videos, and more.
  • Overlay music from your device library or use the built-in collection
  • Preview the result in the built-in player of the video maker
  • Add your own logo to make your videos truly exclusive
  • Save and share the movie

Download Movavi Clips App

Wrapping Up: Android Video Editing Apps

There’s a video editor for Android that can do it all, whether you’re recording family videos, editing them for social media, or doing touch-ups to a video you’re intending to put on the web for work. These Android video editing apps are easy to use and come with a variety of useful functions.

The latest OxygenOS 11.1.4.4 for OnePlus Nord starts rolling out. The new OxygenOS 11.1.4.4 update for OnePlus Nord brings several bug fixes and improvements along with the latest June 2021 security patches and a ton of bug fixes and improvements. Download OxygenOS 11.1.4.4 for OnePlus Nord from below.

The OxygenOS 11.1.4.4 for OnePlus Nord is rolling out via OTA (over-the-air) in a phase-wise manner and many users already getting the update. You can wait for the OTA updates, or you can Update OnePlus Nord to OxygenOS 11.1.4.4 manually with the below method.

The new OxygenOS 11.1.4.4 update for the OnePlus Nord brings many changes (Check the complete changelogs from below). We provide you the OxygenOS 11.1.4.4 OTA file which you can flash on your device. So if you want to update your OnePlus to the latest version then Download OxygenOS 11.1.4.4 for the OnePlus Nord from below. Check below what’s new in OxygenOS 11.1.4.4.

OxygenOS 11.1.4.4 Features and Changelogs –

  • System
    • Extended battery life
    • Reduced power consumption in specific scenarios
    • Fixed the issue of delayed notifications
    • Fixed the overheating issue in certain scenarios
    • Updated Android security patch to 2021.06

Note:-

  • This method is only for the OnePlus Nord.
  • Full ROM can be flashed via TWRP as well.
  • Follow the steps correctly otherwise, you may brick your device. We Guidegeekz.com is not responsible for any damage to your phone.
  • Charge your device to 60- 70% to prevent it from accidental shutdown.
  • Take a complete backup of everything important.

Download OxygenOS 11.1.4.4 for OnePlus Nord

  • OxygenOS 11.1.4.4 OTA update for OnePlus Nord – GlobalEUIndia
  • OxygenOS 11.1.4.4 Full ROM for OnePlus Nord – GlobalEUIndia

How to Install OxygenOS 11.1.4.4 Update on OnePlus Nord

For Non-Rooted Users

Method 1

  1. First, enable the USB debugging option from the setting ->developer option. To enable Developer Options, go to About phone and tap the Build Number 7 times.
  2. Download ADB and Fastboot and install them on your PC.
  3. Download OxygenOS 11.1.4.4 OTA from above Copy ROM to a folder where adb installed.
  4. Now Turn Off your phone and boot into the recovery mode.
  5. Choose Apply update from ADB
  6. Now Connect your phone to your Laptop/PC
  7. On ROM folder press shift+right click and click on the open command here.
  8. Now check your connection status by typing the below command
    adb devices
    if your device is listed, you’re ready to flash the ROM
  9. Now Install OxygenOS 11.1.4.4 OTA on the OnePlus Nord by typing the below command
    adb sideload File-Name.zip 
  10. Now, wait until the process completes, and then Reboot the phone.
  11. Done!

Method 2

  1. Download OxygenOS 11.1.4.4 OTA zip file from above and save it on your internal phone memory.
  2. Now Switch off your device and boot into the Recovery mode.
  3. To boot the OnePlus Nord into recovery mode press and hold ‘Power + Volume Down’ button.
  4. Now your phone boot into the Stock recovery.
  5. Now Select ‘Apply Update’ and select ‘Choose from Internal Storage
  6. Browse the OTA zip file which you download and save on your phone before.
  7. Select the zip file, and it will Install OxygenOS 11.1.4.4 OTA update file on your device.
  8. Now wait until the process complete and then reboot your device.
  9. Done.

For Rooted Users

  1. First Unlock your device bootloader and Install TWRP on your Device. Skip this step if already installed TWRP.
  2. Reboot your device into Recovery mode and create a Nandroid backup (Recommended) of your device for the safer side, if anything goes wrong.
  3. Now wipe your cache files from Goto Wipe>Advanced Wipe>Select Wipe cache and Dalvik cache and swipe to confirm it.
  4. Now, Go to Install and locate the OOS 11.1.4.4 Full Rom Zip & swipe to Install the ROM file
  5. Now Flash the Magisk again to maintain the root (Optional).
  6. Wipe Dalvik & Cache again.
  7. Done! Reboot System and Enjoy.

Wrapping Up:

That’s all this is the complete guide to Download OxygenOS 11.1.4.4 for OnePlus Nord (OTA + Full ROM). Have any questions? Do let us know that in the comments below. Stay connected with us via Facebook and Twitter to read more such helpful posts.

The latest MIUI 12.0.15.0 update for Redmi 9C starts rolling out via OTA. The update is based on Android 10 and brings a few improvements and June 2021 security patch. Follow the below guide to Download MIUI 12.0.15.0 Global Stable ROM for Redmi 9C.

MIUI 12.0.15.0 Global Stable ROM for Redmi 9C is a stable version and can be flashed via Recovery or via Fastboot. You can wait for the OTA or download MIUI 12.0.15.0 for Redmi 9C from below.

You can Download Redmi 9C MIUI 12.0.15.0.QCRMIXM ROM from below and also manually check for the update by going to Settings -> About Phone -> System updates -> Check for update. Download MIUI 12.0.15.0 Stable ROM for Redmi 9C from below.

Changelog

– [System]

  • Updated Android Security Patch to June 2021. Increased system security.

Note:-

  • This Firmware file is only for Redmi 9C. Don’t try this on any other device.
  • Follow the steps correctly otherwise you may brick your device. We are not responsible for any damage to your phone.
  • It may erase your data, so it is advisable to take a complete backup of your phone for a safer side.
  • Ensure that your phone has at least 50-60% charged to prevent the accidental shutdown in-between the process.

Download MIUI 12.0.15.0 Global Stable ROM for Redmi 9C

  • MIUI 12.0.15.0 OTA for Redmi 9C – Download
  • MIUI 12.0.15.0 Recovery ROM for Redmi 9C – Download
  • MIUI 12.0.15.0 Fastboot ROM for Redmi 9C – Coming Soon

How to Install MIUI 12.0.15.0 Global Stable ROM on Redmi 9C –

To install MIUI 12.0.15.0 update for Redmi 9C download either Recovery ROM or Fastboot ROM from above and use the below method to install this on your device.

Method 1 – Recovery Mode

Recovery Mode

  1. Download MIUI 12 Recovery ROM for Redmi 9C from above and save it on your device.
  2. Now launch the ‘Updater‘ app on your device.
  3. Click on the three-dot menu (‘…’ icon) at the top-right corner, and select the ‘choose update package‘.
  4. Browse through the files and select the package ending with .zip extension.
  5. Done. Your device will reboot on the latest version.

Method 2 – Fastboot Mode

1) First, Download Mi Flash Tool, extract it and install it on your PC.

2) Now download MIUI 12 Fastboot ROM for Redmi 9C for your device.

3) Now boot your device into Fastboot mode by pressing the ‘Volume Down + Power‘ button.

4) Connect your device to the PC via a micro USB cable.

5) Now extract the Fastboot ROM and copy its path on the PC.

6) Now open MI Flash Tool and Paste the address bar of the ROM file folder path copied from above.

Mi Flash

7) First, click on the ‘Refresh‘ button (It will automatically recognize your device) and then click on the ‘Flash‘ button to flash MIUI 12 ROM on your Devices.

Mi Flash

8) Wait for some time to complete the process.

9) Done. Your device will boot on the latest version.

Wrapping Up:

Download MIUI 12.0.15.0 Global Stable ROM for Redmi 9C and flash it to update it manually. Comment below if you have any doubts.

Good news for Motorola users, the much-awaited Android 11 update for Moto G9, G9 Power, and G9 Play starts rolling out. The update brings Android 11 to the device along with new media controls, new privacy, Android security features, performance enhancements, and more. You can Download Android 11 Update for Moto G9, G9 Power, and G9 Play from below.

The new Moto G9, G9 Power, and G9 Play Android 11 update has the software version RPX31.Q2-58-16 and rolling out in a phase-wise manner and weighs around 1.2GB. If you don’t want to wait, you could just go to Settings and manually check or follow the below guide or Download Motorola G9 Android 11 OTA zip file from below to update it manually.

You can manually check Android 11 OTA Update for Moto G9, G9 Power, and G9 Play by going to the phone Settings -> System -> Software Update. You can manually update Moto G9, G9 Play, and G9 Power to Android 11 by downloading the OTA file from below.

Download Android 11 Update for Moto G9, G9 Power, and G9 Play

Before You Begin

  • This method is device-specific. Don’t try this on any other device.
  • Follow the steps correctly otherwise, you may brick your device. We Guidegeekz.com is not responsible for any damage to your phone.
  • Charge your device to 60- 70% to prevent it from accidental shutdown.
  • Take a complete backup of everything important.

Download Android 11 Update for Moto G9, G9 Power, and G9 Play

  • Moto G9 Android 11 OTA Zip – Available Soon
  • Moto G9 Play Android 11 Firmware Zip (Version: RPX31.Q2-58-16)
      • For India Retail (Model No – XT2083-3) – Download
      • For India Retail (Model No – XT2083-7) – Download
      • For Retail Asia (Model No – XT2083-5) – Download
  • Moto G9 Power Android 11 Firmware Zip (Version: RZC31.Q2-57-12)
      • For Retail UK (Model No – XT2091-3) – Download

How to Install Android 11 Update on Moto G9, G9 Power, and G9 Play –

Method 1 for OTA Update–

1) Download Moto G9 Play Android 11 OTA Zip from above and save it to internal memory.

2) Reboot Motorola G9 to Recovery mode by using the command adb reboot bootloader or by using the below steps.

  • Turn Off your device
  • Press and hold ‘Vol Up+Vol Down+Power’ button
  • You will see no command with dead Android
  • Now press Volume Up + power to enter into recovery mode.

3) In recovery mode select Apply update from SD Card.

4) Choose the zip file and wait.

5) Done! Reboot your phone after the process complete.

Method 2 – Install Android 11 Factory Image on Motorola G series

  1. First, enable the USB debugging option from setting ->developer option. To enable Developer Options, go to About phone and tap the Build Number 7 times.
  2. Download ADB and Fastboot and install it on your PC.
  3. Now Download the correct firmware for your device from above and extract it to the ADB installation directory.
  4.  Now go to adb and fastboot installation directory and open the command window there by pressing and hold the ‘shift’ key and right-click anywhere in that folder.
  5. Now Reboot your phone into Bootloader mode by turn it off and press and hold ‘Power + Volume Down‘.
  6. Now issue the below commands one by one. (If you are using mfastboot then type ‘mfastboot‘ instead of ‘fastboot‘)
    fastboot getvar max-sparse-size
    fastboot oem fb_mode_set
    fastboot flash partition gpt.bin
    fastboot flash bootloader bootloader.img
    fastboot flash vbmeta vbmeta.img
    fastboot flash radio radio.img
    fastboot flash bluetooth BTFM.bin
    fastboot flash dsp dspso.bin
    fastboot flash logo logo.bin
    fastboot reboot fastboot
    fastboot flash boot boot.img
    fastboot flash dtbo dtbo.img
    fastboot flash recovery recovery.img
    fastboot flash super super.img_sparsechunk.0
    fastboot flash super super.img_sparsechunk.1
    fastboot flash super super.img_sparsechunk.2
    fastboot flash super super.img_sparsechunk.3
    fastboot flash super super.img_sparsechunk.4
    fastboot flash super super.img_sparsechunk.5
    fastboot flash super super.img_sparsechunk.6
    fastboot flash super super.img_sparsechunk.7
    fastboot flash super super.img_sparsechunk.8
    fastboot flash super super.img_sparsechunk.9
    fastboot flash super super.img_sparsechunk.10
    fastboot flash super super.img_sparsechunk.11
    fastboot flash super super.img_sparsechunk.12
    fastboot flash super super.img_sparsechunk.13
    fastboot flash super super.img_sparsechunk.14
    fastboot flash super super.img_sparsechunk.15
    fastboot reboot bootloader
    fastboot erase carrier
    fastboot erase ddr
    fastboot oem fb_mode_clear
    fastboot reboot

    7) Done! Above steps will flash Stock Android 11 Firmware of Moto G9 series.

Wrapping Up:

Moto G9 series Android 11 will be available to all users via OTA but if you’re the impatient type then you could follow the above procedure to Download Android 11 Update for Moto G9, G9 Power, and G9 Play and flash it manually. If you have any questions related to this post, feel free to leave that in the comment section.

Source

The latest MIUI 12.0.11.0 update for Redmi 9 starts rolling out via OTA. The update brings the latest June 2021 security patch to the device. Follow the below guide to Download MIUI 12.0.11.0 India Stable ROM for Redmi 9.

MIUI 12.0.11.0 India Stable ROM for Redmi 9 is a stable version and can be flashed via Recovery or via Fastboot. You can download MIUI 12.0.11.0 for Redmi 9 from below.

You can Download Redmi 9 MIUI 12.0.11.0.QCTINXM ROM from below and also manually check for the update by going to Settings -> About Phone -> System updates -> Check for update. Download MIUI 12.0.11.0 Stable ROM for Redmi 9 from below.

Changelog

– [System]

  • Updated Android Security Patch to June 2021. Increased system security.

Note:-

  • This Firmware file is only for Redmi 9. Don’t try this on any other device.
  • Follow the steps correctly otherwise you may brick your device. We are not responsible for any damage to your phone.
  • It may erase your data, so it is advisable to take a complete backup of your phone for a safer side.
  • Ensure that your phone has at least 50-60% charged to prevent the accidental shutdown in-between the process.

Download MIUI 12.0.11.0 India Stable ROM for Redmi 9

  • Redmi 9 MIUI 12.0.11.0 OTA update – Download
  • MIUI 12.0.11.0 Recovery ROM for Redmi 9 – Download
  • MIUI 12.0.11.0 Fastboot ROM for Redmi 9 – Coming Soon

How to Install MIUI 12.0.11.0 India Stable ROM on Redmi 9 –

To install MIUI 12.0.11.0 update for Redmi 9 download either Recovery ROM or Fastboot ROM from above and use the below method to install this on your device.

Method 1 – Recovery Mode

Recovery Mode

  1. Download Recovery ROM for Redmi 9 from above and save it on your device.
  2. Now launch the ‘Updater‘ app on your device.
  3. Click on the three-dot menu (‘…’ icon) at the top-right corner, and select the ‘choose update package‘.
  4. Browse through the files and select the package ending with .zip extension.
  5. Done. Your device will reboot on the latest version.

Method 2 – Fastboot Mode

1) First, Download Mi Flash Tool, extract it and install it on your PC.

2) Now download Fastboot ROM for Redmi 9 for your device.

3) Now boot your device into Fastboot mode by pressing the ‘Volume Down + Power‘ button.

4) Connect your device to the PC via a micro USB cable.

5) Now extract the Fastboot ROM and copy its path on the PC.

6) Now open MI Flash Tool and Paste the address bar of the ROM file folder path copied from above.

Mi Flash

7) First, click on the ‘Refresh‘ button (It will automatically recognize your device) and then click on the ‘Flash‘ button to flash MIUI 12 ROM on your Devices.

Mi Flash

8) Wait for some time to complete the process.

9) Done. Your device will boot on the latest version.

Wrapping Up:

Download MIUI 12.0.11.0 India Stable ROM for Redmi 9 and flash it to update it manually. Comment below if you have any doubts.

Google has added a new feature to its Messaging app that deletes OTP messages from your inbox automatically. The new feature that aims to keep user’s inbox free of clutter will automatically delete one-time passwords 24-hours after they’re received. You can enable this feature from the Messages app’s settings to Auto Delete OTP Messages from Your Phone After 24 Hours.

Google also says that the app applies a machine-learning algorithm to filter messages into categories like personal, transactions, OTPs, and offers in order to keep your personal correspondence separate from bank transactions and special offer notifications. The sorting process takes place on the device so it should work offline too.

The feature will be available on Android 8.0 or later. Google Messages app is not the default messaging service on some Android phones. To take advantage of this feature, you must first download the app from the Playstore.

How to Auto Delete OTP Messages from Your Phone After 24 Hours

You can enable this feature to Auto Delete OTP Messages from your Phone from the Messages app’s settings. To use the OTP auto-deletion option, you must also enable the view message by category feature. Here’s the step-by-step guide to Auto Delete OTP Messages from your phone after 24 hours.

  1. First, update the Google Messages to the latest version.
  2. Open the Google Messages app on your phone and tap on the three vertical dots in the search box.
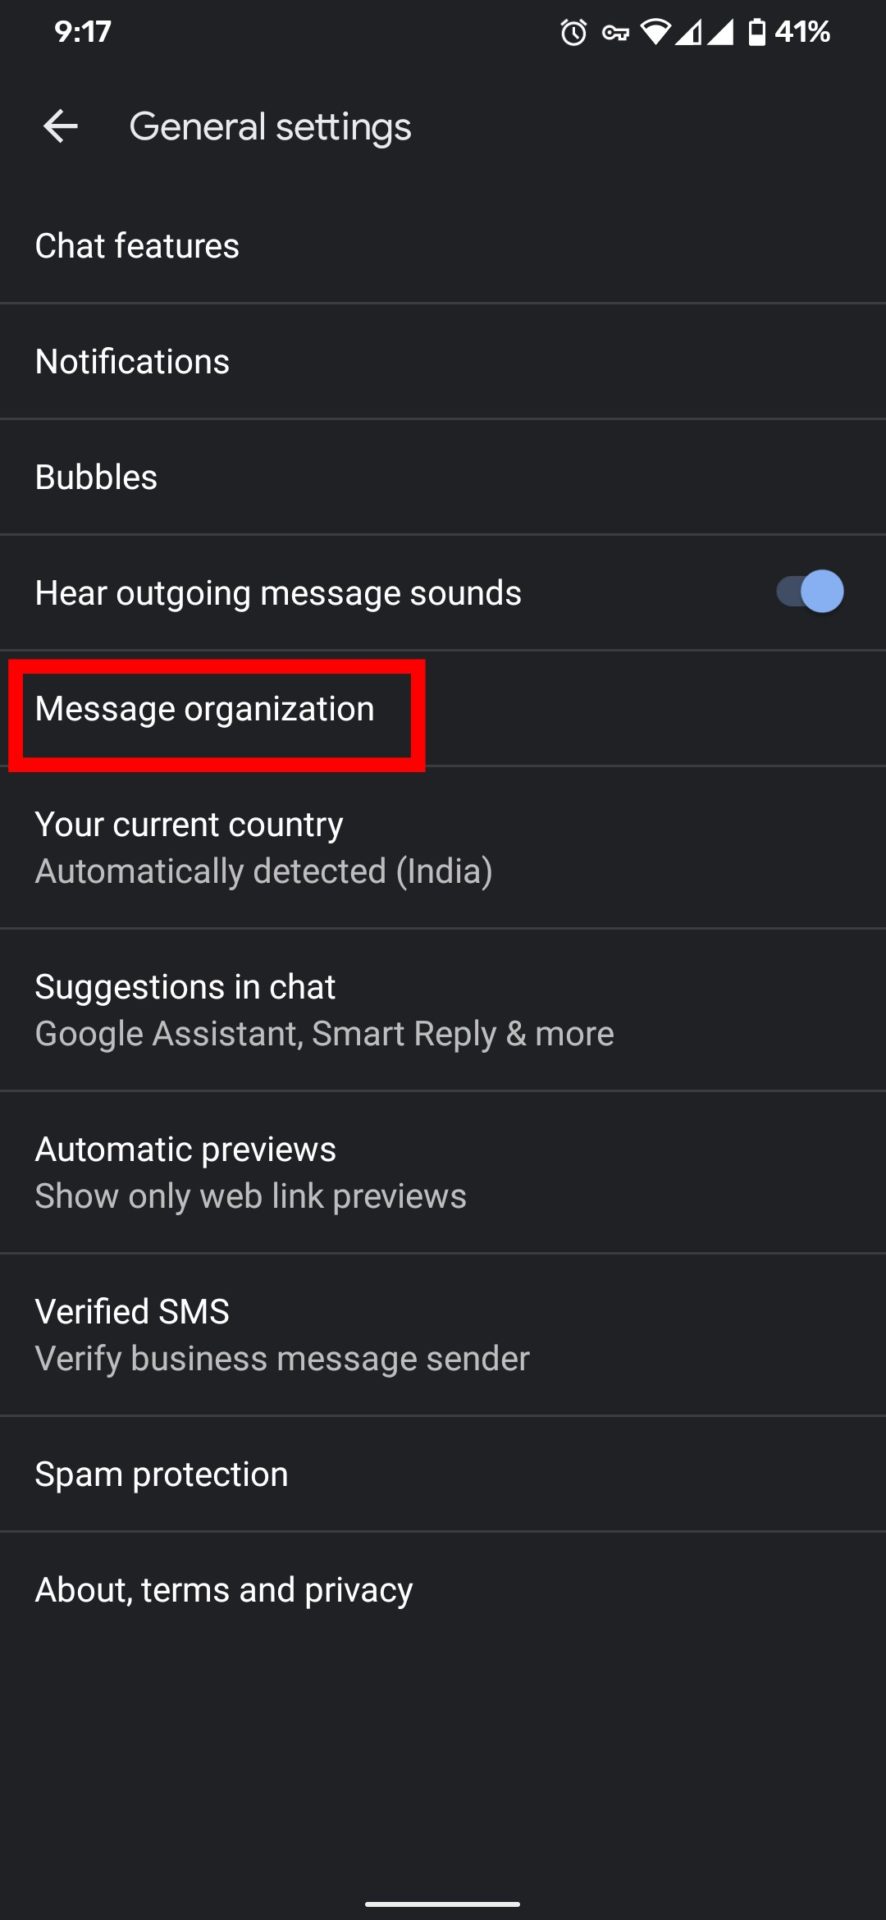
  3. Select Settings from the menu and then tap on “Message Organization”.
  4. On the next page, first, turn on the “View messages by category” option.
  5. After that, you will be able to enable the toggle for the “Auto-delete OTPs after 24 hrs” feature.
  6. Done, this will Auto Delete OTPs From Your Phone After 24hrs.

Wrapping Up: Auto-Delete OTPs on Android Phone

This Auto-delete OTP message feature is quite useful. It would save your time and keeps your inbox clean by automatically deleting all the OTP messages.

Have any questions? Do let us know that in the comments below. Stay connected with us via Facebook and Twitter to read more such helpful posts.

The latest Android 11 based MIUI 12.5.1.0 update for Redmi K20 Pro starts rolling out via OTA. The update is based on Android 11 and brings lots of new features, improvements, and June 2021 Security patches. Follow the below guide to Download MIUI 12.5.1.0 India Stable ROM for Redmi K20 Pro.

MIUI 12.5.1.0 India Stable ROM for Redmi K20 Pro is a stable version and can be flashed via Recovery or via Fastboot. You can download MIUI 12.5.1.0 for Redmi K20 Pro from below.

You can Download Redmi K20 Pro MIUI 12.5.1.0.RKFINXM ROM from below and also manually check for the update by going to Settings -> About Phone -> System updates -> Check for update. Download MIUI 12.5.1.0 Stable ROM for Redmi K20 Pro from below.

Changelogs:

[System]

  • New: Response to gestures is now instant.
  • New: With 20 times more rendering power, there are now few limits to what you can see on your screen.
  • New: With custom device model adjustments, any phone becomes faster after the upgrade.
  • Optimization: MIUI became lighter, faster, and more durable.
  • Updated Android Security Patch to June 2021. Increased system security.
  • Stable MIUI based on Android 11

[Notes]

  • New: Compose mind maps with complex structures.
  • New: New tools for doodling and sketching.
  • New: Press and hold a sketch to adjust the strokes automatically.
  • New: A gesture shortcut now allows you to create notes, tasks, and excerpts anywhere.
  • New: Excerpts save text, URLs, and images to Notes in a few simple taps.
  • New: Dynamic layouts bring the typography in Notes to a new level.
  • All-new Notes.

[Xiaomi Cloud]

  • New: Location info can be now reported automatically before the device is powered off

[Status bar, Notification shade]

  • Fix: Lock screen notification animations froze after the device was unlocked using face data
  • Fix: Notifications flashed in some cases
  • Fix: Floating notifications weren’t displayed correctly in landscape mode
  • Fix: Notification badges weren’t updated for incoming notifications on a locked device

Note:-

  • This Firmware file is only for Redmi K20 Pro. Don’t try this on any other device.
  • Follow the steps correctly otherwise you may brick your device. We are not responsible for any damage to your phone.
  • It may erase your data, so it is advisable to take a complete backup of your phone for a safer side.
  • Ensure that your phone has at least 50-60% charged to prevent the accidental shutdown in-between the process.

Download MIUI 12.5.1.0 India Stable ROM for Redmi K20 Pro

  • MIUI 12.5.1.0 OTA update for Redmi K20 Pro – Download
  • MIUI 12.5.1.0 Recovery ROM for Redmi K20 Pro – Download (Mi Pilot Only)
  • MIUI 12.5.1.0 Fastboot ROM for Redmi K20 Pro – Coming Soon

How to Install MIUI 12.5.1.0 India Stable ROM on Redmi K20 Pro –

To install MIUI 12.5.1.0 update for Redmi K20 Pro download either Recovery ROM or Fastboot ROM from above and use the below method to install this on your device.

Method 1 – Recovery Mode

Recovery Mode

  1. Download MIUI 12.5 ROM for Redmi K20 Pro from above and save it on your device.
  2. Now launch the ‘Updater‘ app on your device.
  3. Click on the three-dot menu (‘…’ icon) at the top-right corner, and select the ‘choose update package‘.
  4. Browse through the files and select the package ending with .zip extension.
  5. Done. Your device will reboot on the latest version.

Method 2 – Fastboot Mode

1) First, Download Mi Flash Tool, extract it and install it on your PC.

2) Now download Fastboot ROM for Redmi K20 Pro for your device.

3) Now boot your device into Fastboot mode by pressing the ‘Volume Down + Power‘ button.

4) Connect your device to the PC via a micro USB cable.

5) Now extract the Fastboot ROM and copy its path on the PC.

6) Now open MI Flash Tool and Paste the address bar of the ROM file folder path copied from above.

Mi Flash

7) First, click on the ‘Refresh‘ button (It will automatically recognize your device) and then click on the ‘Flash‘ button to flash MIUI 12 ROM on your Devices.

Mi Flash

8) Wait for some time to complete the process.

9) Done. Your device will boot on the latest version.

Wrapping Up:

Download MIUI 12.5.1.0 India Stable ROM for Redmi K20 Pro and flash it to update it manually. Comment below if you have any doubts.

The latest Android 11 based open beta update for the OnePlus 6/6T starts rolling out. The new Open beta 1 update for the OnePlus 6/6T updates the system to OxygenOS 11 version and brings a host of new features such as a new UI visual design, updated camera UI, weather widget, and gaming tools box in Game Space, among others. Download OxygenOS Android 11 Open Beta 1 for OnePlus 6/6T from below.

The OxygenOS Android 11 Open Beta 1 for OnePlus 6/6T is rolling out via OTA only for users who are still on OBT builds. You can Update Oneplus 6/6T to Android 11 manually with the below method.

The new Android 11 update for OnePlus 6/6T brings many changes (Check the complete changelogs from below). We provide you the Open Beta 1 OTA file which you can flash on your device. So if you want to update your OnePlus to the latest version then Download OxygenOS Android 11 Open Beta 1 for OnePlus 6/6T from below.

Changelogs –

  • System
    • Updated to OxygenOS 11 version
    • Fresh new UI visual design brings you a more comfortable experience with various optimizations of details
    • Since this is a big Android update with multiple new features, the upgrade process might be a little longer, please be more patient.
  • Game Space
    • Newly added gaming tools box for convenient switches of Fnatic mode. You can now choose three ways of notifications: text-only, heads up, and block, just for your immersive gaming experience
    • Newly added quick reply feature in a small window for Instagram, WhatsApp, and Telegram (Enable it by swiping down from upper right/left corners of the screen in gaming mode)
    • Newly added mistouch prevention feature. Enable it, swipe down from the top of the screen, click and the notification bar will pop out
  • Camera
    • Updated the camera UI and optimized some of the function paths to offer a more convenient operation
  • Ambient Display
    • Newly added Insight clock style, a joint creation with Parsons School of Design. It will change according to the phone usage data (To set: Settings > Customization > Clock on ambient display)
    • Newly added Canvas feature that can automatically draw a wireframe picture based on a lock screen photo on your phone(Path: Settings – Customization – Wallpaper – Canvas – Choose photo preview and it can be generated automatically)
  • Dark Mode
    • Added a shortcut for Dark Mode, you can pull down the Quick Settings panel and find it
    • Supported automatically enable by time range (path: Settings – Display – Dark Mode – Turn on automatically – Automatically enable from sunset to sunrise / Custom time range)
  • Shelf
    • Newly shelf interface design, the interface is clearer
    • Added weather widget, animation effect smarter

Note:-

  • This method is only for the OnePlus 6/6T.
  • Full ROM can be flashed via TWRP as well.
  • Follow the steps correctly otherwise, you may brick your device. We Guidegeekz.com is not responsible for any damage to your phone.
  • Charge your device to 60- 70% to prevent it from accidental shutdown.
  • Take a complete backup of everything important.

Download OxygenOS Android 11 Open Beta 1 for OnePlus 6/6T

  • OxygenOS Open beta 1 update for OnePlus 6 – Full ROM
  • OxygenOS Open Beta 1 ROM for OnePlus 6T – Full ROM

How to Install OxygenOS Android 11 Open Beta 1 for OnePlus 6/6T

For Non-Rooted Users

Method 1

  1. First, enable the USB debugging option from the setting ->developer option. To enable Developer Options, go to About phone and tap the Build Number 7 times.
  2. Download ADB and Fastboot and install them on your PC.
  3. Download OxygenOS open beta OTA from above Copy ROM to a folder where adb installed.
  4. Now Turn Off your phone and boot into recovery mode.
  5. Choose Apply update from ADB
  6. Now Connect your phone to your Laptop/PC
  7. On ROM folder press shift+right click and click on the open command here.
  8. Now check your connection status by typing the below command
    adb devices
    if your device is listed, you’re ready to flash the ROM
  9. Now Install OxygenOS open beta 1 OTA on the OnePlus 6 series by typing the below command
    adb sideload File-Name.zip 
  10. Now, wait until the process completes, and then Reboot the phone.
  11. Done!

Method 2

  1. Download OxygenOS open beta 1 OTA zip file from above and save it on your internal phone memory.
  2. Now Switch off your device and boot into the Recovery mode.
  3. To boot the OnePlus 6 into recovery mode press and hold ‘Power + Volume Down’ button.
  4. Now your phone boot into the Stock recovery.
  5. Now Select ‘Apply Update’ and select ‘Choose from Internal Storage
  6. Browse the OTA zip file which you download and save on your phone before.
  7. Select the zip file, and it will Install the OTA update file on your OnePlus 6.
  8. Now wait until the process complete and then reboot your device.
  9. Done.

For Rooted Users

  1. First Unlock your device bootloader and Install TWRP on your Device. Skip this step if already installed TWRP.
  2. Reboot your device into Recovery mode and create a Nandroid backup (Recommended) of your device for the safer side, if anything goes wrong.
  3. Now wipe your cache files from Goto Wipe>Advanced Wipe>Select Wipe cache and Dalvik cache and swipe to confirm it.
  4. Now, Go to Install and locate the Full Rom Zip & swipe to Install the ROM file
  5. Now Flash the Magisk again to maintain the root (Optional).
  6. Wipe Dalvik & Cache again.
  7. Done! Reboot System and Enjoy.

Wrapping Up:

That’s all this is the complete guide to Download OxygenOS Android 11 Open Beta 1 for OnePlus 6/6T. Have any questions? Do let us know that in the comments below. Stay connected with us via Facebook and Twitter to read more such helpful posts.

Source