Author

Sumit Bahl

Browsing

The latest Android 11 update for Redmi 9 starts rolling out via OTA. The update is based on Android 11 and brings new features along with May 2021 security patch. Follow the below guide to Download MIUI 12.0.1.0 Global Stable ROM for Redmi 9.

MIUI 12.0.1.0 Global Stable ROM for Redmi 9 is a stable version and can be flashed via Recovery or via Fastboot. You can wait for the OTA or download MIUI 12.0.1.0 for Redmi 9 from below.

You can Download Redmi 9 NFC MIUI 12.0.1.0.RJCMIXM ROM from below and also manually check for the update by going to Settings -> About Phone -> System updates -> Check for update. Download Android 11 ROM for Redmi 9 from below.

Redmi 9 MIUI 12.0.1.0 Changelog –

[System]

  • Stable MIUI based on Android 11.

Updated Android Security Patch to May 2021. Increased system security.

[Xiaomi Cloud]

  • New: Location info can be now reported automatically before the device is powered off

Note:-

  • This Firmware file is only for Redmi 9. Don’t try this on any other device.
  • Follow the steps correctly otherwise you may brick your device. We are not responsible for any damage to your phone.
  • It may erase your data, so it is advisable to take a complete backup of your phone for a safer side.
  • Ensure that your phone has at least 50-60% charged to prevent the accidental shutdown in between the process.

Download MIUI 12.0.1.0 Global Stable ROM for Redmi 9

  • MIUI 12.0.1.0 OTA for Redmi 9 – Download
  • MIUI 12.0.1.0 Recovery ROM for Redmi 9 – Download (Mi Pilot Only)
  • MIUI 12.0.1.0 Fastboot ROM for Redmi 9 – Download

How to Install MIUI 12.0.1.0 Global Stable ROM on Redmi 9 –

To install MIUI 12.0.1.0 update for Redmi 9 download either Recovery ROM or Fastboot ROM from above and use the below method to install this on your device.

Method 1 – Recovery Mode

Recovery Mode

  1. Download Android 11 ROM for Redmi 9 from above and save it on your device.
  2. Now launch the ‘Updater‘ app on your device.
  3. Click on the three-dot menu (‘…’ icon) at the top-right corner, and select the ‘choose update package‘.
  4. Browse through the files and select the package ending with .zip extension.
  5. Done. Your device will reboot on the latest version.

Method 2 – Fastboot Mode

1) First, Download Mi Flash Tool, extract it and install it on your PC.

2) Now download fastboot ROM for Redmi 9 for your device.

3) Now boot your device into Fastboot mode by pressing the ‘Volume Down + Power‘ button.

4) Connect your device to the PC via a micro USB cable.

5) Now extract the Fastboot ROM and copy its path on the PC.

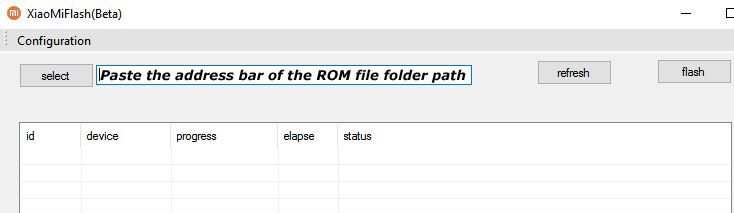
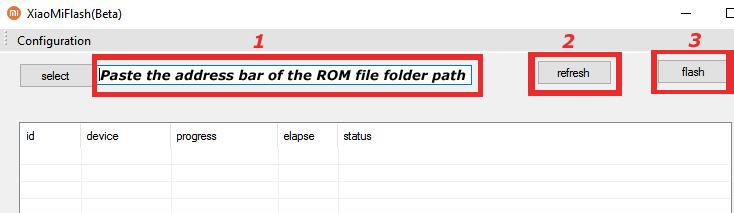
6) Now open MI Flash Tool and Paste the address bar of the ROM file folder path copied from above.

Mi Flash

7) First, click on the ‘Refresh‘ button (It will automatically recognize your device) and then click on the ‘Flash‘ button to flash MIUI 12 ROM on your Devices.

Mi Flash

8) Wait for some time to complete the process.

9) Done. Your device will boot on the latest version.

Wrapping Up:

If you want to update Redmi 9 to Android 11, then you can follow the above process. Download MIUI 12.0.1.0 Global Stable ROM for Redmi 9 and flash it to update it manually. Comment below if you have any doubts.

Have any questions? Do let us know that in the comments below. Stay connected with us via Facebook and Twitter to read more such helpful posts.

Good news for POCO X3 users, Xiaomi released the Android 11 update for POCO X3 users via OTA. The update is rolled out for Indian users that brings Android 11 to the device along with the May security patch. You can Download POCO X3 Android 11 Update from below.

The MIUI 12.0.1.0 India Stable ROM for POCO X3 is a stable Android 11 version and can be flashed via Recovery or via Fastboot. You can wait for the OTA or download MIUI 12.0.1.0 for POCO X3 from below to Update POCO X3 to Android 11 manually.

You can Download POCO X3 MIUI 12.0.1.0.RJGINXM ROM from below and also manually check for the update by going to Settings -> About Phone -> System updates -> Check for update. Download MIUI 12.0.1.0 India Stable ROM for POCO X3 from below.

POCO X3 Android 11 Changelog:

[System]

  • Stable MIUI based on Android 11
  • Updated Android Security Patch to May 2021. Increased system security.
  • [Status bar, Notification shade]
  • GPS toggle renames as “Location”

Note:-

  • This Firmware file is only for POCO X3. Don’t try this on any other device.
  • Follow the steps correctly otherwise you may brick your device. We are not responsible for any damage to your phone.
  • It may erase your data, so it is advisable to take a complete backup of your phone for a safer side.
  • Ensure that your phone has at least 50-60% charged to prevent the accidental shutdown in between the process.

Download POCO X3 Android 11 Update

  • MIUI 12.0.1.0 Recovery ROM for POCO X3 – Download
  • MIUI 12.0.1.0 Fastboot ROM for POCO X3 – Coming Soon

How to Install Android 11 on POCO X3 –

To install Android 11 update for POCO X3 download either Recovery ROM or Fastboot ROM from above and use the below method to install this on your device.

Method 1 – Recovery Mode

Recovery Mode

  1. Download Android 11 ROM for POCO X3 from above and save it on your device.
  2. Now launch the ‘Updater‘ app on your device.
  3. Click on the three-dot menu (‘…’ icon) at the top-right corner, and select the ‘choose update package‘.
  4. Browse through the files and select the package ending with .zip extension.
  5. Done. Your device will reboot on the latest version.

Method 2 – Fastboot Mode

1) First, Download Mi Flash Tool, extract it and install it on your PC.

2) Now download Android 12 update for POCO X3 for your device.

3) Now boot your device into Fastboot mode by pressing the ‘Volume Down + Power‘ button.

4) Connect your device to the PC via a micro USB cable.

5) Now extract the Fastboot ROM and copy its path on the PC.

6) Now open MI Flash Tool and Paste the address bar of the ROM file folder path copied from above.

Mi Flash

7) First, click on the ‘Refresh‘ button (It will automatically recognize your device) and then click on the ‘Flash‘ button to flash MIUI 12 ROM on your Devices.

Mi Flash

8) Wait for some time to complete the process.

9) Done. Your device will boot on the latest version.

Wrapping Up:

If you want to update POCO X3 to Android 11, then you can follow the above process. Download MIUI 12.0.1.0 India Stable ROM for POCO X3 and flash it to update it manually. Comment below if you have any doubts.

Previously, OEMs would bundle all of the stock firmware files into a single zip file that could be easily extracted and flashed manually. The new A/B update mechanism, on the other hand, provided a new format for Android OTA/Firmware update files, which includes a Payload.bin file that contains the individual image files for various firmware partitions. To retrieve the individual device partition/firmware images, you must extract Payload.bin from Android Firmware or OTA.

This might be done on a PC or an Android smartphone with the Payload Dumper Tool. The utility is just a Python script that allows users to extract the Android OTA Payload.bin file from any Windows, macOS, or Linux PC, as well as an Android device. Here are all of the steps to extract payload.bin on Android and retrieve the stock boot image file.

Download Payload Dumper Tool for Android

To extract the contents of the Payload.bin file you need to Download Payload Dumper Tool created by developer Gregory Monitor. The Payload Dumper tool can only be used to extract the Payload.bin file from full OTA packages. It will not work for incremental OTA packages.

Download Payload Dumper Tool

How to Extract Payload.bin from Android Firmware or OTA

You can extract Payload.bin from Android OTA or Firmware from Android devices as well as on PC. We’ll show you how to extract the boot.img, system.img, and other files from a payload.bin file using the Payload Dumper tool on an Android device.

  1. Download the Payload Dumper Tool from the link above, unzip it to the root of your phone’s internal storage, and rename it payload_dumper.
  2. To retrieve the ‘payload.bin’ file, download and extract the Firmware or OTA package on your device.
  3. Copy the extracted ‘payload.bin’ file inside the ‘payload_dumper’ folder that you extracted in 1st step.
  4. Download and install the Termux app on your Android device from Playstore.
  5. Open Termux and enter the below Commands to install Python on an Android device.
    Extract Payload.bin from Android Firmware or OTA
    Image credit thecustomdroid

    pkg install python -y
    pip install --upgrade pip
    pip install protobuf
    apt update && apt upgrade -y

  6. These commands will configure Python, install the necessary ‘Protobuf’ dependencies, upgrade its own native package manager on your Android device as well.
  7. Enter the below command to grant storage permissions to the Termux app.
    termux-setup-storage
  8. Tap Allow when you see the permission “Allow Termux to access photos, media, and files on your device.”
  9. Your device is now ready to use the Payload Dumper Tool.
  10. Enter the below command to change the directory of Termux to the Payload dumper folder.
    cd storage/shared/payload_dumper
  11. Now enter the following command in Termux to extract the Android OTA Payload.bin file on your Android device.
    python extract_android_ota_payload.py payload.bin
  12. Once finished, the extracted firmware images will be placed inside the same ‘payload_dumper’ folder.

Wrapping Up: Extract Android OTA Payload.bin File using Payload Dumper Tool

You can easily Extract Payload.bin from Android Firmware or OTA with the above method. You can now flash these files on your device using various fastboot commands.

Have any questions? Do let us know that in the comments below. Stay connected with us via Facebook and Twitter to read more such helpful posts.

When we go to any government agency or somewhere else, we must have a passport photo on hand. While this is a minor activity, it takes a long time to complete it at the last minute. We can finish this task ahead of time, but the studio guy charges us a lot of money for such a short bit of work. Here we share the Best Passport Photo Apps for Android.

Why don’t you keep some passport photos on hand that you can print yourself? Yes, we’re talking about your smartphone here. In this digital world, everything is so simple for us. Making a passport-size photo on your own has never been easier thanks to technological advancements.

You can create and store your own photo ID and still have a professional-looking outcome. The best passport photo apps for Android allow you to take a shot using your phone’s camera and immediately convert it into a suitable passport photo. You may even generate a professional-looking photo by removing the background from an existing photograph. Check out the best apps to take passport size photos on Android from below.

Best Passport Photo Apps for Android

Today, we’re going to talk about some Android apps that will allow you to make a passport-size photo from mobile by yourself. If you are concerned about the fact that you may not get the appropriate format or size, the apps are easy to use. Depending on national standards you can choose the appropriate VISA or passport size and type. Check out the passport size photo maker app from below.

1. Passport Size Photo Maker

Passport Size Photo Maker

The Passport Size Photo Maker is one of the best apps to create passport size photos on Android phones. You may make ID and passport photographs from any existing photo or a photo capture with your phone. Don’t worry if you only have a group photo, cropping, changing the background, and enhancing the photographs are all simple tasks.

This app supports passport and VISA formats from about 150 nations, allowing it to cover practically the whole globe. By combining regular passport, id, or VISA images into a single 4×6, 5×7, or A4 page, the passport size photo maker saves you a lot of money. Along with the sharing feature, which allows you to print from a nearby photo booth.

Passport Size Photo Maker Features:

  • Change background to acceptable passport standards with auto-editing capabilities.
  • Easy Sharing option.
  • Support for 150 countries’ passports
  • Create passport photos from any photo or camera

Download Passport Size Photo Maker App

2. Passport Photo AiD

Passport Photo AiD

Passport Photo AiD allows you to capture or add a photo from your camera roll, then uses artificial intelligence to examine it for compliance. It’s also good to remove and replace the background with pure white, which is fantastic if you do not have white walls in your house.

The app detects which photo size (2×2 inch, 4×6 cm, 35 mm, etc) is required for your document (passport photo, visa photo, id photo, and other ids pictures). It is included with a photo crop tool/photo resizer tool that fits the picture to the correct size. It takes about 3 seconds for your photo to be prepared.

Passport Photo AiD Features:

  • Create passport photos from any photo or camera
  • AI-based algorithms
  • Automatically recognize the face on the photo and automatically crop the image
  • Remove and replace the background with pure white
  • Automatic Photo Resizer / Photo Cropper tool

Download Passport Photo AiD App

3. Passport Photo ID Maker Studio

Passport Photo ID Maker Studio

Among similar apps, Passport Photo ID Maker Studio is the best passport size photo editor. Passport size photo maker is able for all nations in the world including the US, Spain, Germany, France, India, Italy, Korea, and Brazil to create official photo sizes for IDs, Passport, VISA, and Licence.

You can use the app to make a simple passport photo and save it in the proper file and size. You can combine several types of ID photographs if you require them all. You can then print a single set on an A4, 5/7, 4/6, 44, or 34 sheets of paper. It also includes a photographer’s manual to assist you in capturing that perfect, professional-looking snap.

All of the essential features for creating a passport photo are accessible for free. It does, however, have a premium option that allows you to use advanced editing features such as Automatic background removal and the Ink and Money Saver option.

Passport Photo ID Maker Studio Features:

  • Create official photo sizes for IDs, Passport, VISA and Licence of all countries
  • Ink and money saver
  • Automatic background removal
  • Print multiple photos together
  • Choose file type and size
  • Offer photographer’s manual

Download Passport Photo ID Maker Studio App

4. ID VISA Passport photo

ID VISA Passport photo

This app functions as an online photo booth, allowing you to edit or shoot images using your smartphone. Artificial intelligence is used in this powerful photo generator app to generate photographs for various types of documents as needed. It can also be used to create various types of images, such as student ID photos, school card photos, infant passport photos, and newborn passport images.

Simply select a selfie or a pic of your choice and leave the rest to this AI-powered software. The built-in automatic passport photo editor functions primarily as an image background remover. It instantly converts the photo background to a white or transparent background.

ID VISA Passport photo Features:

  • AI-powered software
  • Image background remover
  • Powerful editor

Download ID VISA Passport photo App

5. Passport photo maker

Passport photo maker

A passport photo maker is a convenient and simple way to create passport-size photos. It works with a variety of countries and passport photo sizes. It allows users to create their own passport-size photographs based on preferred specifications for width and height. It may be used to produce photos for identification cards, election cards, pan cards, visa photos, school identity card creator apps, office id card makers, license photo editors, and custom photo designs.

You can use this software to erase photo backgrounds, change the color of your background, and save 1 to 6 photographs for your passport size photo. Background Changer, Tilt Image, Brightness, Contrast, Saturation, and Exposure, among other features, are included. You may email the result, save it to your gallery, and share it with your friends on social media platforms like Facebook, WhatsApp, Messenger, and others.

Passport photo maker Features:

  • Erase photo backgrounds
  • Change the color of your background
  • In-built editing tool
  • Easy sharing option

Download Passport photo maker App

Wrapping Up: Best apps to take passport size photo on Android

These are the best passport photo apps for Android. All of these apps offer a user-friendly interface and convenient settings and templates for a variety of documents and countries.

Have any questions? Do let us know that in the comments below. Stay connected with us via Facebook and Twitter to read more such helpful posts.

The latest MIUI 12.0.3.0 update for Redmi 9 Prime starts rolling out via OTA. The update is based on Android 10 and brings a few improvements and fixes bugs. Follow the below guide to Download MIUI 12.0.3.0 India Stable ROM for Redmi 9 Prime.

MIUI 12.0.3.0 India Stable ROM for Redmi 9 Prime is a stable version and can be flashed via Recovery or via Fastboot. You can download MIUI 12.0.3.0 for Redmi 9 Prime from below.

You can Download Redmi 9 Prime MIUI 12.0.3.0.QJCINXM ROM from below and also manually check for the update by going to Settings -> About Phone -> System updates -> Check for update. Download MIUI 12.0.3.0 Stable ROM for Redmi 9 Prime from below.

Redmi 9 Prime MIUI 12.0.3.0 Changelog:

[System]

  • Updated Android Security Patch to June 2021. Increased system security.

[Xiaomi Cloud]

  • New: Location info can be now reported automatically before the device is powered off

Note:-

  • This Firmware file is only for Redmi 9 Prime. Don’t try this on any other device.
  • Follow the steps correctly otherwise you may brick your device. We are not responsible for any damage to your phone.
  • It may erase your data, so it is advisable to take a complete backup of your phone for a safer side.
  • Ensure that your phone has at least 50-60% charged to prevent the accidental shutdown in between the process.

Download MIUI 12.0.3.0 India Stable ROM for Redmi 9 Prime

  • Redmi 9 Prime MIUI 12.0.3.0 OTA update – Download
  • MIUI 12.0.3.0 Recovery ROM for Redmi 9 Prime – Download
  • MIUI 12.0.3.0 Fastboot ROM for Redmi 9 Prime – Coming Soon

How to Install MIUI 12.0.3.0 India Stable ROM on Redmi 9 Prime –

To install MIUI 12.0.3.0 update for Redmi 9 Prime download either Recovery ROM or Fastboot ROM from above and use the below method to install this on your device.

Method 1 – Recovery Mode

Recovery Mode

  1. Download Recovery ROM for Redmi 9 Prime from above and save it on your device.
  2. Now launch the ‘Updater‘ app on your device.
  3. Click on the three-dot menu (‘…’ icon) at the top-right corner, and select the ‘choose update package‘.
  4. Browse through the files and select the package ending with .zip extension.
  5. Done. Your device will reboot on the latest version.

Method 2 – Fastboot Mode

1) First, Download Mi Flash Tool, extract it, and install it on your PC.

2) Now download Fastboot ROM for Redmi 9 Prime for your device.

3) Now boot your device into Fastboot mode by pressing the ‘Volume Down + Power‘ button.

4) Connect your device to the PC via a micro USB cable.

5) Now extract the Fastboot ROM and copy its path on the PC.

6) Now open MI Flash Tool and Paste the address bar of the ROM file folder path copied from above.

Mi Flash

7) First, click on the ‘Refresh‘ button (It will automatically recognize your device) and then click on the ‘Flash‘ button to flash MIUI 12 ROM on your Devices.

Mi Flash

8) Wait for some time to complete the process.

9) Done. Your device will boot on the latest version.

Wrapping Up:

Download MIUI 12.0.3.0 India Stable ROM for Redmi 9 Prime and flash it to update it manually. Comment below if you have any doubts.

The latest MIUI 12.0.6.0 update for Mi 9T Pro starts rolling out via OTA. The update brings the latest security patch to the device. Follow the below guide to Download MIUI 12.0.6.0 Global Stable ROM for Mi 9T Pro.

MIUI 12.0.6.0 Global Stable ROM for Mi 9T Pro is a stable version and can be flashed via Recovery or via Fastboot. You can download MIUI 12.0.6.0 for Mi 9T Pro from below.

You can Download Mi 9T Pro MIUI 12.0.6.0.QFKMIXM ROM from below and also manually check for the update by going to Settings -> About Phone -> System updates -> Check for update. Download MIUI 12.0.6.0 Stable ROM for Mi 9T Pro from below.

Mi 9T Pro MIUI 12.0.6.0 Changelog

– [System]

  • Updated Android Security Patch to May 2021. Increased system security.

Note:-

  • This Firmware file is only for Mi 9T Pro. Don’t try this on any other device.
  • Follow the steps correctly otherwise you may brick your device. We are not responsible for any damage to your phone.
  • It may erase your data, so it is advisable to take a complete backup of your phone for a safer side.
  • Ensure that your phone has at least 50-60% charged to prevent the accidental shutdown in between the process.

Download MIUI 12.0.6.0 Global Stable ROM for Mi 9T Pro

  • Mi 9T Pro MIUI 12.0.6.0 OTA update – Download
  • MIUI 12.0.6.0 Recovery ROM for Mi 9T Pro – Download
  • MIUI 12.0.6.0 Fastboot ROM for Mi 9T Pro – Coming Soon

How to Install MIUI 12.0.6.0 Global Stable ROM on Mi 9T Pro –

To install MIUI 12.0.6.0 update for Mi 9T Pro download either Recovery ROM or Fastboot ROM from above and use the below method to install this on your device.

Method 1 – Recovery Mode

Recovery Mode

  1. Download Recovery ROM for Mi 9T Pro from above and save it on your device.
  2. Now launch the ‘Updater‘ app on your device.
  3. Click on the three-dot menu (‘…’ icon) at the top-right corner, and select the ‘choose update package‘.
  4. Browse through the files and select the package ending with .zip extension.
  5. Done. Your device will reboot on the latest version.

Method 2 – Fastboot Mode

1) First, Download Mi Flash Tool, extract it, and install it on your PC.

2) Now download Fastboot ROM for Mi 9T Pro for your device.

3) Now boot your device into Fastboot mode by pressing the ‘Volume Down + Power‘ button.

4) Connect your device to the PC via a micro USB cable.

5) Now extract the Fastboot ROM and copy its path on the PC.

6) Now open MI Flash Tool and Paste the address bar of the ROM file folder path copied from above.

Mi Flash

7) First, click on the ‘Refresh‘ button (It will automatically recognize your device) and then click on the ‘Flash‘ button to flash MIUI 12 ROM on your Devices.

Mi Flash

8) Wait for some time to complete the process.

9) Done. Your device will boot on the latest version.

Wrapping Up:

Download MIUI 12.0.6.0 Global Stable ROM for Mi 9T Pro and flash it to update it manually. Comment below if you have any doubts.

The latest security patch update for Mi A2 Lite starts rolling out via OTA. The update is based on Android 10 and increased system stability and reduced system lag. Follow the below guide to Download Mi A2 Lite Global Stable V11.0.20.0 ROM.

The update is a stable version and can be flashed via Recovery or via Fastboot. You can wait for the OTA or download Mi A2 Lite v11.0.20.0 from below to update it manually.

You can Download Mi A2 Lite 11.0.20.0.QDLMIXM ROM from below and also manually check for the update by going to Settings -> About Phone -> System updates -> Check for update. Download Mi A2 Lite Global Stable V11.0.20.0 ROM from below.

Note:-

  • This Firmware file is only for Mi A2 Lite. Don’t try this on any other device.
  • Follow the steps correctly otherwise you may brick your device. We are not responsible for any damage to your phone.
  • It may erase your data, so it is advisable to take a complete backup of your phone for a safer side.
  • Ensure that your phone has at least 50-60% charged to prevent the accidental shutdown in-between the process.

Download Mi A2 Lite Global Stable V11.0.20.0 ROM

  • Download Mi A2 Lite V11.0.20.0 OTA ROM – Download
  • Download Mi A2 Lite V11.0.20.0 Recovery ROM – Download
  • Download Mi A2 Lite V11.0.20.0 Fastboot ROM – Download

How to Install Mi A2 Lite Global Stable V11.0.20.0 ROM –

To install the latest update on Mi A2 Lite download either Recovery ROM or Fastboot ROM from above and use the below method to install this on your device.

Method 1 – Recovery Mode

Recovery Mode

  1. Download recovery ROM from above and save it on your device.
  2. Now launch the ‘Updater‘ app on your device.
  3. Click on the three-dot menu (‘…’ icon) at the top-right corner, and select the ‘choose update package‘.
  4. Browse through the files and select the package ending with .zip extension.
  5. Done. Your device will reboot on the latest version.

Method 2 – Fastboot Mode

1) First, Download Mi Flash Tool, extract it, and install it on your PC.

2) Now download Fastboot ROM for your device.

3) Now boot your device into Fastboot mode by pressing the ‘Volume Down + Power‘ button.

4) Connect your device to the PC via a micro USB cable.

5) Now extract the Fastboot ROM and copy its path on the PC.

6) Now open MI Flash Tool and Paste the address bar of the ROM file folder path copied from above.

Mi Flash

7) First, click on the ‘Refresh‘ button (It will automatically recognize your device) and then click on the ‘Flash‘ button to flash the ROM on your Devices.

Mi Flash

8) Wait for some time to complete the process.

9) Done. Your device will boot on the latest version.

Wrapping Up:

Download Mi A2 Lite Global Stable V11.0.20.0 ROM and flash it to update it manually. Comment below if you have any doubts. Stay connected with us via Facebook and Twitter to read more such helpful posts.

A lot of businesses nowadays have taken up on-demand delivery apps rather than conventional means. This generally helps any type of business to increase its customer base as well as its overall sales.

These apps have thereby eliminated the middlemen service, and they also offer excellent communication between the customers and sellers. Nowadays, they offer a variety of services such as food, transportation, etc. It has led to exponential growth for these types of industries. This market has also created an opportunity for many other apps like Gojek clone, which provides multiple services on a single platform for today’s market.

In today’s world, high-speed internet, as well as smartphones, has become very prominent.

The application development sector has achieved great heights in recent times due to the development of the same. The Gojek clone app generally brings in a large number of services from a single app.

Gojek clone application 

For a businessman building a mobile app is quite expensive. It generally requires a lot of time and money, which can be a burden for any company. With the Gojek clone app, a person can find ready-made Gojek like apps that are packed with many features such as real-time tracking, easy logging, beautiful UI, and many more. It can be easily customized with a business’s brand logo and colors to meet its requirements. These ready-made apps are also cheaper and take half the time to build when it is compared to building an app from scratch. Moreover, Gojek clone apps generally provide a person with the opportunity to many businesses with one app.

The Gojek clone app success has raised eyebrows all over the world. This app is a combination of many on-demand services. This app usually offers convenience in ordering, availing, and delivering any type of product or service from homes. The Gojek clone app is a multi-service app solution that includes transport services, on-demand delivery services, and a large number of handyman services. The Gojek clone script is a type of ready-made app solution that usually provides many useful features that are required by the majority of businesses.

Services that are offered by Gojek Clone script

It usually makes it easy for a person to operate any type of multi-service business. It comes with everything that a person needs. It generally includes a large number of components such as:

  1. It is a user-friendly app that can be used by both android and iOS users
  2. It comes with a Driver and Service Provider App and can be used on both Android and iOS platforms.
  3. An advanced admin web panel from where you can keep a god’s eye view of your new business.
  4. A Service Provider web panel 
  5. Features clean code
  6. It has a very beautiful UI in it

The Benefits of using Ready made Gojek clone

  • 52+ on-demand services can be provided with the help of a single app.
  • Managing as well as monitoring multiple services will be very easy.
  • Analytics will also be available in this ready-made Gojek clone app.
  • All the customers will usually prefer this app over installing multiple apps on their mobile phones.

Gojek clone app is one of the trusted solutions which usually offers a large number of market-leading support. It also has ample features such as;

  • It requires very little effort to operate.

Generally, starting a new type of business using a Gojek clone app requires very little effort from a person. A ready-made Gojek clone app generally comes pre-equipped with many advanced features that a person will need to run a large variety of businesses such as online taxi business, online food delivery business, grocery business, etc.

The Gojek clone app usually induces more sales as well as a better customer service experience. It can offer more than 52 different types of services with a single app. The customers can now get rid of all the different types of service apps installed on their phones. This app also makes quick assistance to a customer’s requirement. It also has an advanced GPS which makes every service come to a person’s doorstep.

  • It is a perfect business idea for any type of startup.

With a Gojek clone app, a person can start a new business or expand an already running business by adding several different services. It is fully customizable as well as future-proof. A person can easily adapt to it according to the needs of the market.

Managing a large number of services is not as easy as it looks. Commencing a new business usually requires a solid business plan, ideas, resources, and much more. The available services are very common nowadays, and even every business person is well planned. Now is the time where every business demands an app. Nearly every business in the market is running on apps, one way or the other. All the business owners generate a hefty amount of revenue through these types of business models every day. Many business types are being devastated nowadays. The reasons are the lack of resources while building business models and the services for the customers.

Buying a ready-made Gojek clone can save you from all the dilemmas. Not just it helps to save time and money that will be required to build an app from scratch. But also helps to get what you need to start a successful business at the moment. Remember the competition is growing and you don’t want to waste your time perfecting the app, while someone else grabs the opportunity and launches their own business giving you competition in the market.

Conclusion

The main task of this gojek clone app is offering a large number of industries a more efficient way to reach their customers even during the hard days like the ongoing pandemic period. It is a ready-made app script that allows many businesses to run more than 50 services in a single app.

The Gojek clone generally helps online startups diversify to grow to their full potential and reach more customers to increase sales and services. People trying to start various businesses, such as online taxi booking businesses or a food delivery business, can use the Gojek clone and start doing many businesses with just a single app.

The latest MIUI 12.0.5.0 update for Redmi Note 9 Pro starts rolling out via OTA. The update is based on Android 11 and brings a few improvements and fixes bugs. Follow the below guide to Download MIUI 12.0.5.0 India Stable ROM for Redmi Note 9 Pro.

MIUI 12.0.5.0 India Stable ROM for Redmi Note 9 Pro is a stable version and can be flashed via Recovery or via Fastboot. You can download MIUI 12.0.5.0 for Redmi Note 9 Pro from below.

You can Download Redmi Note 9 Pro MIUI 12.0.5.0.RJWINXM ROM from below and also manually check for the update by going to Settings -> About Phone -> System updates -> Check for update. Download MIUI 12.0.5.0 Stable ROM for Redmi Note 9 Pro from below.

Note:-

  • This Firmware file is only for Redmi Note 9 Pro. Don’t try this on any other device.
  • Follow the steps correctly otherwise you may brick your device. We are not responsible for any damage to your phone.
  • It may erase your data, so it is advisable to take a complete backup of your phone for a safer side.
  • Ensure that your phone has at least 50-60% charged to prevent the accidental shutdown in between the process.

Download MIUI 12.0.5.0 India Stable ROM for Redmi Note 9 Pro

  • Redmi Note 9 Pro MIUI 12.0.5.0 OTA update – Download
  • MIUI 12.0.5.0 Recovery ROM for Redmi Note 9 Pro – Download
  • MIUI 12.0.5.0 Fastboot ROM for Redmi Note 9 Pro – Coming Soon

How to Install MIUI 12.0.5.0 India Stable ROM on Redmi Note 9 Pro –

To install MIUI 12.0.5.0 update for Redmi Note 9 Pro download either Recovery ROM or Fastboot ROM from above and use the below method to install this on your device.

Method 1 – Recovery Mode

Recovery Mode

  1. Download Recovery ROM for Redmi Note 9 Pro from above and save it on your device.
  2. Now launch the ‘Updater‘ app on your device.
  3. Click on the three-dot menu (‘…’ icon) at the top-right corner, and select the ‘choose update package‘.
  4. Browse through the files and select the package ending with .zip extension.
  5. Done. Your device will reboot on the latest version.

Method 2 – Fastboot Mode

1) First, Download Mi Flash Tool, extract it, and install it on your PC.

2) Now download Fastboot ROM for Redmi Note 9 Pro for your device.

3) Now boot your device into Fastboot mode by pressing the ‘Volume Down + Power‘ button.

4) Connect your device to the PC via a micro USB cable.

5) Now extract the Fastboot ROM and copy its path on the PC.

6) Now open MI Flash Tool and Paste the address bar of the ROM file folder path copied from above.

Mi Flash

7) First, click on the ‘Refresh‘ button (It will automatically recognize your device) and then click on the ‘Flash‘ button to flash MIUI 12 ROM on your Devices.

Mi Flash

8) Wait for some time to complete the process.

9) Done. Your device will boot on the latest version.

Wrapping Up:

Download MIUI 12.0.5.0 India Stable ROM for Redmi Note 9 Pro and flash it to update it manually. Comment below if you have any doubts.

The latest OxygenOS 11.0.7.7 for the OnePlus 8/8 pro starts rolling out. The new OxygenOS 11.0.7.7 update for the OnePlus 8 brings the latest June 2021 patches. Download OxygenOS 11.0.7.7 for OnePlus 8/8 pro from below.

The OxygenOS 11.0.7.7 for OnePlus 8/8 pro is rolling out via OTA (over-the-air) in a phase-wise manner and many users already getting the update. You can wait for the OTA updates, or you can Update Oneplus 8 to OxygenOS 11.0.7.7 manually with the below method.

The new OxygenOS 11.0.7.7 update for the OnePlus 8/8 pro brings many changes (Check the complete changelogs from below). We provide you the OxygenOS 11.0.7.7 OTA file which you can flash on your device. So if you want to update your OnePlus to the latest version then Download OxygenOS 11.0.7.7 for the OnePlus 8/8 pro from below. Check below what’s new in OxygenOS 11.0.7.7.

OxygenOS 11.0.7.7 Features and Changelogs –

  • System
    • Optimized mobile phone performance
    • Updated Android security patch to 2021.06
  • Camera
    • Fixed the issue that the shooting button fails when taking pictures at 48M picture format

Note:-

  • This method is only for the OnePlus 8/8 pro.
  • Full ROM can be flashed via TWRP as well.
  • Follow the steps correctly otherwise, you may brick your device. We Guidegeekz.com is not responsible for any damage to your phone.
  • Charge your device to 60- 70% to prevent it from accidental shutdown.
  • Take a complete backup of everything important.

Download OxygenOS 11.0.7.7 for OnePlus 8/8 pro

  • OxygenOS 11.0.7.7 update for OnePlus 8 – OTAFull ROM (India)
  • OxygenOS 11.0.7.7 ROM for OnePlus 8 pro – OTAFull ROM (India)

How to Install OxygenOS 11.0.7.7 Update on OnePlus 8/8 pro

For Non-Rooted Users

Method 1

  1. First, enable the USB debugging option from the setting ->developer option. To enable Developer Options, go to About phone and tap the Build Number 7 times.
  2. Download ADB and Fastboot and install them on your PC.
  3. Download OxygenOS 11.0.7.7 OTA from above Copy ROM to a folder where adb installed.
  4. Now Turn Off your phone and boot into recovery mode.
  5. Choose Apply update from ADB
  6. Now Connect your phone to your Laptop/PC
  7. On ROM folder press shift+right click and click on the open command here.
  8. Now check your connection status by typing the below command
    adb devices
    if your device is listed, you’re ready to flash the ROM
  9. Now Install OxygenOS 11.0.7.7 OTA on the OnePlus 8 series by typing the below command
    adb sideload File-Name.zip 
  10. Now, wait until the process completes, and then Reboot the phone.
  11. Done!

Method 2

  1. Download OxygenOS 11.0.7.7 OTA zip file from above and save it on your internal phone memory.
  2. Now Switch off your device and boot into the Recovery mode.
  3. To boot the OnePlus 8 into recovery mode press and hold ‘Power + Volume Down’ button.
  4. Now your phone boot into the Stock recovery.
  5. Now Select ‘Apply Update’ and select ‘Choose from Internal Storage
  6. Browse the OTA zip file which you download and save on your phone before.
  7. Select the zip file, and it will Install OxygenOS 11.0.7.7 OTA update file on your OnePlus 8.
  8. Now wait until the process complete and then reboot your device.
  9. Done.

For Rooted Users

  1. First Unlock your device bootloader and Install TWRP on your Device. Skip this step if already installed TWRP.
  2. Reboot your device into Recovery mode and create a Nandroid backup (Recommended) of your device for the safer side, if anything goes wrong.
  3. Now wipe your cache files from Goto Wipe>Advanced Wipe>Select Wipe cache and Dalvik cache and swipe to confirm it.
  4. Now, Go to Install and locate the OOS 11.0.7.7 Full Rom Zip & swipe to Install the ROM file
  5. Now Flash the Magisk again to maintain the root (Optional).
  6. Wipe Dalvik & Cache again.
  7. Done! Reboot System and Enjoy.

Wrapping Up:

That’s all this is the complete guide to Download OxygenOS 11.0.7.7 for OnePlus 8/8 pro (OTA + Full ROM). Have any questions? Do let us know that in the comments below. Stay connected with us via Facebook and Twitter to read more such helpful posts.