Author

Sumit Bahl

Browsing

The latest OxygenOS 11.2.7.7 for the OnePlus 9/9 pro starts rolling out. The new OxygenOS 11.2.7.7 update for the OnePlus 9 series adds an HDR toggle for video recording, reduces battery draw, improves the charging experience, and optimizes camera performance. Download OxygenOS 11.2.7.7 for OnePlus 9/9 pro from below.

The OxygenOS 11.2.7.7 for OnePlus 9/9 pro is rolling out via OTA (over-the-air) in a phase-wise manner and many users already getting the update. You can wait for the OTA updates, or you can Update Oneplus 9 to OxygenOS 11.2.7.7 manually with the below method.

The new OxygenOS 11.2.7.7 update for the OnePlus 9/9 pro brings many changes (Check the complete changelogs from below). We provide you the OxygenOS 11.2.7.7 OTA file which you can flash on your device. So if you want to update your OnePlus to the latest version then Download OxygenOS 11.2.7.7 for the OnePlus 9/9 pro from below. Check below what’s new in OxygenOS 11.2.7.7.

OxygenOS 11.2.7.7 Features and Changelogs –

  • System
    • Reduced power consumption in specific scenarios
    • Fixed known issues and improved stability
  • Camera
    • Newly added HDR option in video recording interface (Path: Menu options in the upper right corner of the screen-Dynamic video) – OnePlus 9 Pro only
    • Improved the shooting and recording experience

Note:-

  • This method is only for the OnePlus 9/9 pro.
  • Full ROM can be flashed via TWRP as well.
  • Follow the steps correctly otherwise, you may brick your device. We Guidegeekz.com is not responsible for any damage to your phone.
  • Charge your device to 60- 70% to prevent it from accidental shutdown.
  • Take a complete backup of everything important.

Download OxygenOS 11.2.7.7 for OnePlus 9/9 pro

  • OxygenOS 11.2.7.7 update for OnePlus 9 – OTAFull ROM (India)
  • OxygenOS 11.2.7.7 ROM for OnePlus 9 pro – OTAFull ROM (India)

How to Install OxygenOS 11.2.7.7 Update on OnePlus 9/9 pro

For Non-Rooted Users

Method 1

  1. First, enable the USB debugging option from the setting ->developer option. To enable Developer Options, go to About phone and tap the Build Number 7 times.
  2. Download ADB and Fastboot and install them on your PC.
  3. Download OxygenOS 11.2.7.7 OTA from above Copy ROM to a folder where adb installed.
  4. Now Turn Off your phone and boot into recovery mode.
  5. Choose Apply update from ADB
  6. Now Connect your phone to your Laptop/PC
  7. On ROM folder press shift+right click and click on the open command here.
  8. Now check your connection status by typing the below command
    adb devices
    if your device is listed, you’re ready to flash the ROM
  9. Now Install OxygenOS 11.2.7.7 OTA on the OnePlus 9 series by typing the below command
    adb sideload File-Name.zip 
  10. Now, wait until the process completes, and then Reboot the phone.
  11. Done!

Method 2

  1. Download OxygenOS 11.2.7.7 OTA zip file from above and save it on your internal phone memory.
  2. Now Switch off your device and boot into the Recovery mode.
  3. To boot the OnePlus 9 into recovery mode press and hold ‘Power + Volume Down’ button.
  4. Now your phone boot into the Stock recovery.
  5. Now Select ‘Apply Update’ and select ‘Choose from Internal Storage
  6. Browse the OTA zip file which you download and save on your phone before.
  7. Select the zip file, and it will Install OxygenOS 11.2.7.7 OTA update file on your OnePlus 9.
  8. Now wait until the process complete and then reboot your device.
  9. Done.

For Rooted Users

  1. First Unlock your device bootloader and Install TWRP on your Device. Skip this step if already installed TWRP.
  2. Reboot your device into Recovery mode and create a Nandroid backup (Recommended) of your device for the safer side, if anything goes wrong.
  3. Now wipe your cache files from Goto Wipe>Advanced Wipe>Select Wipe cache and Dalvik cache and swipe to confirm it.
  4. Now, Go to Install and locate the OOS 11.2.7.7 Full Rom Zip & swipe to Install the ROM file
  5. Now Flash the Magisk again to maintain the root (Optional).
  6. Wipe Dalvik & Cache again.
  7. Done! Reboot System and Enjoy.

Wrapping Up:

That’s all this is the complete guide to Download OxygenOS 11.2.7.7 for OnePlus 9/9 pro (OTA + Full ROM). Have any questions? Do let us know that in the comments below. Stay connected with us via Facebook and Twitter to read more such helpful posts.

Are you trying to modernize business communication? Have you considered implementing SIP trunking? It’s a telephony protocol used for making internet calls by controlling data transfer. 

A plethora of small and large businesses use SIP trunking to reduce their phone costs and optimize their bandwidth. SIP trunks take the role of virtual phone lines, established to help businesses make and receive internet calls from customers from anywhere in the world. 

These trunks connect two locations in order to send and receive emails, text messages, local calls, long-distance calls, and start video chats. Trunking serves as a replacement for copper-wire telephone networks in need of a physical connection for a call to be established. 

Learn more about SIP trunking.

Understanding SIP trunking

The abbreviation SIP stands for Session Initiation Protocol, referring to a technology whose goal is to establish communication via a data network like the internet. These communication sessions are able to support not only traditional phone calls but also conference calls with a number of participants. The basic function of SIPs is to transmit messages over the web, such as instant messages, videos, and voice calls. Find out more about SIP trunking and discover whether you need it for your business. 

Moreover, Session Initiation Protocol is responsible for establishing a virtual link between a phone network and a PBX with an internet connection. A SIP trunk refers to a group of multiple SIP channels. The capacity of each channel is to handle a single call in the same way an analog telephone line performs this task. Nevertheless, SIP channels don’t need a physical wire to establish a connection; they are virtual. 

This sort of virtual connection is used to route voice traffic to the telephone network through the gateway of the provider. The quality of service is undeniable, whereas the cost savings while using such a technology are significant.  Unlike the other telephone services, SIP trunking is likely to save almost sixty percent of the monthly communication expenses of companies. 

Furthermore, the number of SIP channels is determined by the approximate number of concurrent calls. The largest part of businesses doesn’t require a separate channel for every user but a single SIP trunk for two to five users.

What is SIP Trunking 

Additionally, internet bandwidth is another consideration for users, as not all connections handle the same number of SIP calls. Although high-speed connections are capable of supporting numerous simultaneous calls, companies with a large volume of concurrent calls would probably have to expand the data circuit. For a better understanding of internet bandwidth, visit this link https://techterms.com/definition/bandwidth

Who should consider SIP trunks? 

Many businesses have a tendency to use SIP trunks for real-life communications but mostly for voice calls. Even though there are drastic differences between ISDN technology and SIP trunking, the concept of phone call delivery is the same in both technologies. ISDN circuits need physical installation, whereas SIP trunks are delivered over the internet. 

Session Initiation Protocol Trunks should be considered by any type of business having an IP PBX. These are convenient for companies using physical PBX systems, which require professionals to set them up and maintain them. Also, there should be at least one telephony specialist in the company with expert knowledge. Consequently, physical PBX systems are costlier than SIP trunks. 

In addition, SIP trunking is a wise solution for businesses with a vast volume of calls, both inbound and outbound. It provides cost-effectiveness and flexibility, which aren’t exactly offered by traditional PBX systems. Selecting the right SIP provider is important for businesses, as its services should match their calling profiles. 

Trunks vs. channels

While trunk a term used to refer to a group of cables, it has acquired another meaning on the internet. It’s no longer a group of cables but a number of channels, which handle simultaneous calls. Hence, the quantity of channels should be based on the volume of work. Providers are expected to assist their clients with the calculation of channels. 

What is SIP Trunking

Additionally, these channels are best described as virtual versions of traditional telephone lines. Two concurrent calls can be supported by one channel, an incoming and an outgoing call. Companies that have no more than two simultaneous calls need only one or two channels. However, this doesn’t apply to companies receiving plenty of inbound calls at the same time. 

Benefits of SIP trunks

The number of companies using SIP services is constantly on the rise. Perhaps the most crucial benefit of using these services is cost saving. In the case of traditional telephony and ISDN technology, businesses always end up paying for more capacity than they actually need. In contrast, Session Initiation Protocol Trunks are much more precise in view of usage. The prices of calls and line rentals are substantially lower as well, which is especially convenient for companies with high call volumes. 

Another reason why organizations are appealed by these trunks is geographic flexibility. There are no restrictions as far as telecommunications are concerned, providing companies with a chance to pick any numbers they want, irrespective of geography. It’s what makes them perfect for international suppliers and customers.  Even if you move office or relocate your business to another country, you can always keep the number without making any changes. 

Moreover, Trunks provide companies with control over usage, as they can be scaled up and down easily. When looking for a SIP trunking supplier, make sure you find one offering trusted IP infrastructure and 24/7 support. These providers can easily upgrade the capacity and number of trunks. The channel quantity can be upgraded in accordance with the growth of companies, which results in a larger volume of work. 

Another benefit of these services is combining multiple communication methods into a unified solution. They range from texts and emails to videos and conferencing. Given the installation of trunking is virtual, not physical, the system can be set up within forty-eight hours. Most organizations usually don’t need to worry about extra installation, as their current internet infrastructure and connectivity are usually sufficient.

What factors should you consider?

While searching for SIP services, there are several factors to keep in mind during the research. The first factor to think about is the quantity of concurrent calls, which is vital for calculating the channel number. Even if your understanding of business concurrency is limited, this shouldn’t worry you because of the flexibility of the services. You can have channels removed or added rather easily. 

The following point of consideration is the number of minutes you will need. This factor depends on the quantity of your outgoing calls. The more calls you make, the more minutes you will need. Usually, bundled minutes are offered together with channels by plenty of providers. Other companies, however, look for calls on a set tariff, particularly organizations with low volume calling. 

Companies opening new offices in new geographic locations are suggested to obtain some new numbers. By acquiring an international support number based in a particular country, your business will seem larger in the eyes of customers, regardless of how small it really is. 

Another key metric to calculate is the bandwidth, which can be done through an online bandwidth calculator. These calculators only require users to write down the concurrent call number they expect to have and wait for bandwidth to be calculated. 

The procedure of porting existing numbers should also be taken into consideration in order for companies not to lose touch with their customers. Although the porting process is straightforward, it lasts longer, approximately one to two weeks. 

What to look for in a SIP provider?

Making the best choice of a SIP provider is essential for ensuring proper service. Pricing is a factor most customers pay attention to when choosing a provider. The cost of the trunk channels isn’t the only one that matters, as customers should also consider setup costs, number porting, calling tariffs, and maintenance fees. Every SIP provider should explain these expenses in detail for clients to be clear about the costs. 

Security is of absolute importance when choosing a SIP provider. Companies whose calls are predominantly sensitive should look for a supplier with a secure connection. This is especially relevant for companies in the healthcare, financial, and insurance sectors. Additionally, the providers must have a clear monitoring policy.

Availability should be checked before making a decision, particularly for companies operating in multiple countries. The provider you opt for should provide services in every country of business operation and be experienced in handling both network and SIP elements. 

Furthermore, your experience following the installation is no less important. You should inspect the account management and support processes after the purchase, which requires significant attention on your end. Companies investing in cloud communications must keep track of the technical support they’ll be receiving and the role of the account manager. 

In conclusion

Wire networks are no longer necessary to make calls. 

Cloud communications are more reliable than traditional networks, help companies drive more business value, and provide global phone number coverage!

The latest MIUI 12.5 update for POCO X3 Pro starts rolling out via OTA. The update is based on Android 11 and brings lots of new features along with May 2021 security patch. Follow the below guide to Download MIUI 12.5.1.0 Global Stable ROM for POCO X3 Pro.

MIUI 12.5.1.0 Global Stable ROM for POCO X3 Pro is a stable version and can be flashed via Recovery or via Fastboot. You can wait for the OTA or download MIUI 12.5.1.0 for POCO X3 Pro from below.

You can Download POCO X3 Pro MIUI 12.5 ROM from below and also manually check for the update by going to Settings -> About Phone -> System updates -> Check for update. Download MIUI 12.5 ROM for POCO X3 Pro from below.

POCO X3 Pro MIUI 12.5.1.0.RJUMIXM Changelog –

-System

  • New: With custom device model adjustments, any phone becomes faster after the upgrade.
  • New: Response to gestures is now instant.
  • New: With 20 times more rendering power, there are now few limits to what you can see on your screen.
  • Optimization: MIUI became lighter, faster, and more durable.
  • Updated Android Security Patch to May 2021. Increased system security.

-Notes

  • New: Dynamic layouts bring the typography in Notes to a new level.
  • New: Compose mind maps with complex structures.
  • New: New tools for doodling and sketching.
  • New: Press and hold a sketch to adjust the strokes automatically.
  • New: A gesture shortcut now allows you to create notes, tasks, and excerpts anywhere.
  • New: Excerpts save text, URLs, and images to Notes in a few simple taps.
  • New: Dynamic layouts bring the typography in Notes to a new level.
  • All-new Notes.

-Xiaomi Cloud

  • New: Location info can be now reported automatically before the device is powered off

Note:-

  • This Firmware file is only for POCO X3 Pro. Don’t try this on any other device.
  • Follow the steps correctly otherwise you may brick your device. We are not responsible for any damage to your phone.
  • It may erase your data, so it is advisable to take a complete backup of your phone for a safer side.
  • Ensure that your phone has at least 50-60% charged to prevent the accidental shutdown in between the process.

Download MIUI 12.5.1.0 Global Stable ROM for POCO X3 Pro

  • MIUI 12.5.1.0 OTA for POCO X3 Pro – Download
  • MIUI 12.5.1.0 Recovery ROM for POCO X3 Pro – Download
  • MIUI 12.5.1.0 Fastboot ROM for POCO X3 Pro – Download

How to Install MIUI 12.5.1.0 Global Stable ROM on POCO X3 Pro –

To install MIUI 12.5.1.0 update for POCO X3 Pro download either Recovery ROM or Fastboot ROM from above and use the below method to install this on your device.

Method 1 – Recovery Mode

Recovery Mode

  1. Download Android 11 ROM for POCO X3 Pro from above and save it on your device.
  2. Now launch the ‘Updater‘ app on your device.
  3. Click on the three-dot menu (‘…’ icon) at the top-right corner, and select the ‘choose update package‘.
  4. Browse through the files and select the package ending with .zip extension.
  5. Done. Your device will reboot on the latest version.

Method 2 – Fastboot Mode

1) First, Download Mi Flash Tool, extract it, and install it on your PC.

2) Now download MIUI 12.5 ROM for POCO X3 Pro for your device.

3) Now boot your device into Fastboot mode by pressing the ‘Volume Down + Power‘ button.

4) Connect your device to the PC via a micro USB cable.

5) Now extract the Fastboot ROM and copy its path on the PC.

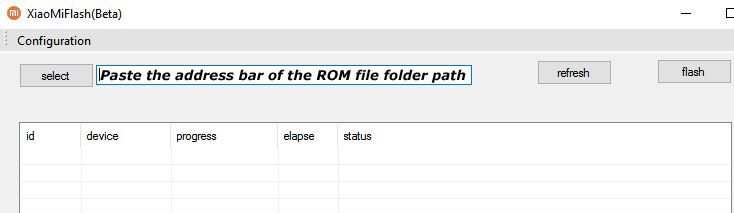
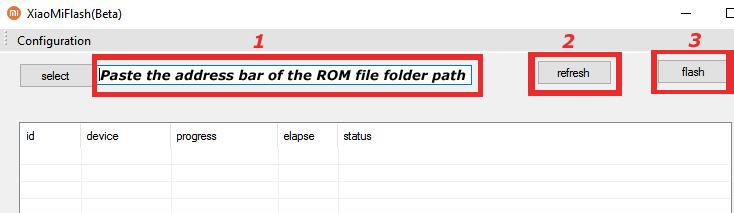
6) Now open MI Flash Tool and Paste the address bar of the ROM file folder path copied from above.

Mi Flash

7) First, click on the ‘Refresh‘ button (It will automatically recognize your device) and then click on the ‘Flash‘ button to flash MIUI 12 ROM on your Devices.

Mi Flash

8) Wait for some time to complete the process.

9) Done. Your device will boot on the latest version.

Wrapping Up:

If you want to update POCO X3 Pro to MIUI 12.5, then you can follow the above process. Download MIUI 12.5.1.0 Global Stable ROM for POCO X3 Pro and flash it to update it manually. Comment below if you have any doubts.

Have any questions? Do let us know that in the comments below. Stay connected with us via Facebook and Twitter to read more such helpful posts.

Huawei unveiled HarmonyOS 2.0, a new operating system that will replace Android on Huawei’s smartphones, tablets, and smartwatches. The new update features robust security control, unlocking new capabilities in cross-device communication, and bringing unique features for all-around greater performance. HarmonyOS has begun to roll out to Chinese customers, but the rest of the world is still waiting. However, you can Download HarmonyOS Theme for your device makeover.

The pre-built HarmonyOS theme is available for all Huawei devices. The theme includes HarmonyOS icons, which are smoother and more attractive than EMUI icons, and new HarmonyOS wallpaper. If you are a Huawei user, then this theme is just right for you. Here we share a direct link to Download HarmonyOS Theme for all Huawei Devices.

Download HarmonyOS Theme for all Huawei Devices

Here we share a link to Download HarmonyOS Theme for all EMUI Devices. This is a ‘.HWT’ theme file that replaces the stock theme file with this new HarmonyOS hwt theme file. You can Download the HarmonyOS stock theme for EMUI Devices from below.

  • Download HarmonyOS Theme 1 – Download
  • Download HarmonyOS Theme 2 – Download

How to Install HarmonyOS Theme on Huawei Devices –

Installing the HarmonyOS theme on Huawei devices are very easy. After downloading the theme from above, you can easily install it with a pre-built theme app. Check how to install HarmonyOS Theme on Huawei Devices from below.

  1. Download HarmonyOS hwt theme file from above.
  2. Now place the .hwt file in File Manager -> Phone -> Huawei -> Themes folder.
  3. Open the theme app and tap on the “Me” tab on the bottom right corner
  4. Tap on the theme you downloaded from above and click the “Apply” button to apply HarmonyOS Theme.
  5. Restart your phone.
  6. Done!

Wrapping Up: Download HarmonyOS Theme

If you want to try HarmonyOS 2.0 look on your phone, then download and enjoy HarmonyOS for Huawei/EMUI devices from above. Have any questions? Do let us know that in the comments below. Stay connected with us via Facebook and Twitter to read more such helpful posts.

Good news for Mi 10 users, the latest MIUI 12.5 update for Mi 10 starts rolling out via OTA. The update is based on Android 11 and brings lots of new features and improvements. Follow the below guide to Download MIUI 12.5.1.0 Global Stable ROM for Mi 10.

MIUI 12.5.1.0 Global Stable ROM for Mi 10 is a stable version and can be flashed via Recovery or via Fastboot. You can wait for the OTA or download MIUI 12.5.1.0 for Mi 10  from below to Update Mi 10 to Android 11 manually.

You can Download Mi 10 MIUI 12.5 ROM from below and also manually check for the update by going to Settings -> About Phone -> System updates -> Check for update. Download MIUI 12.5 ROM for Mi 10 from below.

Note:-

  • This Firmware file is only for Mi 10. Don’t try this on any other device.
  • Follow the steps correctly otherwise you may brick your device. We are not responsible for any damage to your phone.
  • It may erase your data, so it is advisable to take a complete backup of your phone for a safer side.
  • Ensure that your phone has at least 50-60% charged to prevent the accidental shutdown in between the process.

Download MIUI 12.5.1.0 Global Stable ROM for Mi 10

  • MIUI 12.5.1.0 OTA for Mi 10  – Download
  • MIUI 12.5.1.0 Recovery ROM for Mi 10 – Download
  • MIUI 12.5.1.0 Fastboot ROM for Mi 10  – Download

How to Install MIUI 12.5.1.0 Global Stable ROM on Mi 10 –

To install MIUI 12.5.1.0 update for Mi 10 download either Recovery ROM or Fastboot ROM from above and use the below method to install this on your device.

Method 1 – Recovery Mode

Recovery Mode

  1. Download Android 11 ROM for Mi 10 from above and save it on your device.
  2. Now launch the ‘Updater‘ app on your device.
  3. Click on the three-dot menu (‘…’ icon) at the top-right corner, and select the ‘choose update package‘.
  4. Browse through the files and select the package ending with .zip extension.
  5. Done. Your device will reboot on the latest version.

Method 2 – Fastboot Mode

1) First, Download Mi Flash Tool, extract it, and install it on your PC.

2) Now download MIUI 12.5 ROM for Mi 10 for your device.

3) Now boot your device into Fastboot mode by pressing the ‘Volume Down + Power‘ button.

4) Connect your device to the PC via a micro USB cable.

5) Now extract the Fastboot ROM and copy its path on the PC.

6) Now open MI Flash Tool and Paste the address bar of the ROM file folder path copied from above.

Mi Flash

7) First, click on the ‘Refresh‘ button (It will automatically recognize your device) and then click on the ‘Flash‘ button to flash MIUI 12 ROM on your Devices.

Mi Flash

8) Wait for some time to complete the process.

9) Done. Your device will boot on the latest version.

Wrapping Up:

If you want to update Mi 10 to MIUI 12.5, then you can follow the above process. Download MIUI 12.5.1.0 Global Stable ROM for Mi 10 and flash it to update it manually. Comment below if you have any doubts.

Have any questions? Do let us know that in the comments below. Stay connected with us via Facebook and Twitter to read more such helpful posts.

The latest OxygenOS 11.2.3.3 for OnePlus 9R starts rolling out. The new OxygenOS 11.2.3.3 update for the OnePlus 9R is more of a hotfix that addresses some issues found in the previous build. The OxygenOS 11.2.3.3 for OnePlus 9R is rolling out via OTA (over-the-air) in a phase-wise manner and many users already getting the update. You can wait for the OTA updates, or you can Update Oneplus 9R to OxygenOS 11.2.3.3 manually with the below method.

The new OxygenOS 11.2.3.3 update for the OnePlus 9R brings many changes (Check the complete changelogs from below). We provide you the OxygenOS 11.2.3.3 OTA file which you can flash on your device. So if you want to update your OnePlus to the latest version then Download OxygenOS 11.2.3.3 for the OnePlus 9R from below. Check below what’s new in OxygenOS 11.2.3.3.

OxygenOS 11.2.3.3 Features and Changelogs –

  • System
    • Reduced power consumption in specific scenarios
    • Fixed known issues for a better experience

Note:-

  • This method is only for the OnePlus 9R.
  • Full ROM can be flashed via TWRP as well.
  • Follow the steps correctly otherwise, you may brick your device. We Guidegeekz.com is not responsible for any damage to your phone.
  • Charge your device to 60- 70% to prevent it from accidental shutdown.
  • Take a complete backup of everything important.

Download OxygenOS 11.2.3.3 for OnePlus 9R

  • OnePlus 9R OxygenOS 11.2.3.3 OTA link – Download
  • OxygenOS 11.2.3.3 Full ROM for OnePlus 9R – Download

How to Install OxygenOS 11.2.3.3 Update on OnePlus 9R

For Non-Rooted Users

Method 1

  1. First, enable the USB debugging option from the setting ->developer option. To enable Developer Options, go to About phone and tap the Build Number 7 times.
  2. Download ADB and Fastboot and install them on your PC.
  3. Download OxygenOS 11.2.3.3 OTA from above Copy ROM to a folder where adb installed.
  4. Now Turn Off your phone and boot into the recovery mode.
  5. Choose Apply update from ADB
  6. Now Connect your phone to your Laptop/PC
  7. On ROM folder press shift+right click and click on the open command here.
  8. Now check your connection status by typing the below command
    adb devices
    if your device is listed, you’re ready to flash the ROM
  9. Now Install OxygenOS 11.2.3.3 OTA on the OnePlus 9R by typing the below command
    adb sideload File-Name.zip 
  10. Now, wait until the process completes, and then Reboot the phone.
  11. Done!

Method 2

  1. Download OxygenOS 11.2.3.3 OTA zip file from above and save it on your internal phone memory.
  2. Now Switch off your device and boot into the Recovery mode.
  3. To boot the OnePlus 9R into recovery mode press and hold ‘Power + Volume Down’ button.
  4. Now your phone boot into the Stock recovery.
  5. Now Select ‘Apply Update’ and select ‘Choose from Internal Storage
  6. Browse the OTA zip file which you download and save on your phone before.
  7. Select the zip file, and it will Install OxygenOS 11.2.3.3 OTA update file on your OnePlus 9R.
  8. Now wait until the process complete and then reboot your device.
  9. Done.

For Rooted Users

  1. First Unlock your device bootloader and Install TWRP on your Device. Skip this step if already installed TWRP.
  2. Reboot your device into Recovery mode and create a Nandroid backup (Recommended) of your device for the safer side, if anything goes wrong.
  3. Now wipe your cache files from Goto Wipe>Advanced Wipe>Select Wipe cache and Dalvik cache and swipe to confirm it.
  4. Now, Go to Install and locate the OOS 11.2.3.3 Full Rom Zip & swipe to Install the ROM file
  5. Now Flash the Magisk again to maintain the root (Optional).
  6. Wipe Dalvik & Cache again.
  7. Done! Reboot System and Enjoy.

Wrapping Up:

That’s all this is the complete guide to Download OxygenOS 11.2.3.3 for OnePlus 9R (OTA + Full ROM). Have any questions? Do let us know that in the comments below. Stay connected with us via Facebook and Twitter to read more such helpful posts.

Google wants FLoC to replace cookies as the primary method of tracking individuals on the internet. Your browser saves these small bits of text and code on your computer or phone, and they allow websites figure out if you’ve visited previously, what your site preferences are, where you are in the world, and more. FLoC introduces technology that enables advertisers to follow users based on cohorts, or groups of people with similar interests. However, there is a way to Disable FLoC in Google Chrome for those who have no interest in it but want to stick with Chrome.

Google benefits from FLoC, while Internet users do not. FLoC was deemed a bad idea by the EFF, owing to the fact that it is neither as private nor as good as Google claims. It works by tracking people’s surfing habits, assigning an ID to the aggregated data, and then grouping browsers with similar habits together. Cohort data is used to present people targeted adverts based on their demographics. If you’re concerned about this new modification and want to disable FLoC on your Chrome browser, follow the steps below.

How to Check If Your Chrome Browser Is Using FLoC

Before opting out, be sure your browser is involved in Google’s experiment. Am I FLoCed? is a website run by the EFF that allows Chrome users to quickly and easily detect if FLoC is active in their browser.

  1. Open online FLoC detection tool.
  2. Click on ‘Check for FLoc ID’ button.check FLoc id
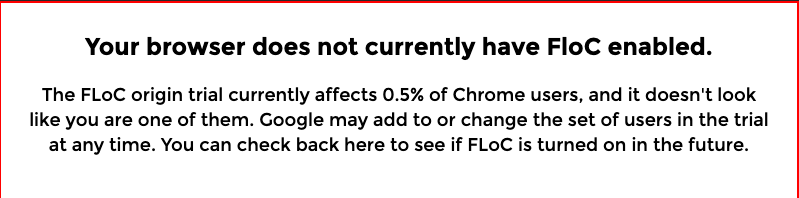
  3. It will show that your browser is currently using FLoc or not.
  4. In my case my browser does not currently have FloC enabled. You can check your Chrome Browser Is Using FLoC before disabling Floc in Google chrome.Check If Your Chrome Browser Is Using FLoC

How to Disable FLoC in Google Chrome

You can easily Disable Privacy Sandbox (FLoC) in Chrome for Android and Desktop. In current versions of Google Chrome, you may alter it from the settings menu; in older versions, it may be hidden behind a Chrome flag. Check how to disable FLoc in chrome for desktop and mobile.

How to Disable FLoC in Google Chrome Desktop

To Opt Out of FLoC in Google Chrome on dektop, you should be running Chrome version 93.0.4528.0 or later. It’s possible that the Google Chrome settings page for turning off FLoC isn’t available on your computer. Because Google has not yet made FLoC available to all users in all areas, this is the case. There is no need to be concerned about this technology if you are unable to reach the FLoC settings. If you don’t see any settings, that means FLoC isn’t working on your computer.

  1. Open the Chrome browser and go to the Settings screen.
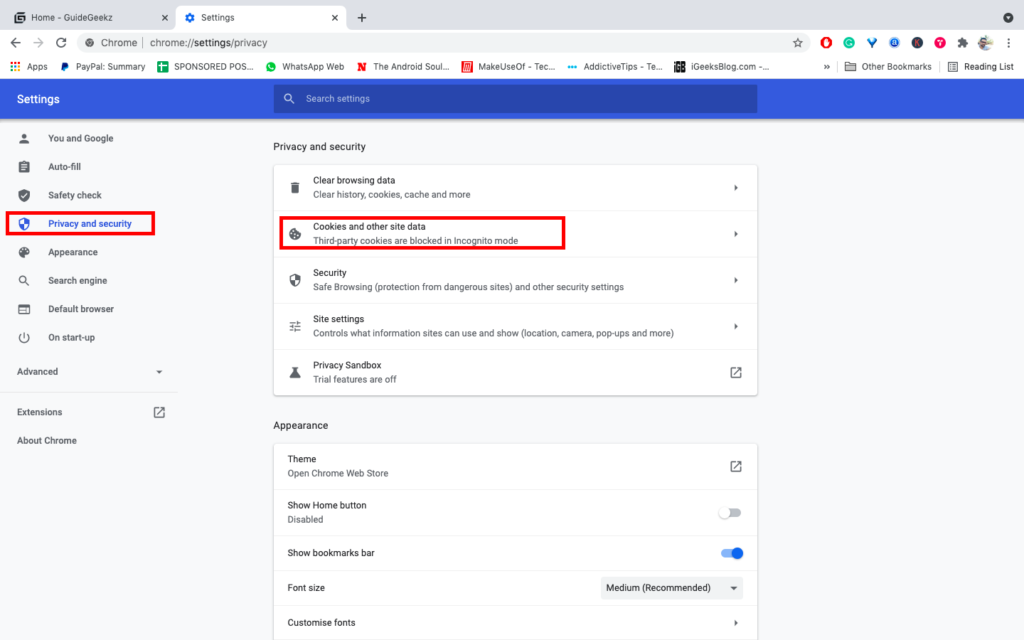
  2. Select “Privacy and Security” from the left-hand pane in the Settings screen.Disable FLoC in Google Chrome Desktop
  3. Click the “Cookies and other site data” option on the right-hand side.
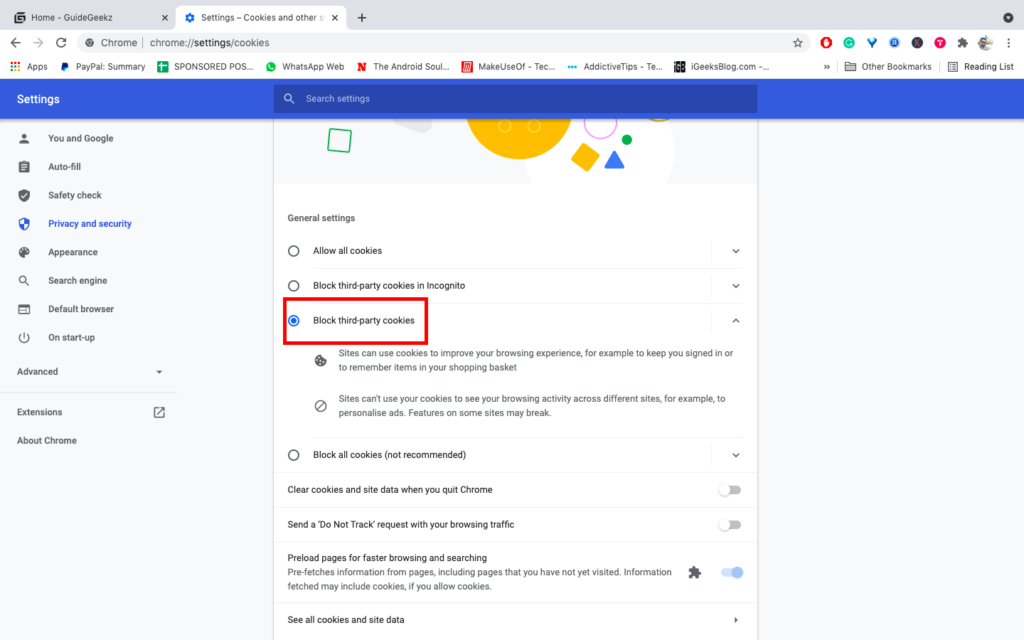
  4. Select “Block Third-party Cookies” from the General settings section.Disable FLoC in Google Chrome Desktop
  5. Done, Blocking third-party cookies will disable FLoC on your Chrome browser.

How to Disable FLoC in Google Chrome on Mobile

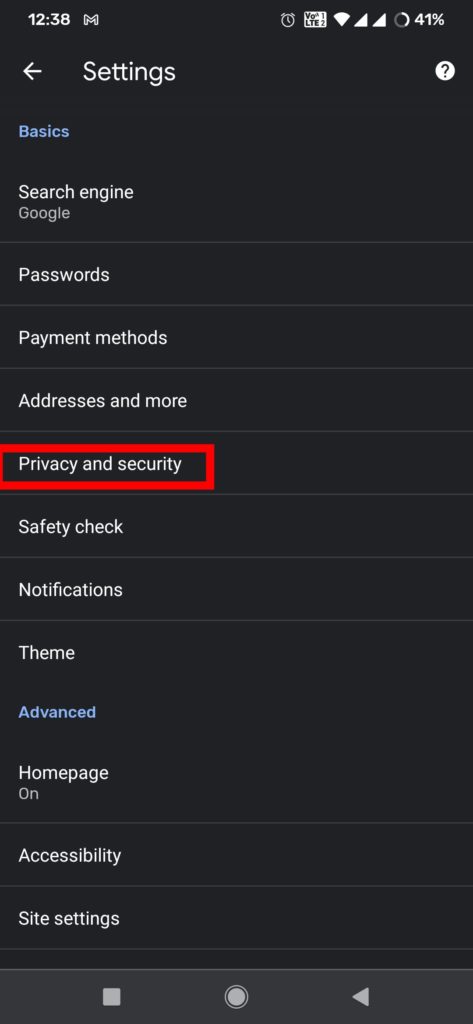
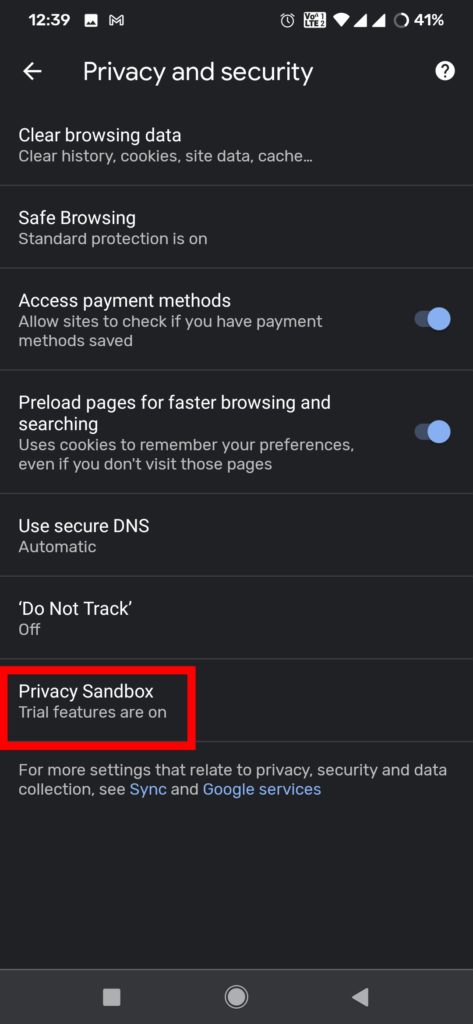
To disable FLoC in Google Chrome on Android or iPhone, go to chrome setting and turned off privacy sanbox. In Chrome on Android, open the main menu, then go to Settings > Privacy and security > Privacy Sandbox.

  1. Open the Google Chrome browser on your phone.
  2. Head over to Settings and open the “Privacy and security” section.
  3. Tap on the “Privacy Sandbox” option.
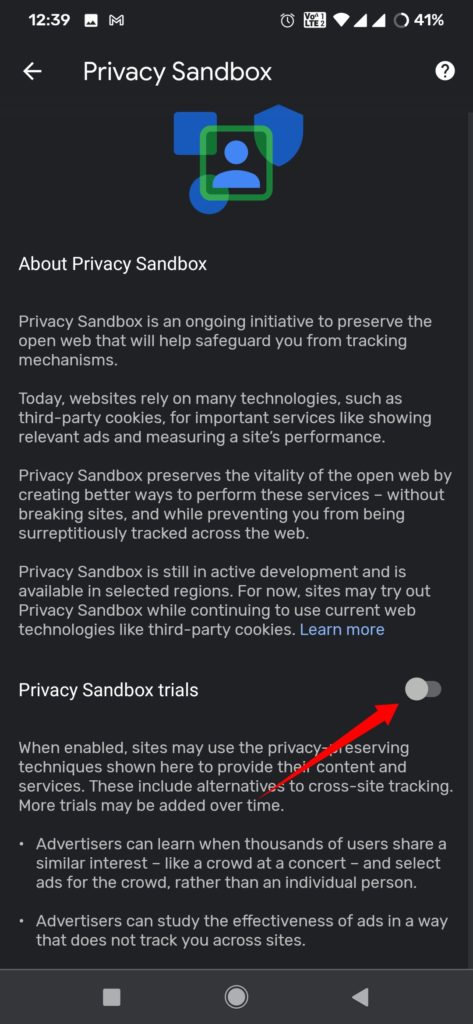
  4. Disable the “Privacy Sandbox trials” toggle.
  5. Done, you have successfully opted out of Chrome’s Privacy sandbox trials.

Wrapping Up: Opt out of Google’s privacy sandbox (FLoC) in Chrome

This is the easiest way to Disable FLoC in Google Chrome. It’s worth noting that the option will sync with your Google account. It means that if you turn off FLoC on one device, it will turn off on all of your other devices as well.

Have any questions? Do let us know that in the comments below. Stay connected with us via Facebook and Twitter to read more such helpful posts.

The latest MIUI 12.0.6.0 update for POCO M3 starts rolling out via OTA. The update brings the latest security patch to the device. Follow the below guide to Download MIUI 12.0.6.0 India Stable ROM for POCO M3.

MIUI 12.0.6.0 India Stable ROM for POCO M3 is a stable version and can be flashed via Recovery or via Fastboot. You can download MIUI 12.0.6.0 for POCO M3 from below.

You can Download POCO M3 MIUI 12.0.6.0.QJFINXM ROM from below and also manually check for the update by going to Settings -> About Phone -> System updates -> Check for update. Download MIUI 12.0.6.0 Stable ROM for POCO M3 from below.

Note:-

  • This Firmware file is only for POCO M3. Don’t try this on any other device.
  • Follow the steps correctly otherwise you may brick your device. We are not responsible for any damage to your phone.
  • It may erase your data, so it is advisable to take a complete backup of your phone for a safer side.
  • Ensure that your phone has at least 50-60% charged to prevent the accidental shutdown in between the process.

Download MIUI 12.0.6.0 India Stable ROM for POCO M3

  • POCO M3 OTA update – Download
  • MIUI 12.0.6.0 Recovery ROM for POCO M3 – Download
  • MIUI 12.0.6.0 Fastboot ROM for POCO M3 – Coming Soon

How to Install MIUI 12.0.6.0 India Stable ROM on POCO M3 –

To install MIUI 12.0.6.0 update for POCO M3 download either Recovery ROM or Fastboot ROM from above and use the below method to install this on your device.

Method 1 – Recovery Mode

Recovery Mode

  1. Download Recovery ROM for POCO M3 from above and save it on your device.
  2. Now launch the ‘Updater‘ app on your device.
  3. Click on the three-dot menu (‘…’ icon) at the top-right corner, and select the ‘choose update package‘.
  4. Browse through the files and select the package ending with .zip extension.
  5. Done. Your device will reboot on the latest version.

Method 2 – Fastboot Mode

1) First, Download Mi Flash Tool, extract it, and install it on your PC.

2) Now download Fastboot ROM for POCO M3 for your device.

3) Now boot your device into Fastboot mode by pressing the ‘Volume Down + Power‘ button.

4) Connect your device to the PC via a micro USB cable.

5) Now extract the Fastboot ROM and copy its path on the PC.

6) Now open MI Flash Tool and Paste the address bar of the ROM file folder path copied from above.

Mi Flash

7) First, click on the ‘Refresh‘ button (It will automatically recognize your device) and then click on the ‘Flash‘ button to flash MIUI 12 ROM on your Devices.

Mi Flash

8) Wait for some time to complete the process.

9) Done. Your device will boot on the latest version.

Wrapping Up:

Download MIUI 12.0.6.0 India Stable ROM for POCO M3 and flash it to update it manually. Comment below if you have any doubts.

The latest Android 11 based MIUI 12.0.11.0 update for Redmi Note 10 starts rolling out via OTA. The update brings a few improvements and fixes bugs. Follow the below guide to Download MIUI 12.0.11.0 Global Stable ROM for Redmi Note 10.

MIUI 12.0.11.0 Global Stable ROM for Redmi Note 10 is a stable version and can be flashed via Recovery or via Fastboot. You can download MIUI 12.0.11.0 for Redmi Note 10 from below.

You can Download Redmi Note 10 MIUI 12.0.11.0.RKGMIXM ROM from below and also manually check for the update by going to Settings -> About Phone -> System updates -> Check for update. Download MIUI 12.0.11.0 Stable ROM for Redmi Note 10 from below.

Note:-

  • This Firmware file is only for Redmi Note 10. Don’t try this on any other device.
  • Follow the steps correctly otherwise you may brick your device. We are not responsible for any damage to your phone.
  • It may erase your data, so it is advisable to take a complete backup of your phone for a safer side.
  • Ensure that your phone has at least 50-60% charged to prevent the accidental shutdown in between the process.

Download MIUI 12.0.11.0 Global Stable ROM for Redmi Note 10

  • Redmi Note 10 MIUI 12.0.11.0 OTA update – Download
  • MIUI 12.0.11.0 Recovery ROM for Redmi Note 10 – Download
  • MIUI 12.0.11.0 Fastboot ROM for Redmi Note 10 – Coming Soon

How to Install MIUI 12.0.11.0 Global Stable ROM on Redmi Note 10 –

To install MIUI 12.0.11.0 update for Redmi Note 10 download either Recovery ROM or Fastboot ROM from above and use the below method to install this on your device.

Method 1 – Recovery Mode

Recovery Mode

  1. Download Recovery ROM for Redmi Note 10 from above and save it on your device.
  2. Now launch the ‘Updater‘ app on your device.
  3. Click on the three-dot menu (‘…’ icon) at the top-right corner, and select the ‘choose update package‘.
  4. Browse through the files and select the package ending with .zip extension.
  5. Done. Your device will reboot on the latest version.

Method 2 – Fastboot Mode

1) First, Download Mi Flash Tool, extract it, and install it on your PC.

2) Now download Fastboot ROM for Redmi Note 10 for your device.

3) Now boot your device into Fastboot mode by pressing the ‘Volume Down + Power‘ button.

4) Connect your device to the PC via a micro USB cable.

5) Now extract the Fastboot ROM and copy its path on the PC.

6) Now open MI Flash Tool and Paste the address bar of the ROM file folder path copied from above.

Mi Flash

7) First, click on the ‘Refresh‘ button (It will automatically recognize your device) and then click on the ‘Flash‘ button to flash MIUI 12 ROM on your Devices.

Mi Flash

8) Wait for some time to complete the process.

9) Done. Your device will boot on the latest version.

Wrapping Up:

Download MIUI 12.0.11.0 Global Stable ROM for Redmi Note 10 and flash it to update it manually. Comment below if you have any doubts.

WhatsApp is a terrific way to communicate with friends and family via instant messaging. Among other things, it allows you to share documents, photos, and videos. WhatsApp has modified the location on the device where pictures, videos, GIFs, audio, documents, and stickers can be saved. Following this modification, many users reported that they were unable to view their media on WhatsApp. However, if you are facing the issue, there is an easy way to Restore Media Visibility on WhatsApp for Android.

The blurred thumbnail with a download button will appear in place of the deleted media file. WhatsApp appears to automatically produce a .nomedia file after relocating media, thus you won’t be able to see it following the path change.

How to Restore Media Visibility on WhatsApp for Android

Here we share two ways to Restore Media Visibility on WhatsApp for Android. You can either change the Media visibility setting from the WhatsApp app or you can delete the .nomedia file from the file manager. Check how to fix WhatsApp images not showing in Gallery issue on Android from below.

Method 1 – Enable Media Visibility in WhatsApp

With this method, you can enable the media visibility setting from the WhatsApp app. After enabling this setting all your media will be visible.

  1. Open WhatsApp on your phone.
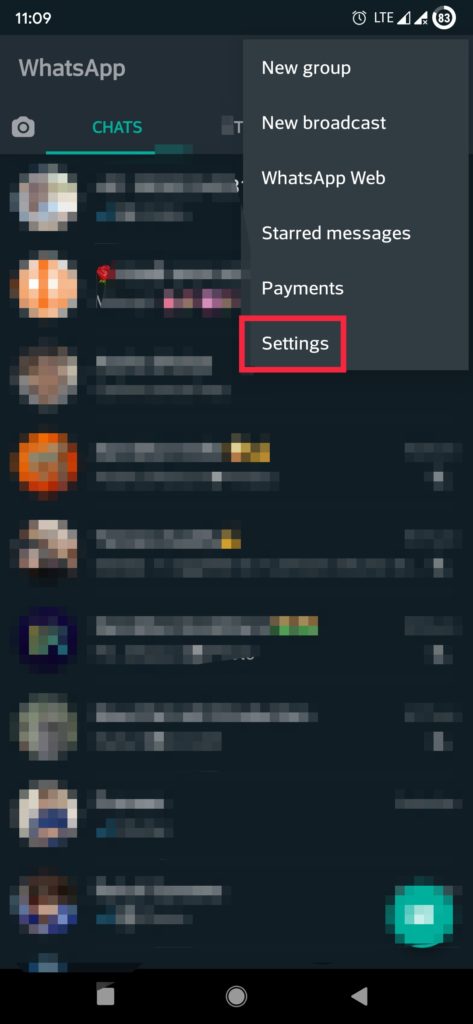
  2. Click on menu options (three-dot in the top right)
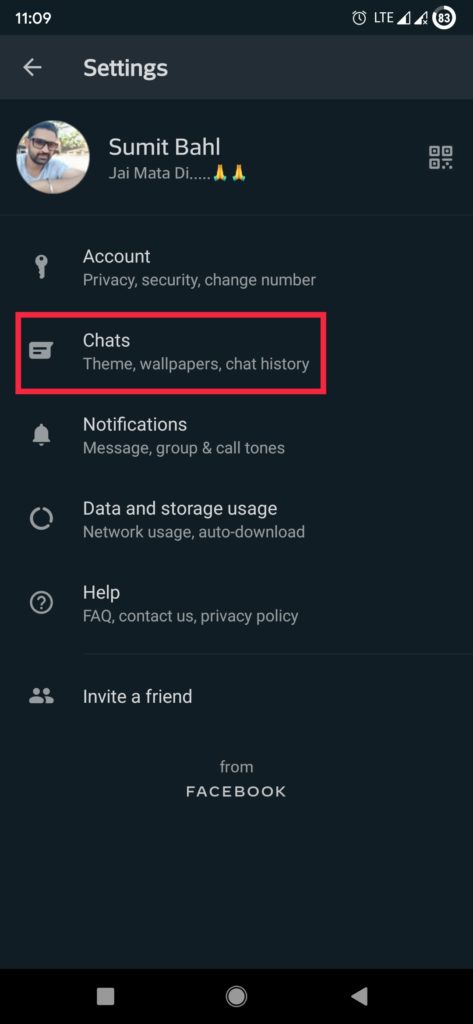
  3. Tap on Settings and click on chat.
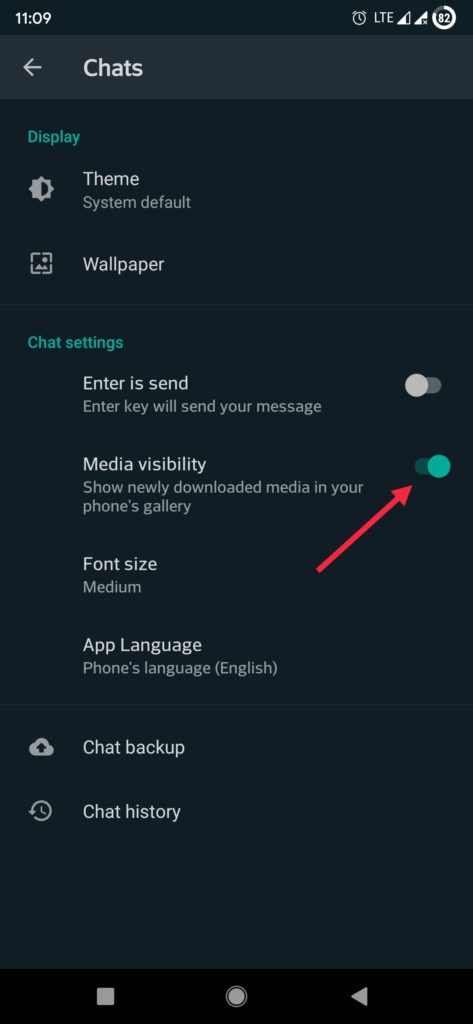
  4. Enable the toggle in front of Media Visibility.
  5. Once enabled, you should be able to see your media on the photo gallery app.

Method 2 – Delete the .nomedia File

WhatsApp automatically creates a .nomedia file after moving media. So the easiest way to fix this issue is to delete the .nomedia file from that folder.

  1. Open the File Manager on your phone.
  2. Now enable the option Show Hidden Media Files and return to internal storage on your phone
  3. Head over to the WhatsApp -> Media -> WhatsApp Images.
  4. Delete a file named .nomedia.
  5. Done!

Wrapping Up: Restore WhatsApp Media Visibility

If you’re having trouble seeing your media on WhatsApp due to a media bug, try the options listed above. Have any questions? Do let us know that in the comments below. Stay connected with us via Facebook and Twitter to read more such helpful posts.