Author

Sumit Bahl

Browsing

If you are a rooted user and a fan of custom ROMs, you should know the importance of data backup. While switching to the ROMs, things can go wrong in the process. That’s why it is highly advisable to take backup your rooted Android phone before performing actions like flashing ROMs, installing themes or mods.

Luckily, with apps like OAndBackupX, you can easily take a backup of your rooted Android Phone. OAndBackupX is an open-source app and comes with a brand new sleek and modern user interface. It is compatible with the latest Android versions and has features like the ability to handle split APKs, batch backup and restore, support for in-app backup encryption, and many more. Download OAndBackupX to Backup Rooted Android Phone from below.

Features of OAndBackupX:

  • It allows you to backup individual apps and their data.
  • Both backup and restore of individual programs one at a time and batch backup and restore of multiple programs are supported.
  • Restoring system apps should be possible without requiring a reboot afterward.
  • Backups can be scheduled with no limit on the number of individual schedules, and there is the possibility of creating custom lists from the list of installed apps.

Download OAndBackupX to Backup Rooted Android Phone

OAndBackupX is avialble on the GitHub, F-Droid, and Izzyondroid. Download OAndBackupX from below.

[su_button url=”https://github.com/machiav3lli/oandbackupx/releases/latest” target=”blank” style=”soft” background=”#dc5e49″ size=”7″ center=”yes” rel=”nofollow”]Download OAndBackupX apk from Github[/su_button]

[su_button url=”https://f-droid.org/packages/com.machiav3lli.backup/” target=”blank” style=”soft” background=”#dc5e49″ size=”7″ center=”yes” rel=”nofollow”]OAndBackupX F-droid page[/su_button]

[su_button url=”https://apt.izzysoft.de/fdroid/index/apk/com.machiav3lli.backup” target=”blank” style=”soft” background=”#dc5e49″ size=”7″ center=”yes” rel=”nofollow”]Download OAndBackupX app from Izzyondroid[/su_button]

How to Install and Use OAndBackupX

Installing OAndBackupX is a breeze; all you need a rooted device. Once installed on your device, you can take a backup of an individual app or perform a batch backup. You can choose between user app or system apps, and one of the best things about this app is it will also backup app permissions. Check how to Use OAndBackupX from below.

  1. Download OAndBackupX from above and install it on your device.
  2. After successful installation, Pop-up appears on the app to grant the permission to root access, grant it.
  3. After successful authorization, the app will scan all apps and shows a list of all installed apps.
  4. Now you tap on any app to take a backup.
  5. If you want batch backup then select backup option from the bottom bar.
  6. Choose the app and take backup easily.
Download OAndBackupX to Backup Rooted Android Phone
Pic credit: androidcommunity.com

Wrapping Up:

If you are looking for an app to take the backup of apps and data, then you should try OAndBackupX. This will not only let you take a backup of your Android apps and data but also take the backup of apps permission.

Have any questions? Do let us know that in the comments below. Stay connected with us via Facebook and Twitter to read more such helpful posts.

Google starts rolling out the much-needed background blurring feature on Google Meet. Once turn it on, it will only focus on you and blur out the rest of your background during video calls in a similar manner as a photo taken in portrait mode. This making it easy for users to minimize background distractions during a video call. Check the below steps to Blur Your Background in Google Meet.

In a new blog post, Google revealed that they added a feature that “intelligently separates you from the background, blurring your surroundings while keeping you clear and in focus.” Besides the ability to blur backgrounds during a video call, Google Meet will also let you see up to 49 people simultaneously when using the tiled view.

Background blur in Google Meet works directly within your browser and does not require an extension or any additional software. The feature is useful for those who have messy rooms. However, Google warns turning on background blurring might slow down your device. So it is recommended to turn on this only required else turning it off to make other apps to run faster.

Blur Your Background in Google Meet

How to Blur Your Background in Google Meet

The feature to blur background in Google Meet is turned off by default, but the user can easily enable it from setting. It would work on Chrome browsers operating on Windows and Macs. The option to blur background in Google Meet Android app will be rolled out soon.

There are two options to blur the background in Meet. You can enable the option during the meeting or before the meeting starts. Check both the options below.

  1. Open Google Meet via meet.google.com.
  2. Click the More (three-dot) button at the bottom right.
  3. Select Turn on Background Blur during a call, or before joining one. Once select, the effect will be automatically applied.
  4. Alternatively, you can also, quickly enable or disable the background blur toggle at the bottom right of the preview screen.
  5. Once activated, it will only focus on you and blur out the rest of your background. 

Still not working? Turn on hardware acceleration

If you are still having issues using background effects, then you need to turn on hardware acceleration. To do this, open the Chrome -> Settings (top left corner) -> System -> use hardware acceleration when available.

  1. Open the Chrome window and click the Chrome menu.
  2. Click on Settings and go to advance.
  3. Open System and Turn on Use hardware acceleration when available.
  4. Restart Chrome.

Wrapping Up:

If you are doing meetings frequently on Google Meet and don’t want anyone to show your room or background for any reason, you should follow the above steps to Blur Your Background in Google Meet.

Have any questions? Do let us know that in the comments below. Stay connected with us via Facebook and Twitter to read more such helpful posts.

With a recent update, Google integrates the Google Meet tab in the new Gmail app.  The new Gmail UI has included a Google Meet tab just below the compose button. This allows users to start a meeting on Google Meet by simply clicking on a Meet button in Gmail. However, it can be really annoying if you don’t have to make video calls regularly. The good news is Google has conveniently left an off switch to Remove Meet Tab From Gmail on Android.

The new Gmail UI is useful only if you use Google Meet regularly. The Meet tab is huge and takes a lot of space on the screen and gets irritating. However, if you do not rely on it for video calls and require more space to read mails, then there’s a way to disable the Meet tab. Follow the below guide to hide the Google Meet tab from the Gmail inbox.

How To Remove Meet Tab From Gmail on Android

The Meet tab in the  Gmail is not permanent, and if you want Google Meet and Gmail to work as separate apps, then you can easily hide Meet in the Gmail app. Google has provided an OFF switch, which will disable Meet from the Gmail app.

Hide/Remove Google Meet tab from Gmail app on Android

To turn off Meet in Gmail app, you need to go to Gmail settings and choose the account and uncheck the Meet tab to disable meet in Gmail app.

  1. Open Gmail on your device and tap the hamburger menu icon from the top left.
  2. Scroll down and open Settings.
  3. Choose an account and tap on the Gmail address to open the settings specific to that Google Account.
  4. Scroll to General > Meet, and turn off the toggle to show the Meet button.
  5. If you are using multiple accounts, you’ll need to disable the Meet tab for each of them individually by following the same steps for each.
  6. Done, your Gmail app will revert to its old design.

Wrapping Up:

By following these simple steps, you can remove Meet Tab From Gmail on Android and revert to its old design. The whole process only takes a few seconds, and you won’t see the Meet tab again.

Have any questions? Do let us know that in the comments below. Stay connected with us via Facebook and Twitter to read more such helpful posts.

WhatsApp is the most popular instant messaging app in the world where billions of people share images and videos with their friends, relatives, colleagues, and loved ones. Once you receive and downloaded these media files from a contact in WhatsApp, it’s automatically saved to your phone’s storage. Most of the media files received are not worthy of keeping to the gallery. That’s why you should use the below settings to Stop Saving WhatsApp Media to Phone’s Gallery.

These WhatsApp media maybe be confidential, and anyone with access to your gallery can see that. These WhatsApp media not only clutter your phone’s gallery but also eat up a lot of storage. Luckily, there’s an option available to de-clutter your phone and stop WhatsApp to save images and videos to the gallery automatically.

How to Stop Saving WhatsApp Media to Phone’s Gallery

There are multiple ways to hide WhatsApp media from the phone gallery automatically. As a solution, you need to deactivate the “Show media gallery” under Media visibility. After that, any new media file will be blocked and showing up in the gallery. You can still be able to view them from the WhatsApp threads that they were received.

Stop all WhatsApp media from appearing in the gallery

With this method you can stop all WhatsApp photos & videos from appearing in the phone’s gallery app. Your media files will not show up in the gallery, but it will still be accessible within WhatsApp. Check the below steps to stop all WhatsApp media from appearing in the gallery.

  1. Open WhatsApp on your phone.
  2. Click on menu options (three-dot in the top right)
  3. Tap on Settings and click on chat.
  4. Disable the toggle in front of Media Visibility.
  5. Once disabled, your newly downloaded media will not be showing in the phone’s gallery.

Hide Photos & Videos in WhatsApp from individual chats and groups

Un-checking the ‘Show media in gallery’ option will automatically hide WhatsApp media received from all the chats. But what if you want to show or hide WhatsApp photos or videos from individual chats and groups? It’s possible, to do that, you need to open that particular chat or group and control the media visibility option. Check the below steps to hide all new photos & videos in WhatsApp from individual chats and groups.

  1. Open the chat or group whose images/videos you don’t want to appear in the gallery.
  2. Tap on the three-dot menu and select View contact or Group info (you can also tap the contact’s name or group subject)
  3. Tap on the Media visibility option.
  4. Set “Show newly downloaded media from this chat in your phone’s gallery?” to Yes (If you want media to appear in the gallery) and No (If you don’t want media files to appear in the gallery).
  5. Select OK to complete the process.

Dot Method to Hide WhatsApp Media

You can create a .nomedia file to hide all the WhatsApp media files from the gallery completely. To do that, go to your File Manager and open the WhatsApp folder. On the WhatsApp folder, tap on Media > WhatsApp Images and create a new file named .nomedia within it. Check how to use the dot method to hide WhatsApp media from below.

  1. Open the File Manager on your phone.
  2. Head over to the WhatsApp -> Media -> WhatsApp Images.
  3. Create a file named .nomedia.
  4. Done!

Wrapping Up:

If you want to have some privacy or want to keep your gallery clean from WhatsApp clutters, you should hide these media files from the gallery. You can also stop Whatsapp media from saving to Google Photos by stop back up & sync or deselect from the device folder.

Have any questions? Do let us know that in the comments below. Stay connected with us via Facebook and Twitter to read more such helpful posts.

Whether you have an iPhone or Android device, you’ll find that there are a variety of apps available for you to choose between. It can be difficult to decide which apps are essential and worth taking up your phone’s precious memory. This task can be particularly confusing after buying a brand new phone and being faced with a clean slate and having to start from scratch.

For that reason, we’ve put together a list of 8 of the most important apps you should install on your new phone to make your life better!

1) Google Drive

Google Drive

Google Drive is a cloud storage service that is very popular with many phone users. This app is very useful and allows you to store your documents and media on Google servers, protecting your phone from additional clutter.

This way you can have ample free space in your hard drive and you can access your stored files and media from any device having an internet connection. This app is free of charge and gives you access to all Google’s services including Gmail, YouTube, Play Store and so on. Google Drive app is available on both Android and iOS devices.

2) WhatsApp

WhatsApp

WhatsApp has more than 2 billion loyal users all over the world. It’s completely free of charge and allows you to chat with your friends and family using just an internet connection. It’s a popular chat app and is accessible in most of countries and also provides voice and video call services, nationally and internationally.

It is easy to download this app and only requires your phone number for verification, though you will need to be connected to the internet to send messages and make calls. WhatsApp is available on both Android and iOS phones. Installing this app on your phone is a must to stay connected with your friends and family no matter where you are.

3) eBay

eBay

This is a shopping app which allows you to buy and sell electronics, clothes, beauty products, home appliances and much more. A variety of top brands are also associated with eBay and it is considered one of the best online marketplaces for shopping straight from your phone. eBay offers their users the best mobile phone deals along discounts in fashion and beauty products. Installing this app on your phone is a must if you enjoy online shopping.

4) Google Maps

Google Maps

This is an online map from Google. The Google Maps app is free of charge and is available for Android as well as iPhone users. Installing this app on your phone is very beneficial since it will give you the directions for virtually anywhere, as well as useful info like transit times and traffic congestion. You just need to fill the address of your destination, business or landmark and this app will give you a step-by-step and turn-by-turn directions.

This app can also estimate the total time to reach your destination and give you an idea of the traffic you might encounter on your way. Google Maps is a must to install on your phone since it provides maps for almost every country in the world.

5) Kindle

Kindle

This app is available for both Android and iPhone users. If you are a voracious reader then installing this app on your phone is a must. Amazon Kindle app gives access to a wide range of eBooks on your phone. The advantage of reading on a Kindle app is that you can adjust the screen brightness, font sizes and background color while reading, avoiding eye-strain while giving you access to all your favourite books from your phone.

6) Find my Device 

Find my Device 

Find My Device is a Google app which is free of charge. This app allows Android phone users to remotely track, lock or erase the data on a lost or stolen phone. It can locate your phone only within a certain distance. This app is great if you want to protect your data stored in your phone from getting into the wrong hands.

iPhone users can install the Find My app which is available on iOS devices and can even use it to help you find your device when it’s offline.

7) Netflix

Netflix

Netflix is a highly popular entertainment app with both Android and iPhone users. This app lets you watch your favourite shows or movies. They have a wide variety of movies and shows belonging to various genres. This app uses your phone data or Wi-Fi connection to connect you to their vast collection of entertainment.

The app is free but you’ll need to subscribe to be able to watch Netflix and the subscription fee varies according to your location and membership plan. This app is essential for any avid TV fan or movie buff.

8) Uber

Uber

The Uber app allows you to hire a ride for a reasonable cost in many parts of the world, although Uber services depend on its legal status in your country and city. The Uber app provides individual as well as group rides and you’ll be notified of your estimated fare before booking your ride.

The app also provides you with the car and driver details for better security, while letting you track the car driver’s arrival on the app map. Features include UberPool which allows you to share your ride with other riders to save money. This app is available for Android as well as iPhone users.

Google Duo is one of the most popular video chat apps available, which is free to use and offer end-to-end encryption. People are using it to connect with their family and friends, participate in courses, or attend online classes. It is available for Android, iOS, web, and now according to a recent blog post, Google Duo is now available for Android TV too. You can check the below steps to Install Google Duo on Android TV.

Most people video chat and conference through their smartphones but video chat with family, friends, and colleagues over big TV screens will be a lot more comfortable. Google Duo on Android TV will allow you to initiate one-on-one and group calls from your TV. If your Android TV doesn’t have a built-in camera, you can plug in a USB camera for the video calls.

The integration of Google Duo with Android TV will be coming in a few weeks. However, if you have an Android TV and want to try out the feature now, then you need to download the latest version of the Google Duo and sideload it on your smart TV. Check how to install Google Duo on Android TV from below.

Download Google Duo for Android TV

Google Duo for Android TV is currently not available for the TV Playstore, but it will be available soon. Until then, you need to download Google Duo apk for Android TV from websites like APKMirror or APKpure.

[su_button url=”https://www.apkmirror.com/apk/google-inc/duo-by-google/duo-by-google-99-0-327700793-dr99_rc12-release/google-duo-high-quality-video-calls-99-0-327700793-dr99_rc12-android-apk-download/” target=”blank” style=”soft” background=”#dc5e49″ size=”7″ center=”yes” rel=”nofollow”]Download Google Duo apk for Android TV[/su_button]

Prerequisites:

  • Android TV with webcam and built-in microphone,
  • If your TV doesn’t have a built-in camera, then use a separate USB web camera for TV.
  • File explorer app like Solid Explorer or ES File Explorer must be installed on the TV.

How to Install Google Duo on Android TV

  1. Download the latest Google Duo app from above.
  2. Now transfer the Google Duo apk file to Android TV. You can sideload APKs from your PC with ADB, by using a USB drive or by using an app like Send files to TV. For more details, you can follow this guide to sideload apps on Android TV.
  3. Download and install any File Manager like ES File Explorer or Solid Explorer (on Android TV) from Play Store and open it.
  4. Browse Google Duo that you downloaded from above and tap on it to install it on your Android TV.
  5. Finally, open Google Duo to enjoy the video chat on a larger screen.

Wrapping Up:

Video chat options on TVs are relatively rare. But Google Duo makes it possible, and it is completely ready for the TV experience. The UI on TV looks great, call quality is excellent, and the video looks really great. You should try Duo on your Android TV right now; you are going to love it.

Have any questions? Do let us know that in the comments below. Stay connected with us via Facebook and Twitter to read more such helpful posts.

Most of us receive lots of notifications on our phones on a daily basis. These notifications will stay at your notification drawer, and most of the time, users dismissed these notifications without reading them. But is it possible to retrieve old notifications even if they have removed from the notifications bar? Yes, no matter if you have accidentally dismissed notifications or swipe them in a hurry. There are few ways available with that you can easily view notification history on Android smartphones.

These dismissed notifications are not lost forever. They’re stored in the system’s Notification Log. However, it is not easily accessible, and you cannot view this log in the main settings app but once enable, you can view your notification history on Android.

Most of the device with the stock version of Android has built-in access to those dismissed notifications. Also, there are third-party apps available which open notification log to see old notifications in Android. In both cases, you won’t be able to access the notifications you have dismissed before turning on the feature. So if you ended up dismissing something important, then follow the below steps to access notification log on Android.

How to View Notification History on Android Smartphone

There are a couple of ways to read old notifications that you have cleared. The first method involves an official setting, and the other one can be accessed with a third party app. Here we share both ways in detail, so check the below steps on to view Notification History on Android smartphones.

Method 1: View dismissed notifications with Android Widget

Pixel or stock Android users can easily access dismissed notifications by customizing a special widget called Notification Log. Check the below steps to enable notification logs widget on Android device.

  1. Unlock your device and long-press anywhere on the home page.
  2. From the lower part of the screen, choose Widgets.
  3. Scroll down and select Settings Shortcut.
  4. Long-press the setting shortcut icon and drag it to your home screen.
  5. A list of features will open; find the Notification Log listed there. Tap on the widget, and you’ll be granted access to your old notifications.

Method 2: Access Notification History with a third-party app

The first method isn’t so user-friendly. It will show you a brief snippet of information and a line of codes when you clicked on dismissed notifications. It will show all the intricate details of the notifications. There are few apps available that can let you view past notifications you received in a more straightforward manner.

  1. Open the Google Play Store on your Android device and install the Notification History Log app on your device.
  2. Once the app is installed, launch it.
  3. The app will ask for permission to access your notifications.
  4. Tap Allow to get full control over your past notifications.Access Notification History with a third-party app

How to Check Notification History in Android 11

Google implements notification management tweaks and makes it much easier for you to check notifications history on Android 11. Until now, the feature remains hidden, but the newer version of Android added this option in the settings menu. The notification Log got a visual revamp to make it more user friendly. Check the below steps to access notification history in Android 11.

  1. Open phone Settings on your phone.
  2. Go to Settings > Apps & notifications > Notifications.
  3. Click on Notification History.
  4. Now enable it to turn on the feature.

Wrapping Up:

You never have to worry about losing a crucial piece of information by dismissing a notification. No matter which device you are using a stock Android or a non-stock version, you can always view the notification history of all the dismissed notifications with the above methods.

Have any questions? Do let us know that in the comments below. Stay connected with us via Facebook and Twitter to read more such helpful posts.

Nowadays, there is a need to develop data-backed management strategies. This is why every company is pushing to make use of big data in all departments, especially in marketing. Probably, you have heard about database marketing, which is also referred to as customer relationship management.

This approach makes use of data from both existing and potential customers to learn more about their needs and prepare personalized strategies. So, all you need is a customer database and the right tools and techniques to make one.

Now that you know what database marketing is, it is time to learn the benefits that come with it. Read on to discover more.

Benefits of Database Marketing

  •   Ability to make better customer-related decisions – Sales and marketing teams together with the management always make decisions that affect the customers and the success of the business. It is easy to create sales and marketing strategies when you have reliable data to help you. Database marketing is a key approach in establishing the right marketing strategies for any market segment.
  •   Understanding and predicting customer behavior – Even in the same segment, customers might behave differently. But there is always a trend that you can easily identify if you manage their data well. When you have the right tools to collect customer data and analyze and present it, you will be surprised to find some trends in their behavior. From this, it is easy to predict their future actions and make the right decisions.
  •   Promotes customized and personalized marketing – By understanding your loyal and potential customers, one is able to customize the marketing strategies to suit the needs of each customer. With marketing database services from a reliable data solutions provider, reaching all customers with personalized marketing information is very easy.
  •   Increasing sales and the profit margin – We all know that increased sales should result in an increased profit margin unless there is a mismanagement of some sort. Database marketing grows the profit margin by converting more potential customers into buyers. Also, it locks in the loyal buyers. Research reveals that businesses that are data-oriented record increased sales and profit margins annually, which is also the main reason why companies grow.

Common Types of Database Marketing

Newbies to this approach should know the different types that are available. First, there is the customer database marketing used by businesses that sell to consumers. This is commonly called the B2C approach. The main aim of the approach is to grow the customer base so that the business can be a major success. Actually, customer database marketing is a common approach in the world of business.

For example, retail supermarkets, banks, and insurance companies, to mention a few, have massive collections of data about their customers. They process this on a daily basis in an effort to understand their potential and loyal customers before they reach out to them with the right marketing strategies.

On the other hand, there is the business database marketing for companies that sell products directly to businesses. It is commonly called the B2B approach. Just like their counterparts, they focus on using available client data to learn their needs, create and implement marketing strategies, and have as many customers as possible.

For example, suppliers of raw products and business consultants collect data about their clients and use it to make customized marketing strategies. The bottom line is to increase the client base as well.

Conclusion

Social media platforms such as Facebook also use a database management approach to categorize users and reach them with customized information. Any business can use this approach to improve their marketing strategies and make more profit. So, database marketing can provide great benefits to your business.

With the sudden and surprising ban of TikTok by the Indian Government, Instagram took a smart move and launched “Reels.” It’s the newest feature that allows the users to create 15-second videos where they can add various songs, effects, filters, and audios and share them with followers on their Feed. It is already available live in Germany, France, and now it has entered into Indian markets too.

The latest feature allows users to shoot video, add filters, and music from the Instagram music library and share it beyond the platform. Videos made on Reels can be shared as feed posts as well as on the Instagram stories. Here we share How to Use Instagram Reels on Android Device in detail.

What are Instagram Reels

Reels is a new way to discover and create short, entertaining videos on Instagram. There is no separate standalone app for Reels, and the feature will appear integrated into your Instagram app. It will appear as a part of the Instagram Stories section.

The feature Reels is integrated within the Instagram app, and that will allow users to record, edit, create, and share a 15-second video. Later, Reels video can share in Explore and Feed section of the platform. Currently, Instagram has not provided any monetization methods, but it is an excellent source to share their work.

Features of Reels

Reels has offering editing tools like timer, speed, rewind, and alignment. User can use their own audio, add effects, adjust speed, add their username, and if the account is set to public, other people can use it in their clips.

  • Recording and Editing – Reels offers 15-second videos. Once recorded, users can edit or trim the videos, add effects, add multiple titles, stickers, GIFs, and many more.
  • Effects – Instagram Reels offers some fantastic filters and lets users add AR effects. Users can browse the filter library by tapping on the Effect icon and then scroll to the end to check all the filters.
  • Timer – Reels allow you to select how long you want to record. Users can make a video ranging from 0.2 seconds to 15 seconds. This feature is perfect for solo users who need to film themselves performing, dancing, or simply talking in front of the camera.
  • Speed – Reels can offer speed controls for speeding up or slowing down audio and video. Users can manage the speed of your video by tapping on the Speed icon and select from .3x to 3x.
  • Audio – Reels lets users browse through a bunch of sound from the Instagram Music library, allows users to use their own voice. You can also select your song, and if you do that, your audio will be attributed to you, and other users can include it in their own reels.
  • Align – Instagram Reels allows you to line up the objects from your previous clip. It will help you create smooth transitions that will be seamless.

How to Use Instagram Reels on Android Device

Using Instagram Reels on Android is very easy. First, the user can record short videos within the Instagram app, and once the video record, you can add edit or add effects to your creation. Check below how to create Instagram Reels on Android, Edit Reels videos, or where to watch Instagram Reels videos.

How to Create Instagram Reels on Android

To create Instagram Reels on Android, open the Instagram app -> head to the camera option -> click Reels at the bottom of the screen -> select the tools to record and edit your video. Check below steps to Create Instagram Reels on Android.

  1. Open the Instagram app and tap on the Camera icon from the top-left of the screen.
  2. You will see three options at the bottom of the app Live, Story, or Reels.
  3. Tap on the Reels option.
  4. Tap on the Audio option and select a song from the Instagram music library or use original audio by simply recording a Reel using the audio.
  5. Now tap on Time, Effects, Speed, and select your desire settings for your Reel.
  6. Now, hold the white button to record your video.
  7. Once complete, you can Download your Reel, add Sticker, or add text to the video.
  8. You can now post your Reel to your Instagram story, page, or save the Reel to your drafts for further editing.

How to Edit Reels Saved in Drafts

Users can save the Reels to the draft for further editing. The Reels you have created and saved in drafts can be accessed from your Instagram profile page. The draft will be saved until you share or delete them. Check below steps to Edit Reels Saved in Drafts.

  1. Go to your profile, then tap the Reels page to Edit Reels Saved in Drafts.
  2. Tap on the Drafts from the Reel page and select the Reel you want to edit.
  3. Select the edit from the top-right corner of the page and then tap on the Camera icon to continue.
  4. Now you can edit, add different audios, choose a filter, or continue your record.
  5. Once done, share or publish your video.

How to Add a Prerecorded Video to Instagram Reels 

You can easily add a Prerecorded Video to Instagram Reels by simply tap the Camera Roll button in the top left corner of the screen, and browse the various videos in your camera roll. To edit a draft of your Reel from your camera roll, check the below steps.

  1. Open the Instagram app and tap on the Camera icon from the top-left of the screen.
  2. Scroll to Reels at the bottom of the screen.
  3. Tap the gallery icon in the bottom left and choose the draft or video from your camera roll.
  4. Now edit the video as per your need to share the Reel on the platform.

How to watch Instagram Reels

There are multiple ways to watch Instagram Reels easily. You can browse your Feed till you spot any Reels video, or you can even watch Reels on the specific profile’s home page.

  • Explore Content – You can watch Instagram Reels by open your Instagram profile and tap the magnifying glass. You can Tap on the Reels and swipe down to view more Reels videos. The Explore section of Instagram Reels has content from public accounts, which show the content based on your preferences, likes, and dislikes.
  • Browse Content – Alternatively, you can browse your Feed till you spot any Reels video. You will see the Reels icon on the bottom-left of the video, tap on it. The video will keep looping until you swipe down to watch more videos.
  • Profile Content – You can watch your personal Reels you’ve posted by going to your profile page and tapping the Reels icon.

Where to Post your Reel Video

Already created a Reel video! Now what? Where to Post your Reels Video? Users can choose to share their videos with either their followers or everyone on Instagram. Reels can be shared with the Feed as well as Explore so everyone on Instagram can view it. Users can also choose to send their Reel as a DM or post it to the Stories.

  • Reels Feed/Explorer – The best way to Post your Reel Video is to share it on Reels feed. By doing this, your content will be not be limited to your followers, it will be posted on public Feed, and anyone can see that.
  • Your Feed – You can also share your Reels video to your Feed. It allows your followers to see the video when they scroll through their Feed like usual.
  • Your Stories – Another way to post your Reels is to Post to your Story.
  • DM the video – You can also send the video directly to your friends.

Wrapping Up:

We share everything about Instagram’s new features, How to use Instagram Reels, how to create, edit, post, or where to watch Reels. If you have any questions about Reels, let us know in the comment section below.

With the recent update, iOS 14 offers a “Back Tap” feature in Accessibility settings that let you trigger many actions when you double-tap and triple tap on the back of your iPhone. Reportedly, Google was working on a similar gesture on Android 11. This feature lets you double tap on the back of your Pixel device to perform some amazing actions like launching Google Assistant, taking screenshots, launching the camera app, dismiss a timer, snooze alarms, controlling media playback, and more. Check How to Get Back Tap Gesture on any Android Device from below.

How to Get Back Tap Gesture on any Android Device

It may be possible Google made the gesture specifically for use with its devices. But XDA Developers forum member Kieron Quinn has found a way to Get Back Tap Gesture on any Android Device. It is possible with a third-party app called Tap, Tap.

Tap, Tap is an open-source app that makes use of the machine learning models that Google built to recognize double tap on the back of its Pixel devices.

Tap, Tap allows users to perform custom actions by double tap the back of your phone to do actions like toggle the flashlight, launch App, take a screenshot, lock the screen, or simulating a home, recent apps, or back button press. It is also compatible with Tasker and triggering a Tasker event. Tap, Tap gestures are fairly accurate and even work through thick, leather cases.

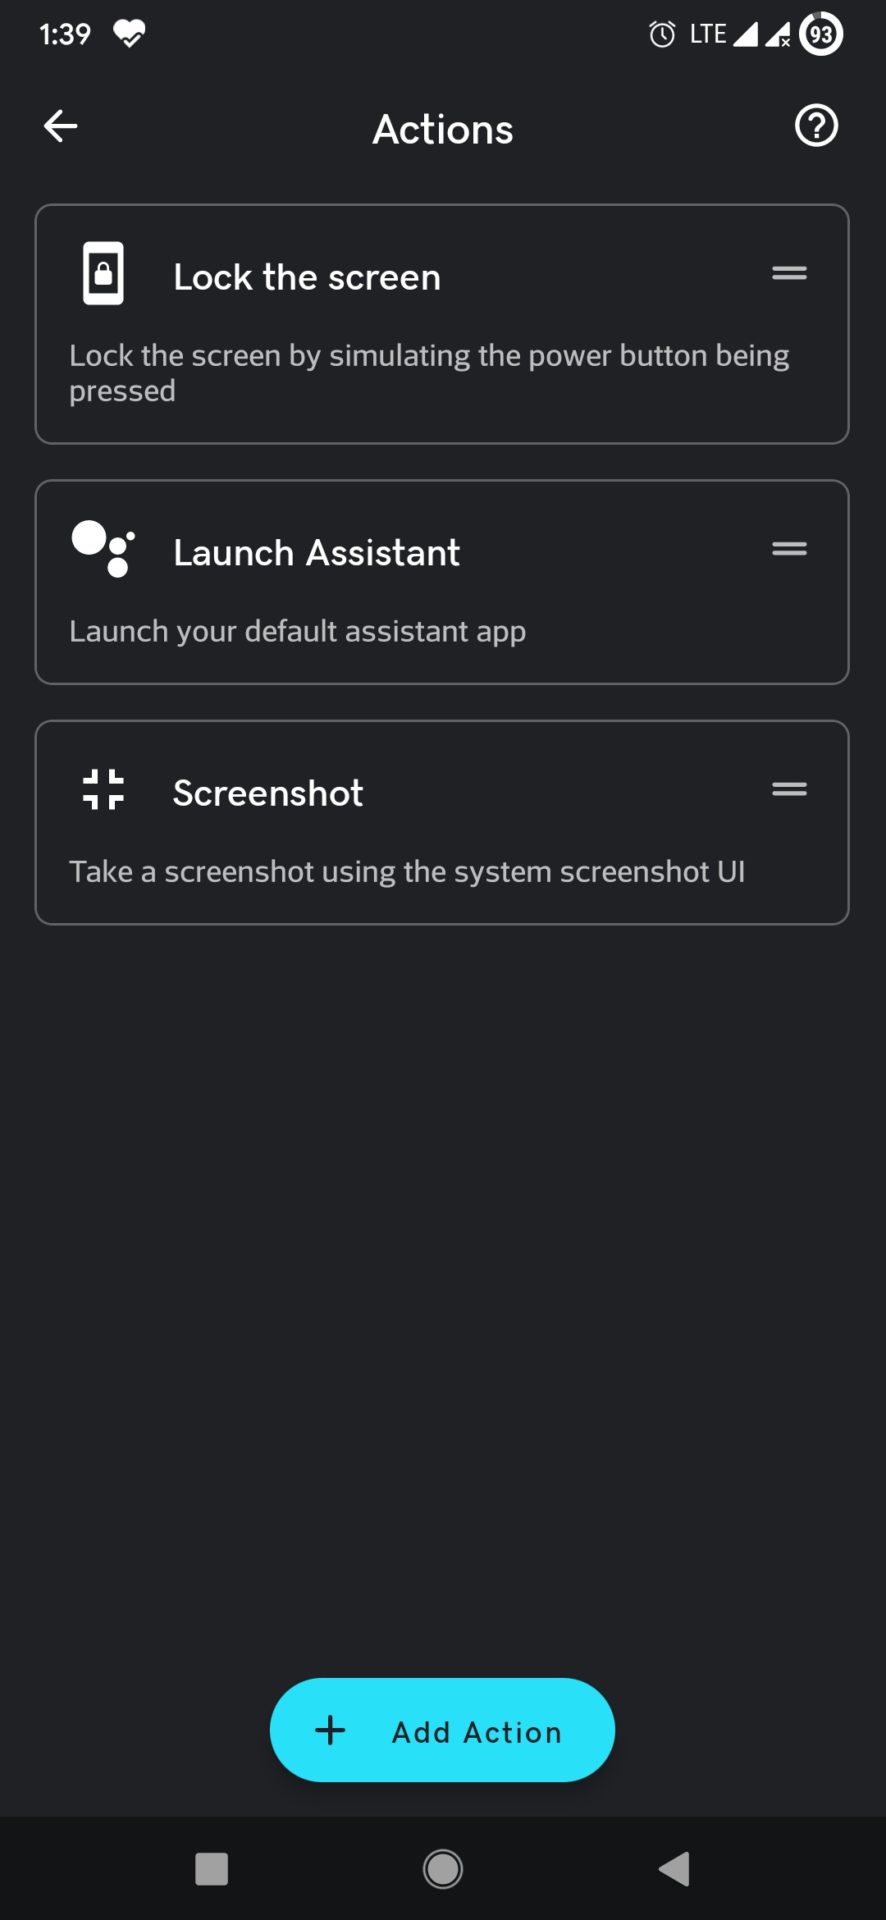
You can have multiple Actions listed here, but Tap, Tap will only prioritize running the first Action. If that Action fails to run for whatever reason, the next Action in the list is run.

Compatibility

The App is compatible with any devices running Android 7.0 Nougat and higher. It is already tested with OnePlus, Asus, Huawei, and other OEMs. However, it works best with the Pixel 3 XL, Pixel 4, and Pixel 4 XL. Tap, Tap also compatible with Tasker and run the Tasker plugin or trigger an event without any issue.

Download Tap, Tap apk

Currently Tap, Tap app is not available in the Playstore hopefully it will find its way to the Google Play Store. For now, you can download Tap, Tap apk from the XDA forums or from official Github page. After downloading the app, you’ll need to sideload the app onto your Android device. 

[su_button url=”https://github.com/KieronQuinn/TapTap” target=”blank” style=”soft” background=”#dc5e49″ size=”7″ center=”yes” rel=”nofollow”]Download Tap, Tap apk[/su_button]

[su_button url=”https://forum.xda-developers.com/android/apps-games/app-tap-tap-double-tap-device-gesture-t4140573″ target=”blank” style=”soft” background=”#dc5e49″ size=”7″ center=”yes” rel=”nofollow”]Tap, Tap XDA Forum thread[/su_button]

How Tap, Tap App Works

Tap, Tap app adapts the machine learning model that Google built to recognize accelerometer and gyroscope sensor readings that happen when you tap the rear of the device. At the same time, high-pass and low-pass filters used to refine the sensitivity further.

The App allows users to stack actions on top of each other as a fail-safe. It means when you double-tap the back of the phone, the first action will execute, but if the first action is already in use or fails to complete for some reason, then the App will move on to trigger the next Action in line.

To protect from false positive, the use of Gates. Gates feature to block the gesture from working in certain situations like it blocks an action when the camera app is open or when you are on a call, or when the screen is off.

How to Install and Configure Tap, Tap on your Android phone

You can easily install this app as a normal apk. Once the App is installed, accessibility services must be enabled. After that, you can install Actions, Gates, and more. Check below steps to Install and Configure Tap, Tap on your Android phone.

  1. Download and Install – First, download Tap, Tap app from above either from XDA or Github page. From XDA Forum Thread you will get all information about the updates and development of the application also you can get the latest download link. Once download, you can install Tap, Tap app like any other apk file.
  2. Enable Accessibility – Open the App, you need to enable the Accessibility Service in settings for the application to recognize back taps. You also need to disable Battery Optimization to keep the app running in the background.
  3. Configure Actions – Once enabled, you can head over to the Actions tab where you can click the “+Add Action” button to choose which action you’d like to trigger with a double-tap. You can choose from various actions like launch Google Assistant, Open Camera, wake or lock device, take screenshots, play or pause music, trigger Tasker event, and more.
  4. Configure Gates – The application also has a feature called ‘Gates’ which allows users to determine when not to recognize double-taps. For example, you can choose to disable it when charging or when the screen is off.

Wrapping Up:

Using this app is the best way to get back tap gestures on any Android device. The app works perfectly on my device and hopefully will works with your device to. The app is in the testing phase and released the alpha versions, and probably, it will soon find its way to the Google Play Store.