Author

Sumit Bahl

Browsing

Digital photography is now the most popular type of photography in the world. Millions of people are equipped with digital cameras, such as smartphone cameras, tablet cameras, touch-and-shoot cameras, and DSLR cameras. The days of film photography and developing photographs in a darkroom are over. Digital photography gives the average person the ability to capture pictures and view them on their camera screens immediately.

What is more impressive is that digital pictures can be saved onto several different storage devices and platforms. Photographers can choose between physical storage and cloud storage options for storing their digital photos. Physical storage would be hardware devices and accessories, such as external hard drives, internal hard drives, SD cards, USB flash drives, and DVDs. 

While physical storage options are still used to some extent, the most convenient option is cloud storage. If you want to store your photographs and access them from any computer or smartphone with an internet connection, then you can do so by using cloud storage. There is virtually no chance of your photographs ever getting lost or corrupted on a cloud server. But the same cannot be said for physical storage, unfortunately.

Image files tend to get lost or corrupted on physical storage if the devices are old or damaged. You could try to use a photo file recovery software program to retrieve those lost photo files, but there are no guarantees that you could ever recover them. What if you have precious family photographs on these devices that cannot be replaced? It would be heartbreaking to think that they would be lost forever if you could not recover them on your physical storage devices. 

You won’t have that problem on a cloud storage server. The cloud is a third-party secured server that can be accessed by its owner or a registered user. No matter what type of computer that you are using, you can view the photographs that are stored on the server by entering the proper login credentials. You’ll never have to worry about a corrupt hard drive or flash drive preventing you from accessing your photographs ever again. 

The cloud server is monitored by the third-party hosting company, and they perform automated backups of the stored data. That way, your photographs will always remain protected and safe on the cloud. You will never lose your photographs because the backups will ensure they stay saved. Even if an individual server were to crash on the hosting side, your files stay protected.

Remember that cloud server are different than standard physical servers. A standard server stores all the information onto it and nowhere else. Your photographs would become lost if that particular server were to crash or lose power. Cloud servers, on the other hand, are virtualized servers that utilize multiple individual servers for storing data. In other words, they don’t just store all the data on one individual server. They use several different servers in a data center to keep data secured. 

As a result, one individual server crash on a cloud platform will not result in you losing your photographs. That is why cloud storage is superior to physical storage.

Latest Android 10 based MIUI 11.0.7.0 for Redmi Note 9 Pro starts rolling. The MIUI 11.0.7.0 Update for Redmi Note 9 Pro is based on Android 10 and bring all MIUI 11 features like improved UI design, Dynamic Clock on the lock screen, creative always-on display, dynamic video wallpapers, Quick replies, among other things. Follow the below guide to Download MIUI 11.0.7.0 Global Stable ROM for Redmi Note 9 Pro.

MIUI 11.0.7.0 Global Stable ROM for Redmi Note 9 Pro is a stable version and can be flashed via Recovery or via Fastboot. You can wait for the OTA or download MIUI 11.0.7.0 for Redmi Note 9 Pro from below to Update Redmi Note 9 Pro to Android 10 manually.

The new update is MIUI 11.0.7.0.QJWINXM and soon will be released and available for all users. You can Download Redmi Note 9 Pro MIUI 11.0.7.0.QJWINXM ROM from below and also manually check for the update by going to Settings -> About Phone -> System updates -> Check for update. Download MIUI 11.0.7.0 Stable ROM for Redmi Note 9 Pro from below.

Note:-

  • This Firmware file is only for Redmi Note 9 Pro. Don’t try this on any other device.
  • Follow the steps correctly otherwise you may brick your device. We are not responsible for any damage to your phone.
  • It may erase your data, so it is advisable to take a complete backup of your phone for a safer side.
  • Ensure that your phone has at least 50-60% charged to prevent the accidental shutdown in-between the process.

Download MIUI 11.0.7.0 Global Stable ROM for Redmi Note 9 Pro

  • MIUI 11.0.7.0 OTA for Redmi Note 9 Pro – MIUI 11.0.5.0 to MIUI 11.0.7.0
  • MIUI 11.0.7.0 Recovery ROM for Redmi Note 9 Pro – Download
  • MIUI 11.0.7.0 Fastboot ROM for Redmi Note 9 Pro – Coming Soon

How to Install MIUI 11.0.7.0 Global Stable ROM on Redmi Note 9 Pro –

To install MIUI 11.0.7.0 update for Redmi Note 9 Pro download either Recovery ROM or Fastboot ROM from above and use the below method to install this on your device.

Method 1 – Recovery Mode

Recovery Mode

  1. Download MIUI 11 Recovery ROM for Redmi Note 9 Pro from above and save it on your device.
  2. Now launch the ‘Updater‘ app on your device.
  3. Click on the three-dot menu (‘…’ icon) at the top-right corner, and select the ‘choose update package‘.
  4. Browse through the files and select the package ending with .zip extension.
  5. Done. Your device will reboot on the latest version.

Method 2 – Fastboot Mode

1) First, Download Mi Flash Tool, extract it and install it on your PC.

2) Now download MIUI 11 Fastboot ROM for Redmi Note 9 Pro for your device.

3) Now boot your device into Fastboot mode by pressing the ‘Volume Down + Power‘ button.

4) Connect your device to PC via micro USB cable.

5) Now extract the Fastboot ROM and copy its path on the PC.

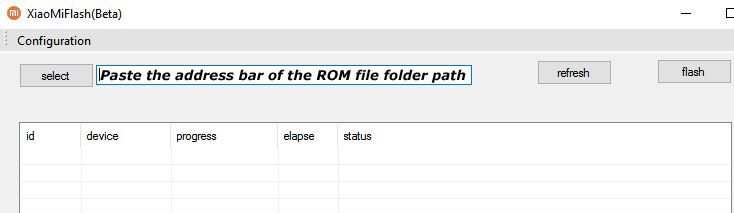
6) Now open MI Flash Tool and Paste the address bar of the ROM file folder path copied from above.

Mi Flash

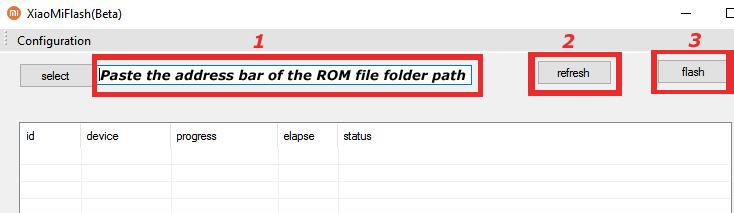
7) First, click on the ‘Refresh‘ button (It will automatically recognize your device) and then click on the ‘Flash‘ button to flash MIUI 11 ROM on your Devices.

Mi Flash

8) Wait for some time to complete the process.

9) Done. Your device will boot on the latest version.

Wrapping Up:

If you want to update Redmi Note 9 Pro to Android 10 based MIUI 11, then you can follow the above process. Download MIUI 11.0.7.0 Global Stable ROM for Redmi Note 9 Pro and flash it to update it manually. Comment below if you have any doubts.

Latest Android 10 based MIUI 11.0.10.0 for POCO X2 starts rolling. The MIUI 11.0.10.0 Update for POCO X2 is based on Android 10 and bring all MIUI 11 features like improved UI design, Dynamic Clock on the lock screen, creative always-on display, dynamic video wallpapers, Quick replies, among other things. Follow the below guide to Download MIUI 11.0.10.0 Global Stable ROM for POCO X2.

MIUI 11.0.10.0 Global Stable ROM for POCO X2 is a stable version and can be flashed via Recovery or via Fastboot. You can wait for the OTA or download MIUI 11.0.10.0 for POCO X2 from below to update POCO X2 to Android 10 manually.

The new update is MIUI 11.0.10.0.QGHINXM and soon will be released and available for all users. You can Download POCO X2 MIUI 11.0.10.0.QGHINXM ROM from below and also manually check for the update by going to Settings -> About Phone -> System updates -> Check for update. Download MIUI 11.0.10.0 Stable ROM for POCO X2 from below.

Note:-

  • This Firmware file is only for POCO X2. Don’t try this on any other device.
  • Follow the steps correctly otherwise you may brick your device. We are not responsible for any damage to your phone.
  • It may erase your data, so it is advisable to take a complete backup of your phone for a safer side.
  • Ensure that your phone has at least 50-60% charged to prevent the accidental shutdown in-between the process.

Download MIUI 11.0.10.0 Global Stable ROM for POCO X2

  • MIUI 11.0.10.0 Recovery ROM for POCO X2 – Download
  • MIUI 11.0.10.0 Fastboot ROM for POCO X2 – Download

How to Install MIUI 11.0.10.0 Global Stable ROM on POCO X2 –

To install MIUI 11.0.10.0 update for POCO X2 download either Recovery ROM or Fastboot ROM from above and use the below method to install this on your device.

Method 1 – Recovery Mode

Recovery Mode

  1. Download MIUI 11 Recovery ROM for POCO X2 from above and save it on your device.
  2. Now launch the ‘Updater‘ app on your device.
  3. Click on the three-dot menu (‘…’ icon) at the top-right corner, and select the ‘choose update package‘.
  4. Browse through the files and select the package ending with .zip extension.
  5. Done. Your device will reboot on the latest version.

Method 2 – Fastboot Mode

1) First, Download Mi Flash Tool, extract it and install it on your PC.

2) Now download MIUI 11 Fastboot ROM for POCO X2 for your device.

3) Now boot your device into Fastboot mode by pressing the ‘Volume Down + Power‘ button.

4) Connect your device to PC via micro USB cable.

5) Now extract the Fastboot ROM and copy its path on the PC.

6) Now open MI Flash Tool and Paste the address bar of the ROM file folder path copied from above.

Mi Flash

7) First, click on the ‘Refresh‘ button (It will automatically recognize your device) and then click on the ‘Flash‘ button to flash MIUI 11 ROM on your Devices.

Mi Flash

8) Wait for some time to complete the process.

9) Done. Your device will boot on the latest version.

Wrapping Up:

If you want to update POCO X2 to Android 10 based MIUI 11, then you can follow the above process. Download MIUI 11.0.10.0 Global Stable ROM for POCO X2 and flash it to update it manually. Comment below if you have any doubts.

Latest MIUI 12.0.0.8 Global Stable ROM for Mi 9 starts rolling out. The global update was already available for Mi 9T/Redmi K20 vairants and now the update is available for Mi 9. The MIUI 12.0.0.8 Update for Mi 9 is based on Android 10 and bring all MIUI 12 features like improved UI design, Dynamic Clock on the lock screen, creative always-on display, dynamic video wallpapers, along with system optimizations. Follow the below guide to Download MIUI 12 Global Stable ROM for Mi 9.

MIUI 12.0.0.8 Global Stable ROM for Mi 9 is a stable version and can be flashed via Recovery or via Fastboot. You can wait for the OTA or download MIUI 12.0.0.8 for Mi 9 from below to Update Mi 9 to MIUI 12 manually.

The new update is MIUI 12.0.0.8.QFAMIXM and soon will be released and available for all users. You can Download Mi 9 MIUI 12.0.0.8.QFAMIXM ROM from below and also manually check for the update by going to Settings -> About Phone -> System updates -> Check for update. Download MIUI 12.0.0.8 Global Stable ROM for Mi 9  from below.

Download MIUI 12.0.0.8 Global Stable ROM for Mi 9

Note:-

  • This Firmware file is only for Mi 9. Don’t try this on any other device.
  • Follow the steps correctly otherwise you may brick your device. We are not responsible for any damage to your phone.
  • It may erase your data, so it is advisable to take a complete backup of your phone for a safer side.
  • Ensure that your phone has at least 50-60% charged to prevent the accidental shutdown in-between the process.

Download MIUI 12.0.0.8 Global Stable ROM for Mi 9

  • MIUI 12.0.0.8 OTA for Mi 9 Update (MIUI 11.0.6.0 to MIUI 12.0.0.8) – Download
  • MIUI 12.0.0.8 Recovery ROM for Mi 9 – Download
  • MIUI 12.0.0.8 Fastboot ROM for Mi 9 – Download

How to Install MIUI 12 Global Stable ROM on Mi 9 –

To install MIUI 12.0.0.8 update for Mi 9 download either Recovery ROM or Fastboot ROM from above and use the below method to install this on your device.

Method 1 – Recovery Mode

Recovery Mode

  1. Download MIUI 12 Recovery ROM for Mi 9 from above and save it on your device.
  2. Now launch the ‘Updater‘ app on your device.
  3. Click on the three-dot menu (‘…’ icon) at the top-right corner, and select the ‘choose update package‘.
  4. Browse through the files and select the package ending with .zip extension.
  5. Done. Your device will reboot on the latest version.

Method 2 – Fastboot Mode

1) First, Download Mi Flash Tool, extract it, and install it on your PC.

2) Now download MIUI 12 Fastboot ROM for Mi 9 for your device.

3) Now boot your device into Fastboot mode by pressing the ‘Volume Down + Power‘ button.

4) Connect your device to PC via micro USB cable.

5) Now extract the Fastboot ROM and copy its path on the PC.

6) Now open MI Flash Tool and Paste the address bar of the ROM file folder path copied from above.

7) First, click on the ‘Refresh‘ button (It will automatically recognize your device) and then click on the ‘Flash‘ button to flash MIUI 12 ROM on your Devices.

Mi Flash

8) Wait for some time to complete the process.

9) Done. Your device will boot on the latest version.

Wrapping Up:

If you want to update Mi 9 to MIUI 12, then you can follow the above process. Download MIUI 12 Global Stable ROM for Mi 9 and flash it to update it manually. Comment below if you have any doubts.

Source

Latest Android 10 based MIUI 12 Global Stable update for Mi 9T Pro/Redmi K20 Pro starts rolling out. Company previously rolled out the MIUI 12 Closed Beta to most of the Xiaomi and Redmi device and now starts the global update for Mi 9T/Redmi K20 vairants and now the update is available for Pro variants. The MIUI 12.0.0.8 Update for Mi 9T Pro/Redmi K20 Pro is based on Android 10 and bring all MIUI 12 features like improved UI design, Dynamic Clock on the lock screen, creative always-on display, dynamic video wallpapers, along with system optimizations. Follow the below guide to Download MIUI 12 Global Stable ROM for Mi 9T Pro/Redmi K20 Pro.

MIUI 12.0.0.8 Global Stable ROM for Mi 9T Pro/Redmi K20 Pro is a stable version and can be flashed via Recovery or via Fastboot. You can wait for the OTA or download MIUI 12.0.0.8 for Mi 9T Pro/Redmi K20 Pro from below to Update Mi 9T Pro/Redmi K20 Pro to MIUI 12 manually.

The new update is MIUI 12.0.0.8.QFKMIXM and soon will be released and available for all users. You can Download Mi 9T Pro MIUI 12.0.0.8.QFKMIXM ROM from below and also manually check for the update by going to Settings -> About Phone -> System updates -> Check for update. Download MIUI 12 Stable ROM for Mi 9T Pro/Redmi K20 Pro  from below.

Note:-

  • This Firmware file is only for Mi 9T Pro/Redmi K20 Pro. Don’t try this on any other device.
  • Follow the steps correctly otherwise you may brick your device. We are not responsible for any damage to your phone.
  • It may erase your data, so it is advisable to take a complete backup of your phone for a safer side.
  • Ensure that your phone has at least 50-60% charged to prevent the accidental shutdown in-between the process.

Download MIUI 12 Global Stable ROM for Mi 9T Pro/Redmi K20 Pro

  • MIUI 12.0.0.8 OTA for Mi 9T Pro/Redmi K20 Pro (MIUI 11.0.4.0 to MIUI 12.0.0.8) – Download
  • MIUI 12.0.0.8 Recovery ROM for Mi 9T Pro/Redmi K20 Pro – Download
  • MIUI 12.0.0.8 Fastboot ROM for Mi 9T Pro/Redmi K20 Pro – Download

How to Install MIUI 12 Global Stable ROM on Mi 9T Pro/Redmi K20 Pro –

To install MIUI 12.0.0.8 update for Mi 9T Pro/Redmi K20 Pro download either Recovery ROM or Fastboot ROM from above and use the below method to install this on your device.

Method 1 – Recovery Mode

Recovery Mode

  1. Download MIUI 12 Recovery ROM for Mi 9T Pro/Redmi K20 Pro from above and save it on your device.
  2. Now launch the ‘Updater‘ app on your device.
  3. Click on the three-dot menu (‘…’ icon) at the top-right corner, and select the ‘choose update package‘.
  4. Browse through the files and select the package ending with .zip extension.
  5. Done. Your device will reboot on the latest version.

Method 2 – Fastboot Mode

1) First, Download Mi Flash Tool, extract it, and install it on your PC.

2) Now download MIUI 12 Fastboot ROM for Mi 9T Pro/Redmi K20 Pro for your device.

3) Now boot your device into Fastboot mode by pressing the ‘Volume Down + Power‘ button.

4) Connect your device to PC via micro USB cable.

5) Now extract the Fastboot ROM and copy its path on the PC.

6) Now open MI Flash Tool and Paste the address bar of the ROM file folder path copied from above.

7) First, click on the ‘Refresh‘ button (It will automatically recognize your device) and then click on the ‘Flash‘ button to flash MIUI 12 ROM on your Devices.

Mi Flash

8) Wait for some time to complete the process.

9) Done. Your device will boot on the latest version.

Wrapping Up:

If you want to update Mi 9T Pro to MIUI 12, then you can follow the above process. Download MIUI 12 Global Stable ROM for Mi 9T Pro/Redmi K20 Pro and flash it to update it manually. Comment below if you have any doubts.

Latest Android 10 based MIUI 12 Global Stable update for K20/Mi 9T starts rolling out. Company previously rolled out the MIUI 12 Closed Beta to most of the Xiaomi and Redmi device and now starts the global updates as a version v12.0.0.11. The MIUI 12.0.0.11 Update for Redmi K20/Mi 9T is based on Android 10 and bring all MIUI 12 features like improved UI design, Dynamic Clock on the lock screen, creative always-on display, dynamic video wallpapers, along with system optimizations. Follow the below guide to Download MIUI 12 Global Stable ROM for Redmi K20/Mi 9T.

MIUI 12.0.0.11 Global Stable ROM forRedmi K20/Mi 9T is a stable version and can be flashed via Recovery or via Fastboot. You can wait for the OTA or download MIUI 12.0.0.11 for Redmi K20/Mi 9T from below to Update Redmi K20/Mi 9T to MIUI 12 manually.

The new update is MIUI 12.0.0.11.QFJMIXM and soon will be released and available for all users. You can Download Mi 9T MIUI 12.0.0.11.QFJMIXM ROM from below and also manually check for the update by going to Settings -> About Phone -> System updates -> Check for update. Download MIUI 12 Stable ROM for Redmi K20/Mi 9T  from below.

Download MIUI 12 Global Stable ROM for Redmi K20/Mi 9T

Note:-

  • This Firmware file is only for Redmi K20/Mi 9T. Don’t try this on any other device.
  • Follow the steps correctly otherwise you may brick your device. We are not responsible for any damage to your phone.
  • It may erase your data, so it is advisable to take a complete backup of your phone for a safer side.
  • Ensure that your phone has at least 50-60% charged to prevent the accidental shutdown in-between the process.

Download MIUI 12 Global Stable ROM for Redmi K20/Mi 9T

  • MIUI 12.0.0.11 OTA for Redmi K20/Mi 9T (MIUI 11.0.5.0 to MIUI 12.0.0.11) – Download
  • MIUI 12.0.0.11 Recovery ROM for Redmi K20/Mi 9T – Download
  • MIUI 12.0.0.11 Fastboot ROM for Redmi K20/Mi 9T – Download

How to Install MIUI 12 Global Stable ROM on Redmi K20/Mi 9T –

To install MIUI 12.0.0.11 update for Redmi K20/Mi 9T download either Recovery ROM or Fastboot ROM from above and use the below method to install this on your device.

Method 1 – Recovery Mode

Recovery Mode

  1. Download MIUI 12 Recovery ROM for Redmi K20/Mi 9T from above and save it on your device.
  2. Now launch the ‘Updater‘ app on your device.
  3. Click on the three-dot menu (‘…’ icon) at the top-right corner, and select the ‘choose update package‘.
  4. Browse through the files and select the package ending with .zip extension.
  5. Done. Your device will reboot on the latest version.

Method 2 – Fastboot Mode

1) First, Download Mi Flash Tool, extract it, and install it on your PC.

2) Now download MIUI 12 Fastboot ROM for Redmi K20/Mi 9T for your device.

3) Now boot your device into Fastboot mode by pressing the ‘Volume Down + Power‘ button.

4) Connect your device to PC via micro USB cable.

5) Now extract the Fastboot ROM and copy its path on the PC.

6) Now open MI Flash Tool and Paste the address bar of the ROM file folder path copied from above.

7) First, click on the ‘Refresh‘ button (It will automatically recognize your device) and then click on the ‘Flash‘ button to flash MIUI 12 ROM on your Devices.

Mi Flash

8) Wait for some time to complete the process.

9) Done. Your device will boot on the latest version.

Wrapping Up:

If you want to update Mi 9T to MIUI 12, then you can follow the above process. Download MIUI 12 Global Stable ROM for Redmi K20/Mi 9T and flash it to update it manually. Comment below if you have any doubts.

OTA Source

Latest Realme UI 1.0 based Android 10 update for Realme 6 starts rolling out. The latest Realme 6 Android 10 update is based on Realme UI and brings tons of new features and optimizations. You can Download Realme 6 B.27 Update OTA Zip from below to Update Realme 6 to Android 10.

The Realme 6 Android 10 update has the software version RMX2001_11_B.27. The update is rolling out in a phase-wise manner, which means maybe you will get the update tomorrow or maybe next 1-2 weeks. If you don’t want to wait, you could just go to Settings and manually check or follow the below guide. Download Realme 6 B.27 OTA zip file from below.

The new Android 10 OTA Update for Realme 6 brings Realme UI 1.0 based on Android 10 and brings system and camera optimization and April 2020 Security Patch. You can manually update Realme 6 to April 2020 Security Patch by downloading the OTA file from below. You can check the complete changelog of Realme 6 Realme UI 1.0 from below.

Changelogs of Realme 6 Android 10 update:

  • Security
    ● Android security patch: April, 2020
  • System
    ● Fixed the issue that the game space is not effective in some scenarios
    ● Updated VOOC charging animation
  • Camera
    ● Added Ultra Steady feature
    ● Optimized the front camera resolution in some scenarios
    ● Optimized the video call resolution in some scenarios

Before You Begin

  • This method is only for Realme 6. Don’t try this on any other device.
  • Follow the steps correctly otherwise, you may brick your device. We Guidegeekz.com is not responsible for any damage to your phone.
  • Charge your device to 60- 70% to prevent it from the accidental shutdown.
  • Take a complete backup of everything important.

Download Realme 6 B.27 Update

  • Realme 6 RMX2001_11_B.27 OTA – Download

How to Install Android 10 Update on Realme 6 –

Method 1 –

1) Download Realme 6 RMX2001_11_B.27 Zip from above and save it to internal memory.

2) Reboot Realme 6 to Recovery mode by using the below steps.

  • Turn Off your device
  • Press and hold the ‘Vol down+Power’ button.

3) Choose the language you want.

4) In recovery mode select Install from storage device.

5) Choose the zip file from phone storage or From the SD card and wait.

6) Done! Reboot your phone after the process complete.

Method 2 –

  1. Download the Realme 6 Android 10 OTA zip file from above and save it on your device.
  2. Go to download folder and rename the file to update.zip
  3. Place it to the root directory of internal storage.
  4. Click the firmware to start the update.
  5. Wait for the update to finish and restart when prompted.

Wrapping Up:

Realme 6 brings all Android 10 features along with new Realme UI and will soon be available for all via OTA but if you’re the impatient type then you could follow the above procedure to Download and Install Android 10 Update for Realme 6. If you have any questions related to this post, feel free to leave that in the comment section.

Good news for Nokia users, latest stable Android 10 update for Nokia 2.3 starts rolling out. The Android 10 update for Nokia 2.3 brings all Android 10 features. You can Download Nokia 2.3 Android 10 OTA Zip from below to Update Nokia 2.3 to Android 10.

The new Android 10 OTA Update for Nokia 2.3 brings all Android 10 features like a system-wide dark theme, Smart reply, full-screen gesture navigation, additional controls for privacy and location, and more. You can manually update Nokia 2.3 to Android 10 by downloading the OTA file from below.

The new Nokia 2.3 Android 10 update rolled out via OTA and soon will be available to all. If you don’t want to wait, you could just go to Settings and manually check or follow the below guide. Download Nokia 2.3 Android 10 OTA zip file from below.

Changelogs of Nokia 2.3 Android 10 update:

  • Dark mode – Take it easy on your eyes.
  • Smart reply – Save more time with recommended actions.
  • Gesture navigation – Get around with a swipe and a pull.
  • Additional controls for privacy and location.
  • Google Security patch (2020-03).

Before You Begin

  • This method is only for Nokia 2.3. Don’t try this on any other device.
  • Follow the steps correctly otherwise, you may brick your device. We Guidegeekz.com is not responsible for any damage to your phone.
  • Charge your device to 60- 70% to prevent it from the accidental shutdown.
  • Take a complete backup of everything important.

Download Android 10 Update for Nokia 2.3

  • Nokia 2.3 Android 10 OTA Zip – Download
  • Nokia 9 Pure view Android 10 Update – Download
  • Nokia 7.2 Android 10 Update – Download

How to Install Android 10 Update on Nokia 2.3 –

Method 1 –

1) Download Nokia 2.3 Android 10 OTA Zip from above and save it to internal memory.

2) Reboot Nokia 2.3 to Recovery mode by using the command adb reboot bootloader or by using the below steps.

  • Turn Off your device
  • Press and hold the ‘Vol Up+Power’ button. Release the power button upon vibration, but keep the volume key pressed.
  • If you will see no command with dead Android
  • Now press Volume Up + power to enter into recovery mode.

3) In recovery mode select Apply update from SD Card.

4) Choose the zip file and wait.

5) Done! Reboot your phone after the process complete.

Method 2 –

  1. Download Nokia 2.3 Android 10 OTA zip file from above and save it on your device.
  2. Go to download folder and rename the file to update.zip
  3. Place it to the root directory of internal storage.
  4. Open Phone app and dial *#*#874#*#* to update.
  5. Wait for the update to finish and restart when prompted.

Method 3 – 

  1. First, enable the USB debugging option from setting ->developer option. To enable Developer Options, go to About phone and tap the Build Number 7 times.
  2. Download ADB and Fastboot and install it on your PC.
  3. Download Android 10 OTA zip for Nokia 2.3 from above Copy ROM to a folder where adb installed.
  4. Now Turn Off your phone and boot into the recovery mode.
  5. Choose Apply update from ADB
  6. Now Connect your phone to your Laptop/PC
  7. On ROM folder press shift+right click and click on open command here.
  8. Now check your connection status by typing the below command
    adb devices
    if your device is listed, you’re ready to flash the ROM
  9. Now Install Android 10 OTA on Nokia 2.3 by typing below command
    adb sideload File-Name.zip 
  10. Now, wait until the process completes and then Reboot the phone.
  11. Done!

Wrapping Up:

Nokia 2.3 brings all Android 10 features and will soon be available for all via OTA but if you’re the impatient type then you could follow the above procedure to Download and Install Android 10 Update for Nokia 2.3. If you have any questions related to this post, feel free to leave that in the comment section.

Here we share a direct link to Download Black Shark 2 Pro Android 10 Firmware Update. The new Android 10 update for Black Shark 2 Pro is based on Android 10 beta update and rolling out via OTA which brings all Android 10 features along with a heavily skinned user interface called JoyUI 11. Download Black Shark 2 Pro Firmware Update from below.

The Android 10 update for Black Shark 2 Pro is an Incremental update that rolls out in a phase-wise manner. The update is rolling out via OTA (over-the-air) which comes with build number DLTR2004231OS00MQ0. You can wait for the OTA updates, or you can Download Black Shark 2 Pro DLTR2004231OS00MQ0 OTA to update it manually with the below method. Download Black Shark 2 Pro Android 10 firmware update file from below.

We provide you the Black Shark 2 Pro Android 10 OTA zip which you can flash on your device. You can check for the by going to Settings > About > System Update > and check for update. Download Black Shark 2 Pro Firmware Update from below.

Note:-

  • This method is only for the Black Shark 2 Pro only.
  • Follow the steps correctly otherwise, you may brick your device. We Guidegeekz.com is not responsible for any damage to your phone.
  • Charge your device to 60- 70% to prevent it from the accidental shutdown.
  • Take a complete backup of everything important.

Download Black Shark 2 Pro Android 10 Firmware Update

  • Download Black Shark 2 Pro Android 10 OTA (Full OTA) – Download

How to Install Android 10 on Black Shark 2 Pro

Method 1

  1. Download Black Shark 2 Pro Android 10 OTA zip file from above and save it on your device.
  2. Go to download folder and rename the file to update.zip 
  3. Move it to “ota” directory in your phone
  4. Open Phone app and dial *#*#1027#*#* to update.
  5. Press “LOCAL UPDATE” and start updating your device.

Method 2

  1. First, enable the USB debugging option from setting ->developer option. To enable Developer Options, go to About phone and tap the Build Number 7 times.
  2. Download ADB and Fastboot and install it on your PC.
  3. Download Black Shark 2 Pro OTA from above Copy ROM to a folder where adb installed.
  4. Now Turn Off your phone and boot into the recovery mode.
  5. Choose Apply update from ADB
  6. Now Connect your phone to your Laptop/PC
  7. On ROM folder press shift+right click and click on open command here.
  8. Now check your connection status by typing the below command
    adb devices
    if your device is listed, you’re ready to flash the ROM
  9. Now Install Android 10 OTA on Black Shark 2 Pro by typing below command
    adb sideload File-Name.zip 
  10. Now, wait until the process completes and then Reboot the phone.
  11. Done!

Wrapping Up:

This is the easiest way to Download Black Shark 2 Pro Android 10 Firmware Update and flash it manually. If you have any questions, comment below.

Here we share a direct link to Download Asus ZenFone Max Pro M1 Android 10 Firmware Update. The new Android 10 update for Asus ZenFone Max Pro M1 is an AOSP-based Android 10 beta update and rolling out via OTA which brings all Android 10 features along with several new features, UI enhancements, and February 2020 Security update. Download Asus ZenFone Max Pro M1 WW-17.2017.2004.424 Firmware Update from below.

The Android 10 update for Asus ZenFone Max Pro M1 is an Incremental update that rolls out in a phase-wise manner. The update is rolling out via OTA (over-the-air) which comes with build number 17.2017.2004.424. You can wait for the OTA updates, or you can Download Asus ZenFone Max Pro M1 17.2017.2004.424 OTA to update it manually with the below method. Download ZenFone Max Pro M1 Android 10 firmware update file from below.

We provide you the Asus ZenFone Max Pro M1 Android 10 OTA zip which you can flash on your device. You can check for the by going to Settings > About > System Update > and check for updates. Download Asus ZenFone Max Pro M1 Firmware Update from below.

Note:-

  • This method is only for the Asus ZenFone Max Pro M1 (ZB601KL) For WW SKU only.
  • Follow the steps correctly otherwise, you may brick your device. We Guidegeekz.com is not responsible for any damage to your phone.
  • Charge your device to 60- 70% to prevent it from the accidental shutdown.
  • Take a complete backup of everything important.

Download Asus ZenFone Max Pro M1 Android 10 Firmware Update

  • Asus ZenFone Max Pro M1 Android 10 FOTA (Full OTA) – Download

How to Install Android 10 on Asus ZenFone Max Pro M1

Method 1

  1. Download the files from above and rename it to update.zip.
  2. Now Turn Off your phone and boot into recovery mode by pressing Power+Volume UP.
  3. Now in recovery mode choose to apply update from sdcard.
  4. Now select the update.zip file.
  5. Now wait until the process complete and then Reboot the phone.
  6. Done!

Method 2

  1. First, enable the USB debugging option from setting ->developer option. To enable Developer Options, go to About phone and tap the Build Number 7 times.
  2. Download ADB and Fastboot and install it on your PC.
  3. Download ZenFone Max Pro M1 v17.2017.2004.424 FOTA from above Copy ROM to a folder where adb installed.
  4. Now Turn Off your phone and boot into the recovery mode.
  5. Choose Apply update from ADB
  6. Now Connect your phone to your Laptop/PC
  7. On ROM folder press shift+right click and click on open command here.
  8. Now check your connection status by typing the below command
    adb devices
    if your device is listed, you’re ready to flash the ROM
  9. Now Install Android 10 OTA on Asus ZenFone Max Pro M1 by typing below command
    adb sideload File-Name.zip 
  10. Now, wait until the process completes and then Reboot the phone.
  11. Done!

Wrapping Up:

This is the easiest way to Download Asus ZenFone Max Pro M1 Android 10 Firmware Update and flash it manually. If you have any questions, comment below.