Author

Sumit Bahl

Browsing

Recently, Google Pay has received a new split expense feature, which lets users split the bill with their contacts and pay quickly. It will eliminate the need to discuss or calculate the amount manually. Here is how to split bills with a group on Google Pay.

Google Pay’s bill splitting feature will be very useful when a group of friends or family members go out to a restaurant or a movie and need to split up the bill among them. It will send the request to the members of the group and keep track of the payments for you. Google Pay will also let you send reminders to your friends and notify you every time a member pays the amount. Here’s how you can easily split the bill with your friends on Google Pay.

How to Split Bills with a Group on Google Pay

The payment procedure to split bills on GPay is simple as compared to other specialized bill splitting tools. To begin, you must establish a new group. After creating the group, users will notice a ‘Split an Expense’ button at the bottom. Here is how to split bills with a group on Google Pay.

Step 1: Create a payment group on Google Pay

To create a group on Gpay, go to the main page and select a new payment option; a new screen will appear. A ‘New Group’ option will appear on this screen, below the ‘Transfer Money’ tab. Here are the steps to create a new payment group on Google Pay.

  1. Open Google Pay and tap on the New Payment button on the main page.
  2. From the next page, tap New group to create a new group on Google Pay.
  3. Select the members you want to add to the group and tap on Next from the top-right corner to proceed further.
  4. Enter the group name and create.

Step 2: Use Bill Splitting Tool of Google Pay

After creating the group, users will notice a ‘Split an Expense’ button at the bottom. After entering the amount to split among the group members, the amount can be split evenly. You can also enter the custom amount that a certain user must pay. Here is how to use the GPay bill splitting tool.

  1. Open the Google Pay group you’ve created and tap the Split an Expense option at the bottom.
  2. Enter the total expense amount and then tap Next.
  3. Now, the amount will be split among the group members evenly.
  4. Once done, tap Send request to raise the payment request.
  5. You can view the expense request from the group’s conversation window to see if your friends have paid the requested amount.

Step 3: Check the status of your shared expenses & send reminders

Every time a member pays, Google Pay notifies you and updates the payment status. You can also check the status of your shared expenses & send reminders.

  1. Open the Google Pay app.
  2. Tap Search at the top of the screen.
  3. Select the group that you created the expense with.
  4. Go to the Expenses tab.
  5. Select the Send Reminder button next to the person who owes you money.

Step 4: Close Request or Delete Gpay Group

If you change your mind, you can cancel the payment request you just made in the Google Pay app by tapping the vertical three dots menu symbol in the upper right corner and selecting Close request.

  1. Open the group and click on three dots at the top right corner.
  2. Tap Close request to cancel the payment request you just made in the Google Pay app.
  3. To delete a Google Pay group, tap the header of the group and go to settings.
  4. Now, you can manually remove members by tapping the minus button next to the user’s name.
  5. On the confirmation pop-up, tap on Remove from group.
  6. Once you remove the group members, you can also leave the group by tapping on the Leave group option from the settings.

Wrapping Up: Split Bills Easily on GPay

Splitting bills with a group on Google Pay makes it easy to keep track of your spending on nights out with friends and ensure they don’t forget to pay you back.

Have any questions? Do let us know that in the comments below. Stay connected with us via Facebook and Twitter to read more such helpful posts.
YouTube Shorts is quickly becoming a viable alternative to short video apps such as TikTok, Reels, and others. However, not everyone enjoyed the idea of seeing short video stories. It could be too short for entertainment, or it could be a way to brag and force others to watch pointless and annoying content. Well, there is no official method or setting on your device to turn this off. Still, we’ve discovered some excellent methods to remove Shorts from the YouTube app.

A lot of people loved this new YouTube Shorts feature. However, people who need informative and useful content are often on the lookout for detailed videos. That’s why we’ve put up a guide that will show you how to disable YouTube Shorts from the YouTube app.

How to Remove Shorts from YouTube app

I provided the easiest and most efficient approach for removing Shorts from the YouTube app. This post will not only show you how to disable the YouTube Shorts tab but also how to entirely remove it.

Method 1: Remove Shorts tab from YouTube app using Youtube Vanced

YouTube Vanced is a modified version of YouTube’s official app. It enhances the normal YouTube app with features like built-in adblocking, background and screen off playback, dark themes, auto-repeat mode, and much more. Aside from this, Youtube Vanced is the best option to permanently remove Youtube short tab. Here’s how to disable YouTube short tab and return to the original YouTube layout.

  1. First, install Youtube Vanced on your device. (If you don’t know how then check this guide to install Youtube Vanced)
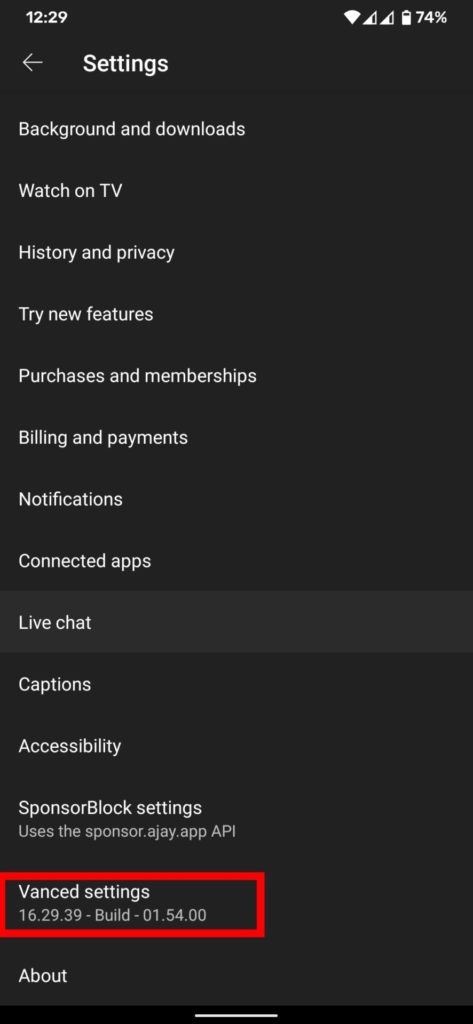
  2. Open Youtube Vanced app and go to app settings.
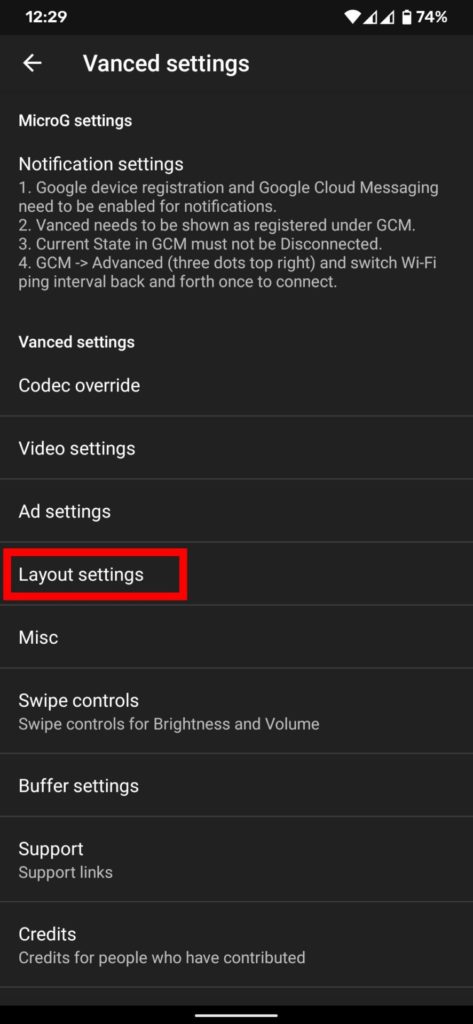
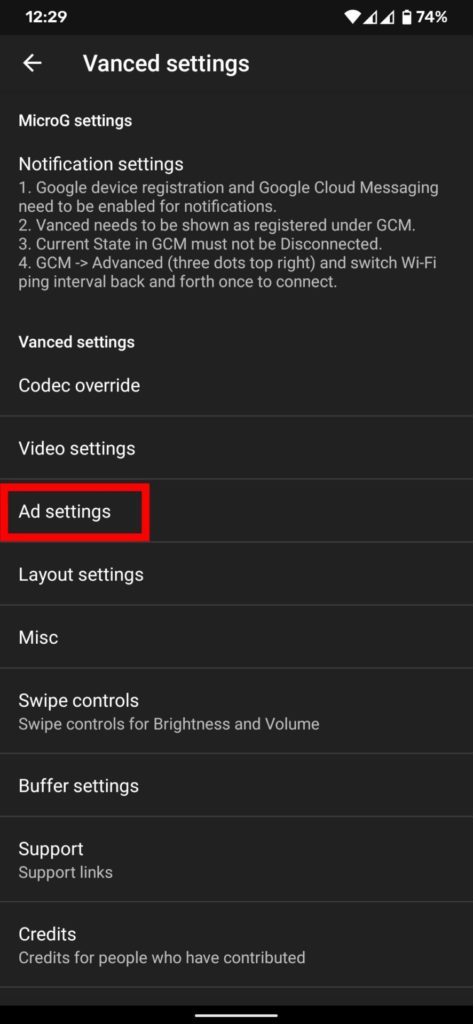
  3. Go to Vanced settings.
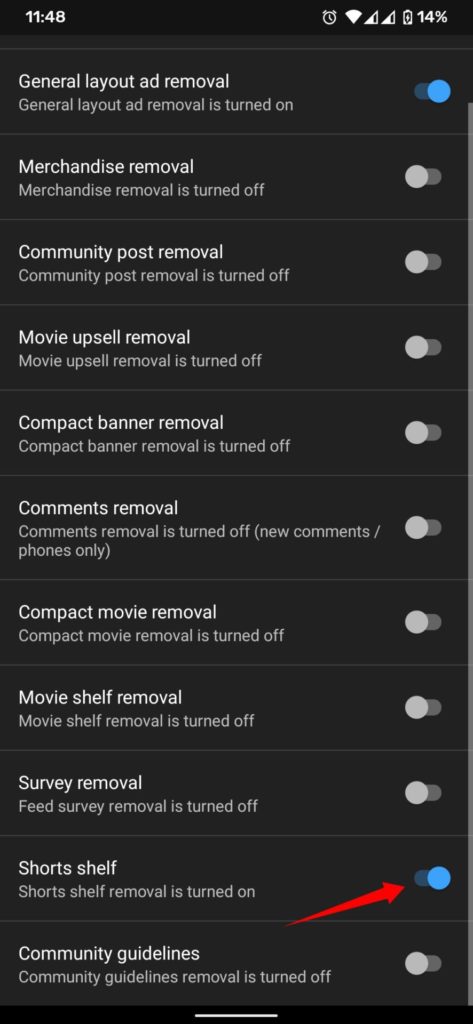
  4. Go to Ads Settings.
  5. Scroll down to the bottom and turn on Shorts self toggle.
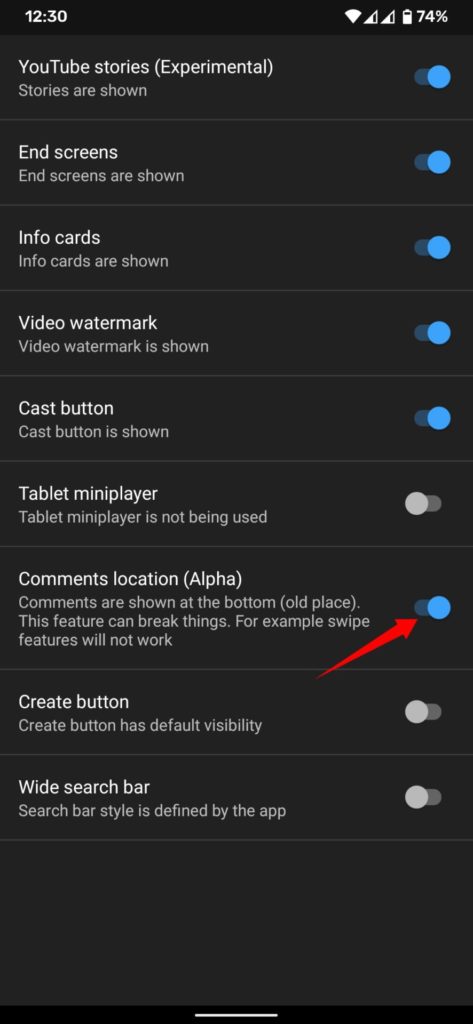
  6. Now Go back and open layout settings.
  7. Turn on the comment location (alpha) section to disable Youtube short button.

Method 2: Disable Youtube Shorts using the browser

Currently, the browser version of YouTube doesn’t contain YouTube shorts. To watch YouTube without shorts, open any browser on your Android or iPhone and navigate to the YouTube website. The best part about using YouTube via your browser is that you can access all of the amazing features that aren’t available in the app. You can also use your account to log in.

Wrapping Up: Remove Youtube Shorts

We hope that these approaches assisted you to get rid of shorts videos on Youtube easily. Have any questions? Do let us know that in the comments below. Stay connected with us via Facebook and Twitter to read more such helpful posts.

If you are looking for retail & ecommerce software development services, you need to be willing to do a lot of digging to find the right custom ecommerce development company for the job. 

It can cost anywhere from $100,000 to $500,000 to build a successful app, and the last thing any investor wants is to spend their hard-earned money on a team that can’t deliver the right product within the budget and timeframe. Usually, by the time you’ve figured out that your team isn’t able to build the product you want, you’ve already sunk the bulk of your funds into their company and will have to invest even more to get it over the line.  

Why Do Things Go Wrong When Hiring Retail & Ecommerce Software Development Services? 

Before you can hire the right custom ecommerce development company for your project, you should be mindful of the reasons things can go wrong, including:

  • Incomplete or unclear briefings

When you hire ecommerce software developers, you have to be clear about the features and requirements you would like to include in your project. Different features require a different skill level and knowledge of different programming languages. If you require a top-notch recommendation engine, you might want to look at companies that are highly versed in fashion tagging and AI. If you are building a luxurious and exclusive app, you definitely need great front-end developers. Make sure that you provide a brief that is highly detailed and that shares all the information a team will need when creating a proposal. 

  • Unrealistic Time Frames

Setting your budget too low can impact delivery times because eCommerce software developers may reduce the allocated hours to fit in with your requirements or commit to an unrealistic deadline. Make sure that you leave room for delays in your budget and your calendar. Even the best thought-out plan can go wrong from time to time. 

  • Hiring the Cheapest Firm, Not the Best

Don’t be tempted to bargain a basement shop for a development team. Custom ecommerce development services don’t come cheaply, and you should be suspicious if you receive a quote that is much lower than all the others. If you need to save money, look into offshoring or other cost-cutting mechanisms, but don’t fall into the trap of hiring a bargain development firm!

  • Unscrupulous Firms

Of course, there are some inexperienced or unscrupulous firms that promote their software development for e-commerce services knowing that they can’t deliver. They persuade investors that they can deliver their project on time and within budget, but as soon as the project is underway and the contract is signed, they fall short. 

How To Hire the Best Team For the Job 

Now that you know what can go wrong, let’s look at the ways you can avoid sticky situations:

  • Always check the credentials of the company you are speaking to. Speak to past clients, review past work and read online reviews to find out more about them.
  • Ask important questions, including how disputes and failure to deliver on-time will be handled. 
  • Include penalties for failure to deliver or delivery on time in your SLAs and contracts from the start. 
  • Make sure that you provide a detailed briefing with your requirements upfront so that the developers know what they will be expected to build and which skills will be needed. 
  • Don’t be tempted to hire the first company or the cheapest company you encounter. Do your homework. 
  • Offshoring is the best way to save money without compromising on quality. 

There are plenty of great companies that offer retail & ecommerce software development services, but you have to know where to look.

Because of technological advancement worldwide and the desire to easily connect with anyone, chatbots have become a favorite of many companies – small and large. There are many reasons why any organization would love to build a chatbot from scratch. Chatbots are conventional forms of artificial intelligence designed to attend to consumer inquiries. These bots can improve your response time and ensure that you are more effective in converting leads.

Asides from being part of an organization’s sales structure, these programs are also used in Human Resource Management in many fields. There’s no doubt that these bots would increase your service delivery by leaps and bounds.

Now, you’ve learned about the usefulness of chatbots and how they can help your business, but you don’t know how to create one. There’s no need to panic. We’ve got you covered. This piece will teach you step-by-step techniques to create a chatbot from scratch. These steps include;

  • Determine the purpose of the chatbot
  • Analyze customer preferences
  • Design your conversation
  • Design a chatbot without coding
  • Design a chatbot with coding

Let’s begin!

Tips To Build a Chatbot From Scratch

Let’s say you’ve already determined to get this tool. What do you do? Well, you can learn to build a chatbot from scratch. It’s not as complicated as it sounds. Many platforms can make it easier for you to create these bots. All that’s left are the tips on how to use them.

The following will help you build a chatbot effectively;

Determine The Purpose Of The Chatbot

Ask yourself, why do you need a chatbot? Without a doubt, a chatbot would make your lead generation or sales process more efficient and easier to control. So, how do you plan to integrate this chatbot into your business structure? And which methods do you wish to apply? The most significant use of chatbots would be to speed up response time and decipher vital information from big data. In simple terms, you’ll get to know which leads are interested and those that are just clicking to scan through your page.

Analyze customer preferences

Don’t just go ahead to design a chatbot that suits only your goals. You have to determine what your customers are expecting from you. If you already run a website or any form of a communication channel with your customers, it should be reasonably easy to determine their needs. Carefully analyze how your customers interact with your business. Do they do it through chat, email, phone calls, or social media? What type of sales service do they require from you? The answers to these questions will help create an AI chatbot.

Design Your Conversation

A chatbot is used to handle conversations with customers and prospects. Since you have determined the goal of building your chatbot, it will be easier to design a conversation. This stage will determine the level of user engagement your bots will get. We have two types of chatbot interaction, namely;

  • Structured Interaction – You’re already familiar with what your customer will say and create predetermined responses for them.
  • Unstructured interaction – This type of conversation flows freely, and nothing is pre-planned.

Design A Chatbot Without Coding

Let’s say you wish to have hands-on experience in building your chatbot but have no coding experience. To design your bot from scratch, you can use chatbot builder platforms, such as Botsify and Chatfuel. However, you may not develop programs to handle unstructured text. But you can easily create simple conversations.

Design A Chatbot With Coding

If you are experienced in coding, you can also design a chatbot with tools like API.ai, Microsoft Bot, Wit.ai, etc. However, you could hire professional chatbot developers to help you. This type of chatbot development will give you more control over the design process. You design programs for structured or unstructured interaction using this process.

Conclusion

And that’s all on how to build a chatbot from scratch. A chatbot can be a handy and general-purpose tool. Having deep insight into the problem you intend to solve will go a long way. These tips will help you design an effective chatbot from scratch.

Some of the world’s most popular websites are online marketplaces. For example, platforms like Amazon and eBay have millions of daily users. They also make billions of dollars per year. In this article, you’ll learn how to build a marketplace website, as well as what you should know when launching this type of business. 

How to Build a Marketplace Website in 4 Easy Steps 

  1.  Types of online marketplaces 
  2.  How to create an online marketplace website 

2.1. Come up with an idea

2.2. Build your prototype

2.3. Build your MVP

2.4. Develop your user base 

Types of Online Marketplaces 

Online marketplaces come in three categories. These include:

  • Business to business marketplaces.
  • Business to customer marketplaces.
  • Customer-to-customer marketplaces.

In addition to this, marketplaces can utilize one of these business models. 

  • Commission-based business model.
  • Subscription-based business model.
  • Listing fee business model.
  • Paid promotions.
  • Advertising.

How to Create an Online Marketplace Website 

2.1. Come up with an Idea

What you have to realize is that competing against the existing marketplace is almost impossible. This is why you need to choose a niche where there is very little competition. Try to think of a unique problem that your marketplace can solve. Who are you going to sell to, and what are their exact specific needs. How big is this market, and can they support your idea? Also, think about your competition and what type of business model you’re going to use. 

2.2. Build Your Prototype

Start by designing your marketplace on paper. Doing this is a great way to think through your idea and is useful if you’re trying to attract investors. Once that is done, you’ll start to actually develop the platform. In order to create an online marketplace, you’ll probably need to hire developers. When doing this, it’s a good idea to create extensive project documentation. This will serve as a guide for developers. It will also help you save time and money. 

2.3. Build Your MVP

This acronym stands for the minimum viable platform. This is basically the point where your platform is fully functioning. If you’re wondering how to make a minimum viable platform, there are several boxes you need to check. First, development should be complete, and the platform must be online. Second, sellers must be able to list their products or services. Third, buyers must be able to browse the site and place orders. 

When building your MVP, it’s a good idea to keep things as simple as possible. This is because the aim of your MVP is simply to test the viability of the platform. For this reason, you do not want to spend too much money on design. 

2.4. Develop Your User Base

Attracting buyers and sellers is the most difficult step when you build a marketplace website. The reason why is simple, without sellers, you won’t attract buyers. The opposite is also true, without buyers, you won’t attract sellers. It’s sort of like the question “which came first, the chicken or the egg.” So how do you do this? Here are a few ways to get started:

Finding sellers:

  •  Find sellers on other marketplaces: Tell them about your marketplace, what you have on offer, and ask if they want to join.
  •  Use search engines: Look for people who are selling products or services related to your marketplace.
  •  Use social media: you can usually find groups of sellers on social media. These are great places to find recruits for your platform. 

Finding buyers:

  •  Start a blog: a blog about topics related to your marketplace. Use SEO to rank these posts and bring in visitors. 
  •  Use social media: build a community for your marketplace with platforms like Facebook and Twitter.  
  •  Use paid advertising: with online advertising, you can find people who are actively looking for your service.  

Final Thoughts 

Marketplace websites are the future of the internet. Platforms like Amazon and eBay are only getting bigger. Not only that, these platforms make billions and have almost completely replaced traditional forms of selling and buyers. With these steps, you can easily build a marketplace website and join in their success. 

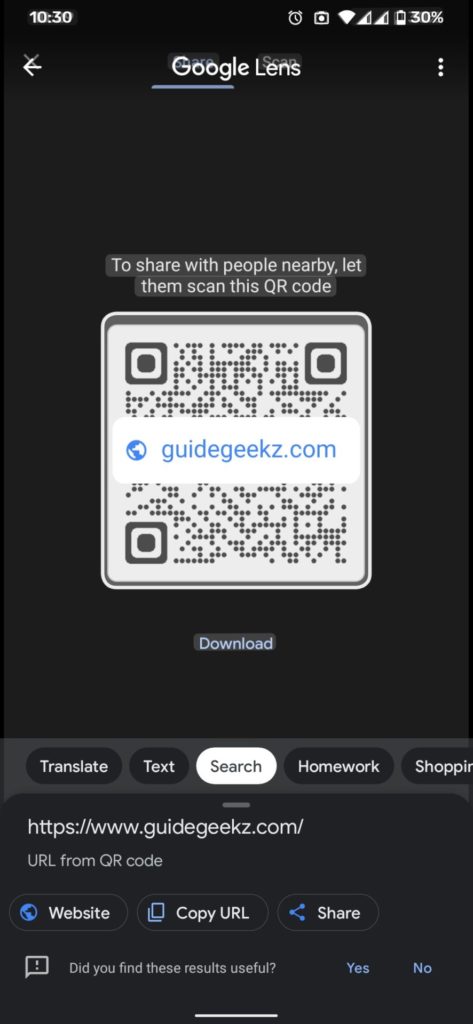
These days, you can find QR codes on everything. Many businesses are now asking customers to scan QR codes to check into events, download apps, place orders, and pay their bills. There are a lot of QR code scanning apps available, and even your phone’s default camera app has QR code scanning functionality. But what if the QR code is on the same phone’s screen as the one you’re holding? Here’s How to Scan QR Code from Image on the same phone.

You can scan QR codes from screenshots, photos, and images on your phone using the Google Photos app and Google lens. Most devices come with these apps pre-installed, but if not, you can always download them from the Google Play store. This is how to get a qr code from image inside your phone without using another phone.

How to Scan QR Code from Image on the Same Phone

Google Photos and Google Lens are two apps that can be used to scan a QR code from our gallery. Both apps use the Google Lens feature to scan the QR code from the image. Google Lens extracts the data from an image and displays a link, usually to a web page.

Method 1: Scan QR code from screenshot or image using Google Photos

You can open the Google Photos app, select a picture or screenshot of the QR code, and tap the Google Lens icon below that picture. Google Lens will automatically detect and display a link. Check how to scan QR codes inside your phone without using another phone.

  1. Open Google Photos.
  2. Select the image or QR code from photos or from the library.
  3. Tap on the Google Lens option from the bottom bar to start scanning.
  4. Google Lens will scan the code and provide you with the information contained in the QR code.

Method 2: Scan QR code from a photo using Google Lens

To scan a QR code present inside your device with a Google lens, you need a Google lens app. If you don’t have one, you can install it from the Google Play Store. After you’ve installed it, you’ll be able to scan any image that contains a QR code.

  1. Download and Install Google Lens on your phone.
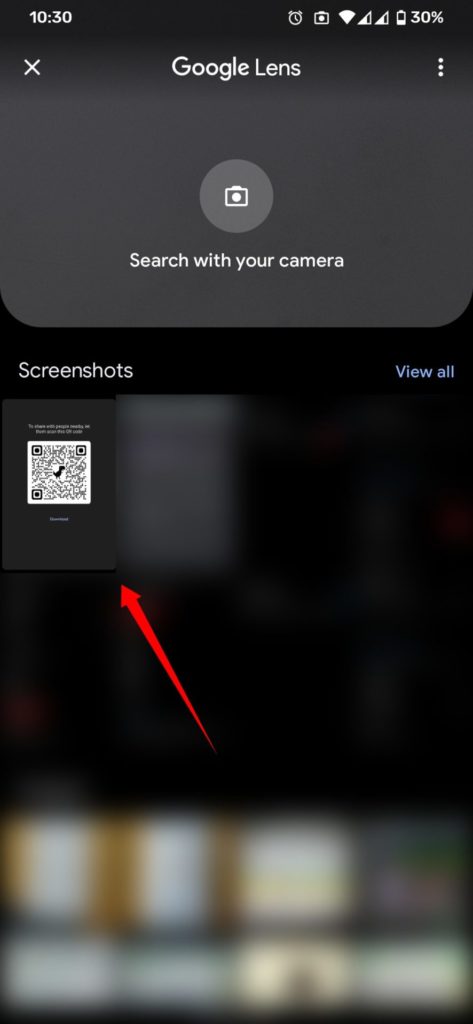
  2. Open the Google lens app and tap a photo with a QR code.
  3. Google Lens will scan the code and provide you with the information contained in the QR code.

Wrapping Up: Scan QR code from Photo or Screenshot

Now you can easily Scan QR Code from Image on the Same Phone. Once you scan it will show you the QR code information and redirect you to a website or a respective app.

Have any questions? Do let us know that in the comments below. Stay connected with us via Facebook and Twitter to read more such helpful posts.
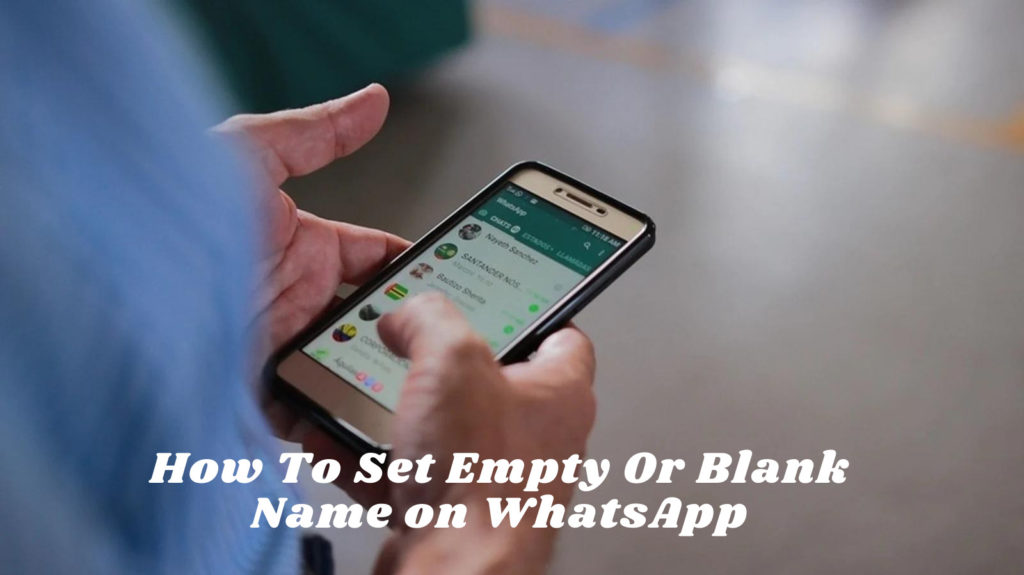
WhatsApp, a Meta-owned instant messaging app, has been testing a number of new features recently in order to improve the app’s experience for users. One of the features that may have gone unnoticed is the option to keep your WhatsApp name in invisible text. Technically, you can’t skip the step of adding your name, but using a simple method, you can Set Empty Or Blank Name on WhatsApp to maintain privacy.

Your name displays on your WhatsApp profile and can be seen by anyone who hasn’t saved your phone number in their contact list. It’ll also show up in any WhatsApp groups you’ve joined. It acts as a safety measure against people who tend to text strangers for no reason. What’s truly difficult is leaving the name section empty because every time you try, WhatsApp will remind you that it’s not meant to be empty. However, there is a simple way to hide your name on Whatsapp and keep your identity hidden from strangers.

How To Set Empty Or Blank Name on WhatsApp

It’s worth noting that WhatsApp officially doesn’t allow users to leave the name field blank. However, we’ll show you two strategies that lets you set blank name on WhatsApp by putting a blank character that WhatsApp accepts.

Method 1: Using Blank Unicode character

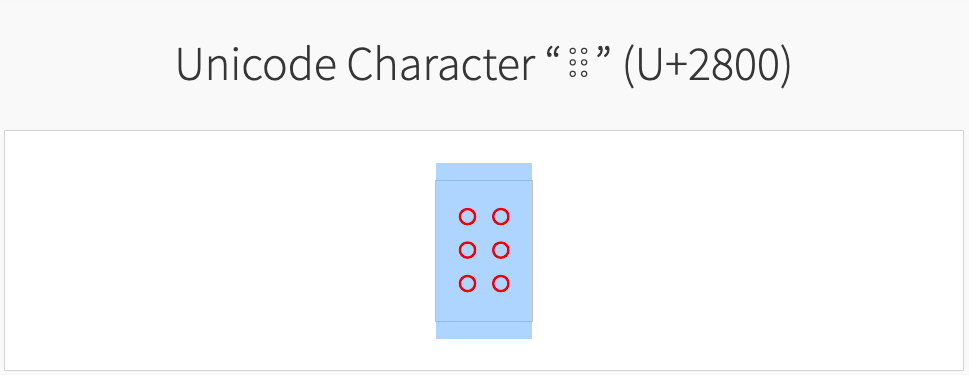
You can hide a name on WhatsApp by using a Unicode character that represents white space. If you paste the Unicode character into the username area, WhatsApp will accept it and display nothing, leaving your name blank. Check out the steps below to find a blank Unicode character for an empty WhatsApp name.

  1. First, copy the blank Unicode character from the Compart website.
  2. Select the white square (⠀) that appears under the name and click on “copy”Blank Unicode character
  3. Now, open WhatsApp, tap on the three dots icon at the top, and select the Settings option.
  4. Tap on your profile picture, you’ll see the Name section right under your profile picture.
  5. Click on the pencil icon to edit the name.
  6. Remove the current name and then paste the blank character you copied earlier.
  7. Click on the Save button to keep your name blank on Whatsapp.
  8. Done, Now your WhatsApp name won’t be visible to unknown contacts.

Method 2: Using Special Characters

The method is almost similar to the first one; only here, instead of the Unicode characters, you have to use symbols to keep your name invisible on WhatsApp.

  1. First, copy these two symbols: ⇨ ຸ
  2. Now, open WhatsApp, tap on the three dots icon at the top, and select the Settings option.
  3. Tap on your profile picture, you’ll see the Name section right under your profile picture.
  4. Click on the pencil icon to edit the name.
  5. Remove the current name and then paste the symbols you copied earlier.
  6. Now, remove only the arrow symbol (⇨) and tap on the Save button.
  7. Done, you have successfully Set Blank (Empty) Name on WhatsApp.

How to Set Blank WhatsApp Status, About and Send Blank Messages on WhatsApp

Have you ever noticed someone in your contact list with a blank status? Yes, just like a blank WhatsApp name you can set empty status on WhatsApp. Not only just blank WhatsApp status, but you can also set empty WhatsApp about field as well as you can send blank messages on WhatsApp for fun.

The method to Set Blank WhatsApp Status, About, and Send Blank Messages on WhatsApp is the same as we mentioned above. All you have to do is to copy and paste the blank Unicode character or symbols from the previous steps into the relevant fields.

Wrapping Up: Hide Name on WhatsApp

With the above-mentioned steps you can Set Empty Or Blank Name on WhatsApp, set blank status on WhatsApp, or send blank messages. Unless you’ve been added as a contact, no one will be able to see your name.

Have any questions? Do let us know that in the comments below. Stay connected with us via Facebook and Twitter to read more such helpful posts.
Experts predict the eCommerce industry will continue to grow rapidly, hitting sales revenues of USD 27.15 trillion by 2027. With the ease of access to the online market, it’s therefore no surprise many people are seeking their fortunes by setting up an eCommerce store.

But, what is the best way to start a new eCommerce company? Money could be tight until you begin to generate profits, so you’ll want to get your business established with the minimum of fuss and without going over budget. The good news is you can use some tried and tested techniques to get your venture up and running.

Let’s dive in and learn how to launch an online store the easy way.

Choose a Niche

You’ll find it more enjoyable to start a business if you are passionate about your products or services. For example, if you like knitting, you could sell premium quality wool. Or, if you’re a keen fisherman, you could provide customers with rods and hooks. When your customers sense your enthusiasm, it can give them confidence that you are selling them the best possible products.
Find a Supplier

Your order fulfillment pipeline is crucial, and a reliable supplier can be the difference between success and failure. It’s good practice to begin by placing small orders with several suppliers. You can then assess their delivery speeds and customer service standards before deciding which provider is the right fit for your business.
Pick a Platform

There are many platforms offering website design and hosting services, and you can review their features and benefits to determine which companies offer the best deals. There are usually a variety of packages on offer, and you can choose your favorite based on factors such as the number of web pages you require, the level of customer support offered, and the price.

It’s also important to ensure your preferred platform allows you to upgrade your package as your business grows.

Promote Your Store

You need to tell as many people as possible about your new eCommerce business. While you could carry out your own advertising activities, this can be time-consuming. It can also be expensive if you are not an expert marketer. To maximize your results, you can hire a professional firm that knows how to use SEO strategies and PPC campaigns to increase your online visibility.

This approach can result in making larger profits at a faster rate. To find out more, click this link.

Track Your Progress

As a small business owner, it’s essential to know precisely how your eCommerce store is performing. Regularly review your website analytics, and compare your outgoings to your sales revenues. You may find making one or two changes to your store set-up or marketing plan could make a significant difference to your profitability.

Start Your New Ecommerce Company Today

Launching a new eCommerce company can be exciting and financially rewarding. However, it can take a lot of hard work and dedication. It’s important to choose an area of expertise, and to partner with suppliers who can meet your needs at your busiest times. Having an effective promotional strategy is also key to your success.

You could be running a thriving online business sooner than you think!

Before you rush off to open your eCommerce store, be sure to check out more great posts in our Entrepreneurialism section.

Over the past few years, we have seen a boom in electric vehicles (EV) across the world. Now, India is witnessing a notable boom in the growth of electric vehicles with major automobile manufacturers are offering EVs across multiple segments. The availability of a charging station, on the other hand, is a critical element that causes hesitancy among potential customers. To make it easier for you, we have listed a few methods to Find Nearby EV Charging Stations in India.

Almost every electric vehicle now comes with an official mobile app or website that directs the user to the closest charging station. Unfortunately, the dedicated app only shows company-specific charging stations; to find all nearby EV charging stations, you’ll need to use a third-party app. Let’s have a look at the best apps and websites that help you locate the nearest electric vehicle charging station.

How to Find Nearby EV Charging Stations in India

Below, is the list of the 5 best apps to find the nearest EV charging stations in India. These apps and websites are free to use and it will make it easier for you to locate electric vehicle charging stations in the country.

1) Google Map

Google Map EV

Google introduced the ability to not only locate charging stations nearby using Google Maps, but it also introduced the ability to see the real-time availability of charging stations near you. In order to find one near you, simply search for “EV Charging Stations” in the app, and Google will show you a list of all the EV charging stations near you, along with their exact address, charging speed, and output power.

Google Maps also provides filters that specify details like working status and plug type for the listed charging stations, making it much easier to find the right one for your vehicle. The feature is available on Google Maps on desktop, Android, iOS, and Android Auto.

2) Tata Power EZ Charge App

Tata Power EZ Charge App

The Tata Power EZ Charge App shows the locations of all nearby Tata Power charging stations and allows users to schedule charging appointments, make payments, bookmark preferred locations, view charging history, view real-time charging status, and select connector types. The app is designed for electric vehicle (EV) owners, fleet EV owners, and taxi EV owners who want to charge at the Tata Power EV Charging Network, which includes EV charge stations in public, residential, and commercial places.

Tata Power has already formed partnerships with companies such as Tata Motors Limited, MG Motors India Limited, Jaguar Land Rover, TVS, and others to establish electric vehicle charging infrastructure for its buyers and dealers. The business intends to build a network of 10,000 charging stations along major routes across the country. The Tata Power EZ Charge mobile app may be used to identify and access charging stations.

3) EV Plugs

EV Plugs

EV Plugs is one of the best apps to locate nearby EV charging stations in India from service providers like Tata Power, EESL, Statiq, Ather, Magenta, and more. The app has 1,000+ verified listings alongside tips for the EV owners on making the most of it while being there

Once you have downloaded the app and given it GPS access, the app will ask you what type of EV charger are you looking for. You can also select the brand, plug type, and vehicle for which you are searching a charging station. Once done, the app shows all the nearby EV charging stations. It also has Google Maps support to navigate you to the station.

4) Statiq

Statiq

Statiq is another charging station app contributing toward faster EV adoption. It has now operated in 27 cities and has installed 150+ charging stations and growing. The app shows the nearest electric vehicle charging station to the user and lets you book a slot at its charging stations and make payments through the app itself.

You can view a bunch of stats within the app such as real-time status of the charging stations, price per kW, operating hours of various charging stations, and so on. It also provides the unique feature of vehicle-based profiling using booking history.

5) PlugShare

PlugShare

PlugShare is the most accurate and complete public EV charging map available in the world. It has over 400,000 electric car charging stations available worldwide. The app operates worldwide however its charging station database is growing in India as well.

The app lists public stations on a map, powered by your device’s GPS, and delivers directions, so you can find the closest station. You can also plan driving estimates, and also set your own helpful reminders for charging your vehicle.

Wrapping Up:

These are the best mobile apps that provide the best solutions in way of finding suitable charging locations as well as other services related to electric vehicles. If you using a different charging station app for finding charging stations, let us know in the comments. Stay connected with us via Facebook and Twitter to read more such helpful posts.