Author

Sumit Bahl

Browsing

Good news for Nokia users, latest stable Android 10 update for Nokia 6.1 starts rolling out. Nokia Mobile quoting “Nokia 6.1, more secure and pure! These phone’s are now running on the latest Android 10 update. Get the latest pure Android experience and access the latest features today. What feature do you think will be your most used?”. via Twitter. You can Download Nokia 6.1 Android 10 OTA Zip from below to Update Nokia 6.1 to Android 10.

The new Android 10 OTA Update for Nokia 6.1 brings all Android 10 features like a system-wide dark theme, Smart reply, full-screen gesture navigation, additional controls for privacy, and location, along with March 2020 security patch. You can manually update Nokia 6.1 to Android 10 by downloading the OTA file from below.

The new Nokia 6.1 Android 10 update has the software version v4.10C and rolling out in a phase-wise manner. Means maybe you will get the update tomorrow or maybe next 1-2 weeks. If you don’t want to wait, you could just go to Settings and manually check or follow the below guide. Download Nokia 6.1 Android 10 OTA zip file from below.

Changelogs of Nokia 6.1 Android 10 update:

  • Dark mode – Take it easy on your eyes.
  • Smart reply – Save more time with recommended actions.
  • Gesture navigation – Get around with a swipe and a pull.
  • Additional controls for privacy and location.
  • Google Security patch (2019-12).

Before You Begin

  • This method is only for Nokia 6.1. Don’t try this on any other device.
  • Follow the steps correctly otherwise, you may brick your device. We Guidegeekz.com is not responsible for any damage to your phone.
  • Charge your device to 60- 70% to prevent it from the accidental shutdown.
  • Take a complete backup of everything important.

Download Android 10 Update for Nokia 6.1

  • Nokia 6.1 Android 10 OTA Zip – Download
  • Nokia 6.2 Android 10 Update – Download
  • Nokia 7.2 Android 10 Update – Download

How to Install Android 10 Update on Nokia 6.1 –

Method 1 –

1) Download Nokia 6.1 Android 10 OTA Zip from above and save it to internal memory.

2) Reboot Nokia 6.1 to Recovery mode by using the command adb reboot bootloader or by using the below steps.

  • Turn Off your device
  • Press and hold the ‘Vol Up+Power’ button. Release the power button upon vibration, but keep the volume key pressed.
  • If you will see no command with dead Android
  • Now press Volume Up + power to enter into recovery mode.

3) In recovery mode select Apply update from SD Card.

4) Choose the zip file and wait.

5) Done! Reboot your phone after the process complete.

Method 2 –

  1. Download the Nokia 6.1 Android 10 OTA zip file from above and save it on your device.
  2. Go to download folder and rename the file to update.zip
  3. Place it to the root directory of internal storage.
  4. Open Phone app and dial *#*#874#*#* to update.
  5. Wait for the update to finish and restart when prompted.

Method 3 – 

  1. First, enable the USB debugging option from setting ->developer option. To enable Developer Options, go to About phone and tap the Build Number 7 times.
  2. Download ADB and Fastboot and install it on your PC.
  3. Download Android 10 OTA zip for Nokia 6.1 from above Copy ROM to a folder where adb installed.
  4. Now Turn Off your phone and boot into the recovery mode.
  5. Choose Apply update from ADB
  6. Now Connect your phone to your Laptop/PC
  7. On ROM folder press shift+right click and click on open command here.
  8. Now check your connection status by typing the below command
    adb devices
    if your device is listed, you’re ready to flash the ROM
  9. Now Install Android 10 OTA on Nokia 6.1 by typing below command
    adb sideload File-Name.zip 
  10. Now, wait until the process completes and then Reboot the phone.
  11. Done!

Wrapping Up:

Nokia 6.1 brings all Android 10 features and will soon be available for all via OTA but if you’re the impatient type then you could follow the above procedure to Download and Install Android 10 Update for Nokia 6.1. If you have any questions related to this post, feel free to leave that in the comment section.

Latest Android 10 based OxygenOS 10.5.6 for OnePlus 8 Pro starts rolling out. The new OxygenOS 10.5.6 update for OnePlus 8 Pro fixes green tint issue and brings system and camera improvement. Download OxygenOS 10.5.6 for OnePlus 8 Pro from below.

The update is rolling out via OTA (over-the-air) and many users already getting OxygenOS 10.5.6 for OnePlus 8 Pro. The update is incremental and rolls out in a phase-wise manner. You can wait for the OTA updates, or you can Update OnePlus 8 Pro to OxygenOS 10.5.6 manually with the below method. Download OxygenOS 10.5.6 for OnePlus 8 Pro from below.

The new OxygenOS 10.5.6 for OnePlus 8 Pro brings many changes (Check the complete changelogs from below). We provide you the OxygenOS 10.5.6 OTA file which you can flash on your device. So if you want to update your OnePlus to the latest version then Download OxygenOS 10.5.6 for OnePlus 8 Pro from below. Check below what’s new in OxygenOS 10.5.6

OxygenOS 10.5.6 Features and Changelogs –

  • System
    • Fixed known issues and improved system stability


  • Camera
    • Refined the dirt detection capability to be more accurate than ever
    • Improved the camera’s shooting experience with the front camera
    • Improved the stability


  • Network
    • Communication stability further enhanced

Note:-

  • This method is only for OnePlus 8 Pro.
  • Full ROM can be flashed via TWRP as well.
  • Follow the steps correctly otherwise, you may brick your device. We Guidegeekz.com is not responsible for any damage to your phone.
  • Charge your device to 60- 70% to prevent it from the accidental shutdown.
  • Take a complete backup of everything important.

Download OxygenOS 10.5.6 for OnePlus 8 Pro

How to Install OxygenOS 10.5.6 Update on OnePlus 8 Pro

For Non-Rooted Users

Method 1

  1. First, enable the USB debugging option from setting ->developer option. To enable Developer Options, go to About phone and tap the Build Number 7 times.
  2. Download ADB and Fastboot and install it on your PC.
  3. Download OxygenOS 10.5.6 OTA from above Copy ROM to a folder where adb installed.
  4. Now Turn Off your phone and boot into the recovery mode.
  5. Choose Apply update from ADB
  6. Now Connect your phone to your Laptop/PC
  7. On ROM folder press shift+right click and click on open command here.
  8. Now check your connection status by typing the below command
    adb devices
    if your device is listed, you’re ready to flash the ROM
  9. Now Install OxygenOS 10.5.6 OTA on OnePlus 8 Pro by typing below command
    adb sideload File-Name.zip 
  10. Now, wait until the process completes and then Reboot the phone.
  11. Done!

Method 2

  1. Download OxygenOS 10.5.6 OTA zip file from above and save it on your internal phone memory.
  2. Now Switch off your device and boot into the Recovery mode.
  3. To boot OnePlus 8 Pro into recovery mode press and hold ‘Power + Volume Down’ button.
  4. Now your phone boot into the Stock recovery.
  5. Now Select ‘Apply Update’ and select ‘Choose from Internal Storage
  6. Browse the OTA zip file which you download and save on your phone before.
  7. Select the zip file, and it will Install OxygenOS 10.5.6 OTA update file on your OnePlus 8 Pro.
  8. Now wait until the process complete and then reboot your device.
  9. Done.

For Rooted Users

  1. First Unlock your device bootloader and Install TWRP on your Device. Skip this step if already installed TWRP.
  2. Reboot your device into Recovery mode and create a Nandroid backup (Recommended) of your device for safer side, if anything goes wrong.
  3. Now wipe your cache files from Goto Wipe>Advanced Wipe>Select Wipe cache and Dalvik cache and swipe to confirm it.
  4. Now, Go to Install and locate the OOS 10.5.6 Full Rom Zip & swipe to Install the ROM file
  5. Now Flash the Magisk again to maintain the root (Optional).
  6. Wipe Dalvik & Cache again.
  7. Done! Reboot System and Enjoy.

Wrapping Up:

That’s all this is the complete guide to Download OxygenOS 10.5.6 for OnePlus 8 Pro (OTA + Full ROM). Have any questions? Do let us know that in the comments below. Stay connected with us via Facebook and Twitter to read more such helpful posts.

Today we discuss How To Install Google Play Store On MIUI 12. As we know, Xiaomi released the MIUI 12 Closed Beta ROM for many devices which brings a visual overhaul with a simpler flat look alongside plenty of new animations, an improved dark mode, AI-assisted calling features, and many more features.

When you have flashed MIUI 12 Closed Beta ROM or Developer ROM on any Xiaomi phones you see no Play Store app in it. Even some Global ROM does not come with Play Store. This means you can’t use Play services or install any apps on your device from Play Store. But with the help of this guide, you can Install Google Play Store On MIUI 12.

You need to download Google Installer for MIUI 12 to Install Gapps on MIUI 12 manually. With this guide, you can Install Gapps on any Xiaomi device running on MIUI 12. So follow the below tutorial to Download MIUI 12 Gapps or Install Play Store On MIUI 12. Also checked MIUI 12 Stock and Live Wallpapers.

Download Gapps for MIUI 12

The initial version of MIUI 12 does not come with Google apps and services. If you are looking for Gapps on your MIUI 12 ROM, then Download Google Installer 3.0 APK for MIUI 12 from below and install it on your device.

[su_button url=”https://drive.google.com/open?id=1QY0Eq67Cw6FwSFGwmcq4xxhk6hCqe1kr” target=”blank” style=”soft” background=”#dc5e49″ size=”7″ center=”yes” rel=”nofollow”] Download Google installer v3.0 apk[/su_button]

Steps to Install Google Play Store On MIUI 12 –

The quickest way to install Google services on MIUI 12 is to Install Google Installer 3.0 on the device. This process doesn’t need root and easily Install Google Play Store On MIUI 12. So don’t worry if you are upgrading to MIUI 12, you can Install Gapps On MIUI 12 by installing a simple app named Google Installer, which contains all Google apps and you can install any app with a single click. Download the below file to Install Google Play services On MIUI 12.

  1. First, download latest Google Installer for MIUI 12 from above and save it on your device.
  2. Now enable the Unknown Sources. To enable Unknown Sources, go to phone settings –> Additional Setting and enable the Unknown Sources.
  3. Now open the file manager and browse for GoogleInstaller.apk file.
  4. To install Google Installer on your phone just click on apk and run the file.
  5. Open the Google Installer app after the installation complete.
  6. Now click on the blue button. This will install all the Google play services on your MIUI device.Google Installer 3.0
  7. Done! This will Install Google Play Store and Play Services On MIUI 12.
  8. Reboot your device after installing Google Play services.

Wrapping Up:

So this is the complete guide Download Gapps for MIUI 12 and to manually Install Google Play Store On MIUI 12 devices. Have any questions? Do let us know that in the comments below. Stay connected with us via Facebook and Twitter to read more such helpful posts.

Latest Realme UI 1.0 based Android 10 update for Realme X50 Pro starts rolling out. The latest Realme X50 Pro Android 10 update is based on Realme UI and brings tons of new features, optimizations and April 2020 Security patch. You can Download Realme X50 Pro A.19 Update OTA Zip from below to Update Realme X50 Pro to Android 10.

The Realme X50 Pro Android 10 update has the software version RMX2076PU_11_A.19. The update is rolling out in a phase-wise manner, which means maybe you will get the update tomorrow or maybe next 1-2 weeks. If you don’t want to wait, you could just go to Settings and manually check or follow the below guide. Download Realme X50 Pro A.19 OTA zip file from below.

The new A.19 OTA Update for Realme X50 Pro brings Realme UI 1.0 based on Android 10 and brings system and camera optimization and April 2020 Security Patch. You can manually update Realme X50 Pro to April 2020 Security Patch by downloading the OTA file from below. You can check the complete changelog of Realme X50 Pro Realme UI 1.0 from below.

Changelogs of Realme X50 Pro A.19 update:

  • Security
    ● Android security patch: April, 2020


  • Desktop
    ● Changed the charging icon


  • Settings
    ● Added Vivid Mode to Screen Color Mode


  • Camera
    ● Added function of recording 60FPS 4K videos
    ● Optimized the quality of photos


  • Optimization
    ● Optimized the screen redness at the low brightness in some scenes
    ● Optimized network stability


  • Known issue fixed
    ● Fixed screen rounded corner problem

Before You Begin

  • This method is only for Realme X50 Pro. Don’t try this on any other device.
  • Follow the steps correctly otherwise, you may brick your device. We Guidegeekz.com is not responsible for any damage to your phone.
  • Charge your device to 60- 70% to prevent it from the accidental shutdown.
  • Take a complete backup of everything important.

Download Realme X50 Pro A.19 Update

  • Realme X50 Pro RMX2076PU_11_A.19 OTA – Download

How to Install Android 10 Update on Realme X50 Pro –

Method 1 –

1) Download Realme X50 Pro A.19 Zip from above and save it to internal memory.

2) Reboot Realme X50 Pro to Recovery mode by using the below steps.

  • Turn Off your device
  • Press and hold the ‘Vol down+Power’ button.

3) Choose the language you want.

4) In recovery mode select Install from storage device.

5) Choose the zip file from phone storage or From the SD card and wait.

6) Done! Reboot your phone after the process complete.

Method 2 –

  1. Download the Realme X50 Pro A.19 OTA zip file from above and save it on your device.
  2. Go to download folder and rename the file to update.zip
  3. Place it to the root directory of internal storage.
  4. Click the firmware to start the update.
  5. Wait for the update to finish and restart when prompted.

Wrapping Up:

Realme X50 Pro brings all Android 10 features along with new Realme UI and will soon be available for all via OTA but if you’re the impatient type then you could follow the above procedure to Download and Install A.19 Update for Realme X50 Pro. If you have any questions related to this post, feel free to leave that in the comment section.

Now you can use a JioMart WhatsApp number to order your groceries. JioMart is a joint venture between Reliance Retail and Reliance Jio. It is an online to offline e-commerce platform where customers can place an order online but can get the products offline (nearest local retail stores). Check below How to Order Groceries from JioMart using WhatsApp.

Reliance Industries entered into the retail market with the online store JioMart on WhatsApp just a few days after the deal between Facebook and Reliance Jio. Recently Facebook acquired around 10% stake in Jiofor 5.7 Billion USD.

The JioMart app will soon be available on Google Playstore and Apple app store. But for now, you aren’t required to download a separate app to order using this method. JioMart now has a dedicated WhatsApp business account +918850008000 and all you have to do is send Hi message to this. The service currently available in Navi Mumbai, Thane, and Kalyan areas of Mumbai, Maharashtra, and soon will be launched across the country. You can check the benefits of JioMart and check the below steps to order groceries from JioMart using WhatsApp.

Why JioMart?

  1. No Question Ask Return Policy – The biggest advantage of using JioMart is its No Question Ask Return Policy, which is helping the customers to order products without any problem.
  2. Express Delivery – It provides express delivery times and offering savings like never before.
  3. JioMart Registration – They are offering free Rs 3000 to early adopters who are registering early for the JioMart.
  4. Free Home Delivery – They provide free home delivery with no minimum order value.
  5. Vast range of products – It has many stores and 50,000+ grocery products.

How to Order Groceries from JioMart using WhatsApp

To order Groceries from Reliance JioMart using WhatsApp, the customer has to follow the simple given steps. Keeping in mind that the orders placed by 7 pm every day will be available for pick up at your nearest ‘JioMart Kirana’ within the next two days. Here is a step by step guide on how to how to order on JioMart by using WhatsApp.

JioMart

  1. Firstly, save JioMart WhatsApp Number: 8850008000 on your phone.
  2. After saving the number, send the ‘Hi‘ message to this contact.
  3. A link will be sent to the persons WhatsApp chat window which would be valid for 30 mins.
  4. After clicking on the link, you will be directed to a new page.
  5. The customer will have to fill the basic details like the address and phone number.
  6. Once the details are filled, a catalogue of the products would be available.
  7. Select the items available and place your order.
  8. After placing the order this information would be forwarded to the local Kirana store with the complete details about the customer.
  9. The customer would also receive the details about the store to whom the order has been placed.
  10. Lastly, the person has to pick up the order or ask for the home delivery from the specified store and pay in cash for it.

Wrapping Up:

JioMart will also start commercial operations and maybe soon selling other products like Medicines, electronics, smartphones, and different categories. JioMart has the potential to compete with Grofers and Big Basket, However, there are few improvements needed like the service does not offer an online payment option yet or orders placed on JioMart WhatsApp service cannot be changed, canceled, or modified.

Have any questions? Do let us know that in the comments below. Stay connected with us via Facebook and Twitter to read more such helpful posts.

Now you can Download MIUI 12 ROM for Poco F1. Xiaomi has already rolled out the first MIUI 12 Closed Beta to most of the Xiaomi and Redmi devices but they didn’t include Poco F1 for some reason.  MIUI 12 Beta for Poco F1 may be released later but developers already ported the ROM for the device. Follow the below guide to Download MIUI 12 20.4.27 Beta for Poco F1 and update them manually.

A team of developers pocoports has successfully ported the MIUI 12 Beta ROM for Poco F1 from the official build for Mi 8. The ROM is pretty stable for its first build and brings all MIUI 12 features including the Google Apps. Download MIUI 12 ROM for Poco F1 from below.

The ROM is pretty stable and all the major and necessary functions, including Bluetooth, Camera, Wifi, Audio, Video, Calling, notch adjustment, OK Google hot word, Hotspot seems to be working fine as of now. To install MIUI 12 ROM on Poco F1, all you need a Rooted device with TWRP installed on your device.

Note:-

  • The ROM is a ported from Mi 8 and can be flashed via TWRP only.
  • Follow the steps correctly otherwise, you may brick your device. We Guidegeekz.com is not responsible for any damage to your phone.
  • Charge your device to 60- 70% to prevent it from the accidental shutdown.
  • Your device bootloader must be unlocked.
  • Take a complete backup of everything important.

Download MIUI 12 ROM for Poco F1

MIUI 12 Closed Beta ROM for Poco F1 is available which can install it via TWRP Recovery. We provide Poco F1 MIUI 12 v20.4.27 ROM to flash it manually. Download MIUI 12 Beta ROM 20.4.27 for Poco F1 from below.

How to Install MIUI 12 on Poco F1 –

To install MIUI 12 ROM on Poco F1 download Recovery ROM from above and use the below method to install this on your device.

  1. First Unlock your device bootloader and Install TWRP on your Device. Skip this step if already installed TWRP.
  2. Reboot your device into Recovery mode and create a Nandroid backup (Recommended) of your device for safer side, if anything goes wrong.
  3. Now wipe your cache files from Goto Wipe>Advanced Wipe>Select Wipe cache and Dalvik cache and swipe to confirm it.
  4. Now, Go to Install and locate the MIUI 12 Full Rom Zip & swipe to Install the ROM file
  5. Now Flash the Magisk again to maintain the root (Optional).
  6. Wipe Dalvik & Cache again.
  7. Done! Reboot System and Enjoy.

Wrapping Up:

That’s all this is the complete guide to Download and Install MIUI 12 on Poco F1. Have any questions? Do let us know that in the comments below. Stay connected with us via Facebook and Twitter to read more such helpful posts.

Today we provide you the complete set of MIUI 12 stock wallpapers. MIUI 12 is the latest Xiaomi operating system which is now available as a closed beta and soon will be rolled out globally. MIUI 12 stock wallpapers and Live Wallpapers are already out and you don’t have to wait until for the update to grab the wallpaper.

The Stock Wallpapers of MIUI 12 have now been available to us and we are going to share them with you below. We grab the 34 beautiful wallpapers which look pretty good on your device. So we shared all MIUI 12 stock wallpapers and Live Wallpapers which you can download from the bottom of the page.

The new MIUI 12 ROM based on Android 10 but brings a visual overhaul with a simpler flat look alongside plenty of new animations, an improved dark mode, AI-assisted calling features, new health app, tweaks to system animations, more sophisticated privacy controls and set of beautiful wallpapers. Download MIUI 12 stock wallpapers from below.

MIUI 12 Stock Wallpapers are available in 1080 × 2400 pixels which looks beautiful on any Android phone. The MIUI 12 comes with 34 stunning High-Resolution wallpapers. You can download a zip file containing all stock wallpapers of MIUI 12 in FHD resolution.

All the wallpaper shown below samples is compressed and resized to fit here. You can download all stock wallpapers of MIUI 12 in 1080 × 2400 Resolution from the link below.

Download MIUI 12 Stock Wallpapers and Live Wallpapers

These are the stunning and beautiful MIUI 12 Stock Wallpapers and Live Wallpapers. Download these beautiful and colorful MIUI 12 Wallpapers and share it with your friends.

Wallpaper Samples –

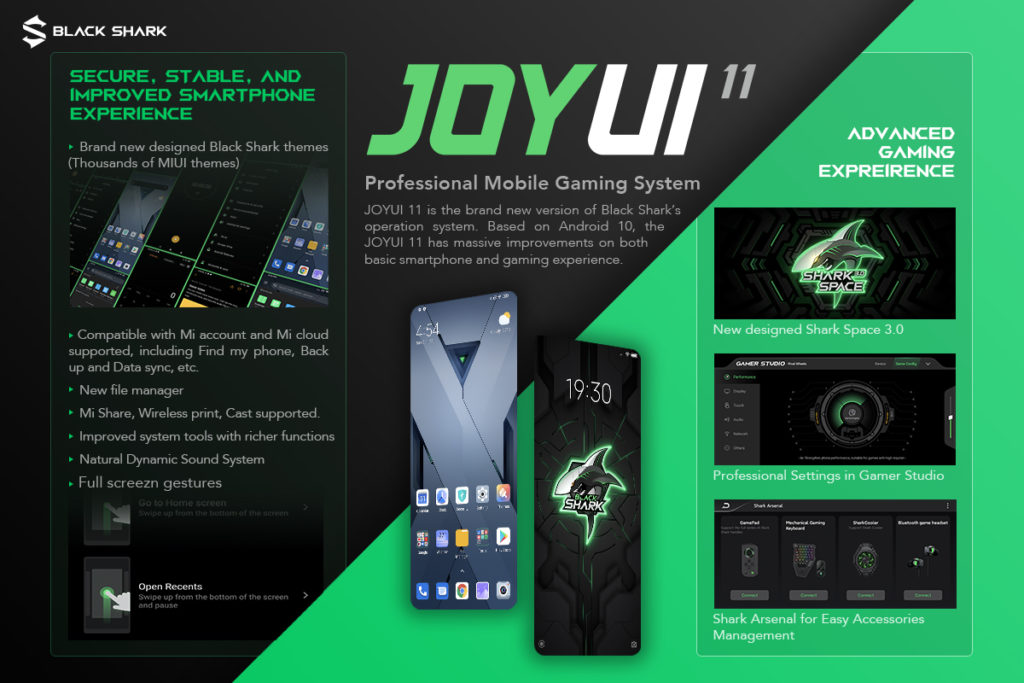
Here we share a direct link to Download Black Shark 2 Android 10 Firmware Update. The new Android 10 update for Black Shark 2 is based on Android 10 beta update and rolling out via OTA which brings all Android 10 features along with a heavily skinned user interface called JoyUI 11. Download Black Shark 2 Firmware Update from below.

The Android 10 update for Black Shark 2 is an Incremental update that rolls out in a phase-wise manner. The update is rolling out via OTA (over-the-air) which comes with build number SKYW2004221OS00MQ0. You can wait for the OTA updates, or you can Download Black Shark 2 SKYW2004221OS00MQ0 OTA to update it manually with the below method. Download Black Shark 2 Android 10 firmware update file from below.

We provide you the Black Shark 2 Android 10 OTA zip which you can flash on your device. You can check for the by going to Settings > About > System Update > and check for update. Download Black Shark 2 Firmware Update from below.

Note:-

  • This method is only for the Black Shark 2 only.
  • Follow the steps correctly otherwise, you may brick your device. We Guidegeekz.com is not responsible for any damage to your phone.
  • Charge your device to 60- 70% to prevent it from the accidental shutdown.
  • Take a complete backup of everything important.

Download Black Shark 2 Android 10 Firmware Update

  • Download Black Shark 2Android 10 OTA (Full OTA) – Download, Mirror

How to Install Android 10 on Black Shark 2

Method 1

  1. Download Black Shark 2 Android 10 OTA zip file from above and save it on your device.
  2. Go to download folder and rename the file to update.zip 
  3. Move it to “ota” directory in your phone
  4. Open Phone app and dial *#*#1027#*#* to update.
  5. Press “LOCAL UPDATE” and start updating your device.

Method 2

  1. First, enable the USB debugging option from setting ->developer option. To enable Developer Options, go to About phone and tap the Build Number 7 times.
  2. Download ADB and Fastboot and install it on your PC.
  3. Download Black Shark 2 OTA from above Copy ROM to a folder where adb installed.
  4. Now Turn Off your phone and boot into the recovery mode.
  5. Choose Apply update from ADB
  6. Now Connect your phone to your Laptop/PC
  7. On ROM folder press shift+right click and click on open command here.
  8. Now check your connection status by typing the below command
    adb devices
    if your device is listed, you’re ready to flash the ROM
  9. Now Install Android 10 OTA on Black Shark 2 by typing below command
    adb sideload File-Name.zip 
  10. Now, wait until the process completes and then Reboot the phone.
  11. Done!

Wrapping Up:

This is the easiest way to Download Black Shark 2 Android 10 Firmware Update and flash it manually. If you have any questions, comment below.

Now you can Download MIUI 12 Closed Beta for Xiaomi and Redmi devices. The new MIUI 12 ROM based on Android 10 but brings a visual overhaul with a simpler flat look alongside plenty of new animations, an improved dark mode, AI-assisted calling features, new health app, tweaks to system animations, and more sophisticated privacy controls. Follow the below guide to Download MIUI 12 Closed Beta for all Xiaomi and Redmi devices and update them manually.

MIUI 12 closed beta is now live for Chinese users while the stable build of MIUI 12 starts rolling out from June. The current version does not support Google Play Services or any pre-installed Google apps. MIUI 12 Global ROM will be rollout shortly but if you want early access to new features then Download MIUI 12 ROM for all supported Xiaomi Devices.

MIUI 12 Features and Changelogs –

  • Highlights
    • MIUI 12. Yours alone.
  • System animations
    • New: All-new physically-based animation engine with advanced architecture will refresh your device’s look.
    • New: Dynamic window technology takes switching screen orientation to a new level.
  • System visuals
    • Brand new visual design works for all types of content and languages.
    • Magazine-level layouts bring important things into the spotlight and make the content structure clear.
  • Privacy protection
    • New: MIUI 12 is the first Android-based mobile OS that went through the rigorous enhanced privacy protection testing.
    • New: Reset your device ID and control how it’s used based on virtual ID technology.
    • New: Grant permissions that will be used only while you’re using an app.
    • New: You can also grant permissions just once, and decide again next time a permission is required.
    • New: Restrict access to telephony to third party apps.
    • New: Return blank messages to the apps that require personal information.
    • New: Receive notifications whenever apps record audio, use camera, or access your location.
    • New: Use secure sharing to control what additional data is sent along with shared items.
    • New: Get comprehensive stats on how apps use permissions in app behavior history.
    • New: Visit privacy.miui.com to learn how MIUI protects your privacy.
    • Optimization: Apps aren’t allowed to launch other apps in the background now.
  • AI Call Assistant
    • New: Mi AI can answer your calls now!
    • New: You can record a customized greeting that will be played to the other person during AI calls.
    • New: Customized greetings are also supported for outgoing calls.
  • Xiaomi Health
    • New: All-new Xiaomi Health gives you more options and makes your health stats more accurate.
    • New: Put your device next to you before falling asleep to analyze your sleep cycle and record talking and snoring.
    • New: You can sync data with supported wearable and smart home devices.
    • New: Xiaomi Health can remind you to stand up and move when it detects that you’ve been sitting down for too long.
    • New: The app also analyzes your stats and gives you simple health advice.
  • Control center
    • New: Swipe down from the upper right corner of your screen to open Control center.
    • New: Animated icons are a joy to look at!
  • Accessibility
    • New: Mi Ditto combines dictation and speech output, making mobile devices more convenient for people who have difficulties using conventionally designed smartphones.
  • Trips
    • New: Traffic and suggested routes to airports and train stations.
    • New: You can track your previous trips now.
    • New: Checklists for trips.
    • New: Alarms for train arrivals.
  • Mi Carrier Services
    • New: View your SIM balance and mobile data usage stats.
    • New: Save frequently used phone numbers to top up balance and buy mobile data later.
    • New: Buy SIM cards and services.
  • Messaging
    • New: Promotional messages are grouped according to their content now.
  • Status bar, Notification shade
    • New: All-new design.
  • Weather
    • New: New animations bring the weather from outside directly to your screen.
  • Settings
    • New: Security introduces new comprehensive privacy protection mechanisms.
    • New: Lite mode simplifies your device and brings essential features up front.
  • File Manager
    • New: Use the floating shortcut to filter and sort items, as well as switch view.
  • Calendar
    • New: New layout tailored for landscape orientation is available now.
    • New: We added lots of fresh animations that will accompany your actions.
    • New: Calendar cards will remind you about important events and anniversaries.
  • Notes
    • New: You can create folders with notes now.
    • New: New dynamic backgrounds look gorgeous!
    • New: Tasks are completed with a satisfying animation now.
    • New: Checklists of subtasks make managing your agenda much simpler.
  • Security
    • New: New animations feel natural and refreshing.
    • New: Keep your home safe with smart home device alerts.
    • New: Binging your favorite shows will be more convenient with our new video toolbox.
  • Xiaomi Cloud
    • New: Shared family storage plan is available now.

Download MIUI 12 Closed Beta for Xiaomi and Redmi devices

MIUI 12 Closed Beta ROM for Xiaomi and Redmi devices is available which can install it via Recovery or via Fastboot. We provide MIUI 12 v20.4.27 ROM to flash it manually. Download MIUI 12 Beta ROM 20.4.27 for all Xiaomi Devices from below.

1) Download MIUI 12 ROM for Redmi Note 8 Pro

  • MIUI 12 Recovery ROM for Redmi Note 8 Pro – Download

2) Download MIUI 12 ROM for Mi 9 

  • MIUI 12 Recovery ROM for Mi 9 – Download

3) Download MIUI 12 ROM for Mi 9 Pro 5G

  • MIUI 12 Recovery ROM for Mi 9 Pro 5G – Download

4) Download MIUI 12 ROM for Mi Mix 2 

  • MIUI 12 Recovery ROM for Mi Mix 2 – Download

5) Download MIUI 12 ROM for Mi 10 Pro 

  • MIUI 12 Recovery ROM for Mi 10 Pro – Download

6) Download MIUI 12 ROM for Redmi K20/Mi 9T

  • MIUI 12 Recovery ROM for Redmi K20/Mi 9T – Download

7) Download MIUI 12 ROM for Mi 8

  • MIUI 12 Recovery ROM for Mi 8 – Download

8) Download MIUI 12 ROM for Mi 8 Pro

  • MIUI 12 Recovery ROM for Mi 8 Pro – Download

9) Download MIUI 12 ROM for Mi 9 SE

  • MIUI 12 Recovery ROM for Mi 9 SE – Download

10) Download MIUI 12 ROM for Mi Note 3

  • MIUI 12 Recovery ROM for Mi Note 3 – Download

11) Download MIUI 12 ROM for Redmi Note 7/7S

  • MIUI 12 Recovery ROM for Redmi Note 7/7S – Download

12) Download MIUI 12 ROM for Mi Max 3

  • MIUI 12 Recovery ROM for Mi Max 3 – Download

13) Download MIUI 12 ROM for Mi Mix 3

  • MIUI 12 Recovery ROM for Mi Mix 3 – Download

14) Download MIUI 12 ROM for Redmi K30 5G

  • MIUI 12 Recovery ROM for Redmi K30 5G – Download

15) Download MIUI 12 ROM for Mi 8 Lite

  • MIUI 12 Recovery ROM for Mi 8 Lite – Download

16) Download MIUI 12 ROM for POCO X2/Redmi K30 4G

  • MIUI 12 Recovery ROM for POCO X2/Redmi K30 4G – Download

17) Download MIUI 12 ROM for Mi Mix 2S

  • MIUI 12 Recovery ROM for Mi Mix 2S – Download

18) Download MIUI 12 ROM for Mi 9 Lite/Mi CC9

  • MIUI 12 Recovery ROM for Mi 9 Lite/Mi CC9 – Download

19) Download MIUI 12 ROM for Redmi K20 Pro/Mi 9T Pro

  • MIUI 12 Recovery ROM for Redmi K20 Pro/Mi 9T Pro – Download

20) Download MIUI 12 ROM for Mi 6

  • MIUI 12 Recovery ROM for Mi 6 – Download

21) Download MIUI 12 ROM for Mi 8 SE

  • MIUI 12 Recovery ROM for Mi 8 SE – Download

22) Download MIUI 12 ROM for Mi Note 10/Mi CC9 Pro

  • MIUI 12 Recovery ROM for Mi Note 10/Mi CC9 Pro – Download

23) Download MIUI 12 ROM for Mi 10

  • MIUI 12 Recovery ROM for Mi 10 – Download

24) Download MIUI 12 ROM for Mi 8 Explorer Edition

  • MIUI 12 Recovery ROM for Mi 8 Explorer Edition – Download

25) Download MIUI 12 ROM for Mi CC9 Meitu Edition

  • MIUI 12 Recovery ROM for Mi CC9 Meitu Edition – Download

26) Download MIUI 12 ROM for Redmi Note 7 Pro

  • MIUI 12 Recovery ROM for Redmi Note 7 Pro – Download

27) Download MIUI 12 ROM for Mi 6X 

  • MIUI 12 Recovery ROM for Mi 6X – Download

28) Download MIUI 12 ROM for Redmi Note 5/Redmi Note 5 Pro

  • MIUI 12 Recovery ROM for Redmi Note 5/Redmi Note 5 Pro – Download

How to Install MIUI 12 Closed Beta ROM on Xiaomi Devices –

To install MIUI 12 ROM on Xiaomi phone download either Recovery ROM or Fastboot ROM from above and use the below method to install this on your device.

Method 1 – Recovery Mode

Recovery Mode

  1. Download MIUI 12 Recovery ROM from above and save it on your device.
  2. Now launch the ‘Updater‘ app on your device.
  3. Click on the three-dot menu (‘…’ icon) at the top-right corner, and select the ‘choose update package‘.
  4. Browse through the files and select the package ending with .zip extension.
  5. Done. Your device will reboot on the latest version.

Method 2 – Fastboot Mode

1) First, Download Mi Flash Tool, extract it and install it on your PC.

2) Now download MIUI 12 Fastboot ROM for your device.

3) Now boot your device into Fastboot mode by pressing the ‘Volume Down + Power‘ button.

4) Connect your device to PC via micro USB cable.

5) Now extract the Fastboot ROM and copy its path on the PC.

6) Now open MI Flash Tool and Paste the address bar of the ROM file folder path copied from above.
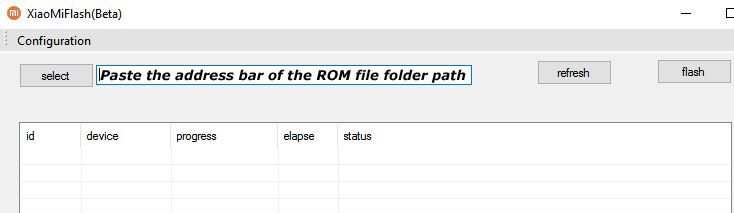
Mi Flash

7) First, click on the ‘Refresh‘ button (It will automatically recognize your device) and then click on the ‘Flash‘ button to flash MIUI 12 ROM on your Devices.
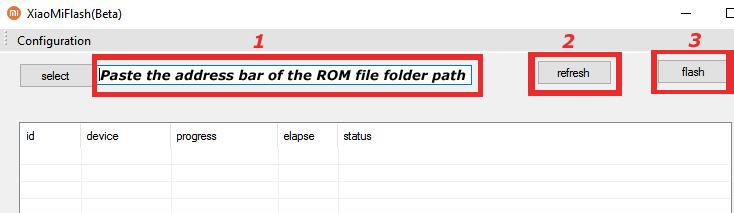
Mi Flash

8) Wait for some time to complete the process.

9) Done. Your device will boot on the latest version.

Wrapping Up:

This is the easiest way to update your Xiaomi device to MIUI 12. Download MIUI 12 Closed Beta for Xiaomi and Redmi devices and flash it to update it manually. Comment below if you have any doubts.

Good news for Realme users, the latest stable Android 10 update for Realme 3 and 3i starts rolling out. The latest Realme 3/3i Android 10 update is based on Realme UI and brings tons of new features and optimizations. You can Download Realme 3 and 3i Android 10 OTA Zip from below to Update Realme 3 and 3i to Android 10.

The Realme 3 and 3i Android 10 update has the software version C.07. The update is rolling out in a phase-wise manner, which means maybe you will get the update tomorrow or maybe next 1-2 weeks. If you don’t want to wait, you could just go to Settings and manually check or follow the below guide. Download Realme 3 and Realme 3i Android 10 OTA zip file from below.

The new Android 10 OTA Update for Realme 3 and 3i brings Realme UI 1.0 based on Android 10 and features like Visuals update, smart sidebar, Navigation Gestures 3.0, Gaming optimization, battery, and security optimization and many more. You can manually update Realme 3 and 3i to Android 10 by downloading the OTA file from below. You can check the complete changelog of Realme 3 and 3i Realme UI 1.0 from below.

Changelogs of Realme 3 and 3i Android 10 update:

  • Visuals
    • Updated UI to realme UI
    • Brand new Real Design makes visuals more attractive and operation more efficient.
  • Smart Sidebar
    • Optimized user interface and improved one-handed operation.
    • Optimized Smart Sidebar: Replaced File Console with File Manager; removed OSIE Visual Effect and No Notification Alerts.
    • Drag an app out of Smart Sidebar to open it in Split-screen Mode.
    • Added two new features: “Assistive Ball Opacity” and “Hide Assistive Ball on Fullscreen App”.
    • Optimized the Floating Window feature for more apps.
    • Added Bubbles: A bubble is displayed when you open an app in a floating window from the Smart Sidebar. Tap the bubble to collapse or open the app.
  • Screenshot
    • Optimized 3-Finger Screenshot Gesture: Use 3 fingers to touch and hold the screen, and swipe to take a screenshot of the selected part of the screen (partial screen capture). Use 3 fingers to touch and hold the screen, and swipe your fingers outwards to capture a long screenshot.
    • Added screenshot settings: You can adjust the position of the screenshot preview floating window and set the screenshot sound.
    • Optimized screenshot preview floating window: After taking a screenshot, drag it up and release it to share it, or drag it down and release to take a long screenshot.
  • Navigation Gestures 3.0
    • Optimized gestures: All gestures are supported in landscape mode.
  • System
    • Added Focus Mode: Minimizes outside distractions when you are learning or working.
    • Added whole new charging animation.
    • Optimized the Quick Settings user interface for easier one-handed operation.
    • Added pause feature for screen recording.
    • Added a floating window and settings for screen recording.
    • New sounds added for file deletion, calculator key touches, and compass pointer.
    • Optimized system built-in ringtones.
    • Added TalkBack floating prompts for Accessibility.
    • New management feature for recent tasks: You can view memory of recent tasks and locked apps.
  • Games
    • Optimized visual interaction for Game Space.
    • Optimized loading animation for Game Space.
  • Homescreen
    • Added new live wallpapers.
    • Added artistic wallpapers.
    • Added option to open Global Search or the notification panel when swiping down on homescreen.
    • Added option to customize the size, shape, and style of app icons on homescreen.
    • Optimized the graphic design of password unlock to facilitate one-handed operation.
    • Support for animated wallpapers on the lockscreen.
    • Added a Simple Mode for homescreen, featuring larger fonts, icons and a clearer layout.
  • Security
    • Random MAC address Generator: When your phone is connected to Wi-Fi network system generates a random MAC address to avoid targeted ads and protect your privacy.
  • Tools
    • In Quick Settings or Smart Sidebar, you can open Calculator in a floating window.
    • Added the trim feature in Recordings.
    • Added the Weather (dynamic) ringtone, which automatically adapts to the current weather.
    • Added weather-adaptive animations in Weather.
  • Camera
    • Optimized the Camera UI for better user experience.
    • Optimized the Timer UI and sound.
  • Photos
    • Optimized the Album UI for a clearer structure and photo thumbnails.
    • Added Album Recommendations that recognize more than 80 different scenes.
  • Communications
    • realme Share now supports sharing files with OPPO, Vivo and Xiaomi devices.
    • Optimized the Contacts UI for a more efficient experience.
  • Settings
    • Search Settings now supports fuzzy match and contains a search history.
  • Application
    • Added YT music
  • Battery
    • Updated decimals display during charging
    • To deepen user’s perception of fast charging, it will always be displayed when your phone is charging and the screen is bright.

Before You Begin

  • This method is only for Realme 3 and 3i. Don’t try this on any other device.
  • Follow the steps correctly otherwise, you may brick your device. We Guidegeekz.com is not responsible for any damage to your phone.
  • Charge your device to 60- 70% to prevent it from the accidental shutdown.
  • Take a complete backup of everything important.

Download Android 10 Update for Realme 3 and 3i

  • Realme 3 Android 10 OTA RMX1825EX_11_C.07– Coming Soon
  • Realme 3i Android 10 OTA RMX1827EX_11_C.07– Coming Soon

How to Install Android 10 Update on Realme 3 and 3i –

Method 1 –

1) Download Realme 3 and 3i Realme UI 1.0 OTA Zip from above and save it to internal memory.

2) Reboot Realme 3 and 3i to Recovery mode by using the below steps.

  • Turn Off your device
  • Press and hold the ‘Vol down+Power’ button.

3) Choose the language you want.

4) In recovery mode select Install from storage device.

5) Choose the zip file from phone storage or From the SD card and wait.

6) Done! Reboot your phone after the process complete.

Method 2 –

  1. Download the Realme 3 and 3i Android 10 OTA zip file from above and save it on your device.
  2. Go to download folder and rename the file to update.zip
  3. Place it to the root directory of internal storage.
  4. Click the firmware to start the update.
  5. Wait for the update to finish and restart when prompted.

Wrapping Up:

Realme 3 and 3i bring all Android 10 features along with new Realme UI and will soon be available for all via OTA but if you’re the impatient type then you could follow the above procedure to Download and Install Android 10 Update for Realme 3 and 3i. If you have any questions related to this post, feel free to leave that in the comment section.