
Author

Sumit Bahl

Browsing

Good news for Nokia users, latest stable Android 10 update for Nokia 5.1 Plus starts rolling out. The Android 10 internal beta leaks for both Nokia 5.1 Plus and Nokia 8 Sirocco. You can Download Nokia 5.1 Plus Android 10 OTA Zip from below to Update Nokia 5.1 Plus to Android 10.

The new Android 10 OTA Update for Nokia 5.1 Plus brings all Android 10 features like a system-wide dark theme, Smart reply, full-screen gesture navigation, additional controls for privacy and location, and more. You can manually update Nokia 5.1 Plus to Android 10 by downloading the OTA file from below.

The new Nokia 5.1 Plus Android 10 update is a leaked version means you won’t get the update via OTA. If you don’t want to wait, you could just go to Settings and manually check or follow the below guide. Download Nokia 5.1 Plus Android 10 OTA zip file from below.

Before You Begin

  • This method is only for Nokia 5.1 Plus. Don’t try this on any other device.
  • Follow the steps correctly otherwise, you may brick your device. We Guidegeekz.com is not responsible for any damage to your phone.
  • Charge your device to 60- 70% to prevent it from the accidental shutdown.
  • Take a complete backup of everything important.

Download Android 10 Update for Nokia 5.1 Plus

  • Nokia 5.1 Plus Android 10 OTA Zip – Download
  • Nokia 9 Pure view Android 10 Update – Download
  • Nokia 7.2 Android 10 Update – Download

How to Install Android 10 Update on Nokia 5.1 Plus –

Method 1 –

1) Download Nokia 5.1 Plus Android 10 OTA Zip from above and save it to internal memory.

2) Reboot Nokia 5.1 Plus to Recovery mode by using the command adb reboot bootloader or by using the below steps.

  • Turn Off your device
  • Press and hold the ‘Vol Up+Power’ button. Release the power button upon vibration, but keep the volume key pressed.
  • If you will see no command with dead Android
  • Now press Volume Up + power to enter into recovery mode.

3) In recovery mode select Apply update from SD Card.

4) Choose the zip file and wait.

5) Done! Reboot your phone after the process complete.

Method 2 –

  1. Download Nokia 5.1 Plus Android 10 OTA zip file from above and save it on your device.
  2. Go to download folder and rename the file to update.zip
  3. Place it to the root directory of internal storage.
  4. Open Phone app and dial *#*#874#*#* to update.
  5. Wait for the update to finish and restart when prompted.

Method 3 – 

  1. First, enable the USB debugging option from setting ->developer option. To enable Developer Options, go to About phone and tap the Build Number 7 times.
  2. Download ADB and Fastboot and install it on your PC.
  3. Download Android 10 OTA zip for Nokia 5.1 Plus from above Copy ROM to a folder where adb installed.
  4. Now Turn Off your phone and boot into the recovery mode.
  5. Choose Apply update from ADB
  6. Now Connect your phone to your Laptop/PC
  7. On ROM folder press shift+right click and click on open command here.
  8. Now check your connection status by typing the below command
    adb devices
    if your device is listed, you’re ready to flash the ROM
  9. Now Install Android 10 OTA on Nokia 5.1 Plus by typing below command
    adb sideload File-Name.zip 
  10. Now, wait until the process completes and then Reboot the phone.
  11. Done!

Wrapping Up:

Nokia 5.1 Plus brings all Android 10 features and will soon be available for all via OTA but if you’re the impatient type then you could follow the above procedure to Download and Install Android 10 Update for Nokia 5.1 Plus. If you have any questions related to this post, feel free to leave that in the comment section.

Good news for Nokia users, latest stable Android 10 update for Nokia 8 Sirocco starts rolling out. The Android 10 internal beta leaks for both Nokia 8 Sirocco and Nokia 5.1 Plus. You can Download Nokia 8 Sirocco Android 10 OTA Zip from below to Update Nokia 8 Sirocco to Android 10.

The new Android 10 OTA Update for Nokia 8 Sirocco brings all Android 10 features like a system-wide dark theme, Smart reply, full-screen gesture navigation, additional controls for privacy and location, and more. You can manually update Nokia 8 Sirocco to Android 10 by downloading the OTA file from below.

The new Nokia 8 Sirocco Android 10 update is a leaked version means you won’t get the update via OTA. If you don’t want to wait, you could just go to Settings and manually check or follow the below guide. Download Nokia 8 Sirocco Android 10 OTA zip file from below.

Before You Begin

  • This method is only for Nokia 8 Sirocco. Don’t try this on any other device.
  • Follow the steps correctly otherwise, you may brick your device. We Guidegeekz.com is not responsible for any damage to your phone.
  • Charge your device to 60- 70% to prevent it from the accidental shutdown.
  • Take a complete backup of everything important.

Download Android 10 Update for Nokia 8 Sirocco

  • Nokia 8 Sirocco Android 10 OTA Zip – Download
  • Nokia 9 Pure view Android 10 Update – Download
  • Nokia 7.2 Android 10 Update – Download

How to Install Android 10 Update on Nokia 8 Sirocco –

Method 1 –

1) Download Nokia 8 Sirocco Android 10 OTA Zip from above and save it to internal memory.

2) Reboot Nokia 8 Sirocco to Recovery mode by using the command adb reboot bootloader or by using the below steps.

  • Turn Off your device
  • Press and hold the ‘Vol Up+Power’ button. Release the power button upon vibration, but keep the volume key pressed.
  • If you will see no command with dead Android
  • Now press Volume Up + power to enter into recovery mode.

3) In recovery mode select Apply update from SD Card.

4) Choose the zip file and wait.

5) Done! Reboot your phone after the process complete.

Method 2 –

  1. Download Nokia 8 Sirocco Android 10 OTA zip file from above and save it on your device.
  2. Go to download folder and rename the file to update.zip
  3. Place it to the root directory of internal storage.
  4. Open Phone app and dial *#*#874#*#* to update.
  5. Wait for the update to finish and restart when prompted.

Method 3 – 

  1. First, enable the USB debugging option from setting ->developer option. To enable Developer Options, go to About phone and tap the Build Number 7 times.
  2. Download ADB and Fastboot and install it on your PC.
  3. Download Android 10 OTA zip for Nokia 8 Sirocco from above Copy ROM to a folder where adb installed.
  4. Now Turn Off your phone and boot into the recovery mode.
  5. Choose Apply update from ADB
  6. Now Connect your phone to your Laptop/PC
  7. On ROM folder press shift+right click and click on open command here.
  8. Now check your connection status by typing the below command
    adb devices
    if your device is listed, you’re ready to flash the ROM
  9. Now Install Android 10 OTA on Nokia 8 Sirocco by typing below command
    adb sideload File-Name.zip 
  10. Now, wait until the process completes and then Reboot the phone.
  11. Done!

Wrapping Up:

Nokia 8 Sirocco brings all Android 10 features and will soon be available for all via OTA but if you’re the impatient type then you could follow the above procedure to Download and Install Android 10 Update for Nokia 8 Sirocco. If you have any questions related to this post, feel free to leave that in the comment section.

Latest Android 10 based MIUI 11.0.7.0 for POCO X2 starts rolling. The MIUI 11.0.7.0 Update for POCO X2 is based on Android 10 and bring all MIUI 11 features like improved UI design, Dynamic Clock on the lock screen, creative always-on display, dynamic video wallpapers, Quick replies, among other things. Follow the below guide to Download MIUI 11.0.7.0 Global Stable ROM for POCO X2.

MIUI 11.0.7.0 Global Stable ROM for POCO X2 is a stable version and can be flashed via Recovery or via Fastboot. You can wait for the OTA or download MIUI 11.0.7.0 for POCO X2 from below to update POCO X2 to Android 10 manually.

The new update is MIUI 11.0.7.0.QGHINXM and soon will be released and available for all users. You can Download POCO X2 MIUI 11.0.7.0.QGHINXM ROM from below and also manually check for the update by going to Settings -> About Phone -> System updates -> Check for update. Download MIUI 11.0.7.0 Stable ROM for POCO X2 from below.

Note:-

  • This Firmware file is only for POCO X2. Don’t try this on any other device.
  • Follow the steps correctly otherwise you may brick your device. We are not responsible for any damage to your phone.
  • It may erase your data, so it is advisable to take a complete backup of your phone for a safer side.
  • Ensure that your phone has at least 50-60% charged to prevent the accidental shutdown in-between the process.

Download MIUI 11.0.7.0 Global Stable ROM for POCO X2

  • MIUI 11.0.7.0 Recovery ROM for POCO X2 – Download
  • MIUI 11.0.7.0 Fastboot ROM for POCO X2 – Download

How to Install MIUI 11.0.7.0 Global Stable ROM on POCO X2 –

To install MIUI 11.0.7.0 update for POCO X2 download either Recovery ROM or Fastboot ROM from above and use the below method to install this on your device.

Method 1 – Recovery Mode

Recovery Mode

  1. Download MIUI 11 Recovery ROM for POCO X2 from above and save it on your device.
  2. Now launch the ‘Updater‘ app on your device.
  3. Click on the three-dot menu (‘…’ icon) at the top-right corner, and select the ‘choose update package‘.
  4. Browse through the files and select the package ending with .zip extension.
  5. Done. Your device will reboot on the latest version.

Method 2 – Fastboot Mode

1) First, Download Mi Flash Tool, extract it and install it on your PC.

2) Now download MIUI 11 Fastboot ROM for POCO X2 for your device.

3) Now boot your device into Fastboot mode by pressing the ‘Volume Down + Power‘ button.

4) Connect your device to PC via micro USB cable.

5) Now extract the Fastboot ROM and copy its path on the PC.

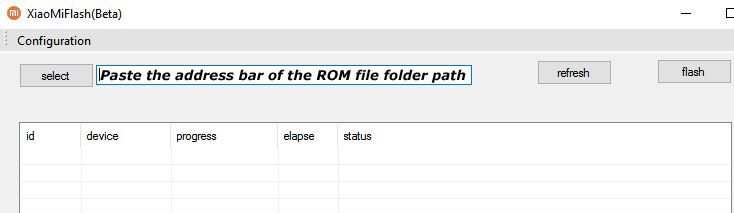
6) Now open MI Flash Tool and Paste the address bar of the ROM file folder path copied from above.

Mi Flash

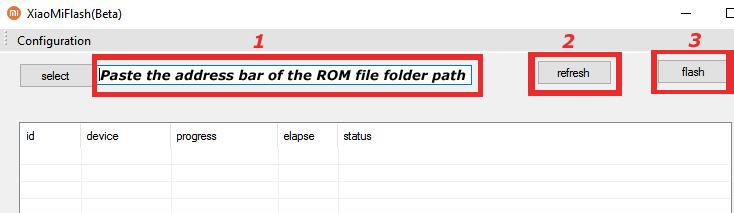
7) First, click on the ‘Refresh‘ button (It will automatically recognize your device) and then click on the ‘Flash‘ button to flash MIUI 11 ROM on your Devices.

Mi Flash

8) Wait for some time to complete the process.

9) Done. Your device will boot on the latest version.

Wrapping Up:

If you want to update POCO X2 to Android 10 based MIUI 11, then you can follow the above process. Download MIUI 11.0.7.0 Global Stable ROM for POCO X2 and flash it to update it manually. Comment below if you have any doubts.

Good news for Motorola users, the latest stable Android 10 update for Motorola One starts rolling out. The update is rolled out via OTA and bring all Android 10 features. You can Download Motorola One Android 10 OTA Zip from below to Update Motorola One to Android 10.

The new Motorola OneAndroid 10 update has the software version QPK30.54-22 and rolling out in a phase-wise manner which means maybe you will get the update tomorrow or maybe next 1-2 weeks. If you don’t want to wait, you could just go to Settings and manually check or follow the below guide or Download Motorola One Android 10 OTA zip file from below to update it manually.

The new Android 10 OTA Update for Motorola One brings all Android 10 features like a system-wide dark mode, privacy enhancements to location permissions, and improvements to notifications, along with February 2020 security patch. You can manually update Motorola One to Android 10 by downloading the OTA file from below.

Before You Begin

  • This method is device-specific. Don’t try this on any other device.
  • Follow the steps correctly otherwise, you may brick your device. We Guidegeekz.com is not responsible for any damage to your phone.
  • Charge your device to 60- 70% to prevent it from the accidental shutdown.
  • Take a complete backup of everything important.

Download Android 10 Update for Motorola One

  • Motorola One Android 10 OTA Zip – Download

How to Install Android 10 Update on Motorola One –

Method 1 for OTA Update–

1) Download Motorola One Android 10 OTA Zip from above and save it to internal memory.

2) Reboot Motorola One to Recovery mode by using the command adb reboot bootloader or by using the below steps.

  • Turn Off your device
  • Press and hold ‘Vol Up+Vol Down+Power’ button
  • You will see no command with dead Android
  • Now press Volume Up + power to enter into recovery mode.

3) In recovery mode select Apply update from SD Card.

4) Choose the zip file and wait.

5) Done! Reboot your phone after the process complete.

Method 2 – Install Android 10 Factory Image on Motorola One

  1. First, enable the USB debugging option from setting ->developer option. To enable Developer Options, go to About phone and tap the Build Number 7 times.
  2. Download ADB and Fastboot and install it on your PC.
  3. Now Download the correct firmware for your device from above and extract it to the ADB installation directory.
  4.  Now go to adb and fastboot installation directory and open the command window there by pressing and hold the ‘shift’ key and right-click anywhere in that folder.
  5. Now Reboot your phone into Bootloader mode by turn it off and press and hold ‘Power + Volume Down‘.
  6. Now issue the below commands one by one. (If you are using mfastboot then type ‘mfastboot‘ instead of ‘fastboot‘)
    fastboot getvar max-sparse-size
    fastboot oem fb_mode_set
    fastboot flash partition gpt.bin
    fastboot flash bootloader bootloader.img
    fastboot flash modem_a NON-HLOS.bin
    fastboot flash fsg_a fsg.mbn
    fastboot erase modemst1
    fastboot erase modemst2
    fastboot flash dsp_a adspso.bin
    fastboot flash logo_a logo.bin
    fastboot flash boot_a boot.img
    fastboot flash system_a system.img_sparsechunk.0
    fastboot flash system_a system.img_sparsechunk.1
    fastboot flash system_a system.img_sparsechunk.2
    fastboot flash system_a system.img_sparsechunk.3
    fastboot flash system_a system.img_sparsechunk.4
    fastboot flash system_a system.img_sparsechunk.5
    fastboot flash system_a system.img_sparsechunk.6
    fastboot flash system_a system.img_sparsechunk.7
    fastboot flash system_a system.img_sparsechunk.8
    fastboot flash system_a system.img_sparsechunk.9
    fastboot flash system_b system_b.img_sparsechunk.0
    fastboot flash system_b system_b.img_sparsechunk.1
    fastboot flash vendor_a vendor.img_sparsechunk.0
    fastboot flash vendor_a vendor.img_sparsechunk.1
    fastboot flash oem_a oem.img
    fastboot flash oem_b oem_other.img
    fastboot erase cache
    fastboot erase userdata
    fastboot erase DDR
    fastboot oem fb_mode_clear
    fastboot reboot

    7) Done! Above steps will flash Stock Android 10 Firmware of Motorola One.

    Done!

Wrapping Up:

Motorola One brings all Android 10 features and will soon be available for all via OTA but if you’re the impatient type then you could follow the above procedure to Download and Install Android 10 Update for Motorola One. If you have any questions related to this post, feel free to leave that in the comment section.
Here we share a direct link to Download Asus Zenfone 5 Android 10 Firmware Update. The new Android 10 update for ZenFone 5/5z is rolling out via OTA which brings all Android 10 features along with several new features, UI enhancements, and March 2020 Security update. Download Asus Zenfone 5 WW-17.0615.2003.20 Firmware Update from below.

The Android 10 update for Asus ZenFone 5 is an Incremental update that rolls out in a phase-wise manner. The update is rolling out via OTA (over-the-air) which comes with build number 17.0615.2003.20. You can wait for the OTA updates, or you can Download Asus ZenFone 5 WW-17.0615.2003.20 OTA to update it manually with the below method. Download Asus ZenFone 5 Android 10 firmware update file from below.

We provide you the Asus ZenFone 5 Android 10 OTA zip which you can flash on your device. You can check for the by going to Settings > About > System Update > and check for update. Download Asus Zenfone 5 Android 10 Firmware Update from below.

Note:-

  • This method is only for the Asus ZenFone 5 (ZE620KL) For WW SKU only.
  • Follow the steps correctly otherwise, you may brick your device. We Guidegeekz.com is not responsible for any damage to your phone.
  • Charge your device to 60- 70% to prevent it from the accidental shutdown.
  • Take a complete backup of everything important.

Download Asus Zenfone 5 Android 10 Firmware Update

  • Download Asus ZenFone 5 Android 10 FOTA (Full OTA) – Download

How to Install Android 10 on Asus ZenFone 5

Method 1

  1. Download the Zenfone 5 Android 10 files from above and save it to internal storage.
  2. Now the system will automatically detect new firmware.
  3. Now enter passwords.
  4. After executing the UL pack, the system will reboot once.
  5. Done! the system will be upgraded to Android 10.

Method 2

  1. Download the files from above and rename it to update.zip.
  2. Now Turn Off your phone and boot into recovery mode by pressing Power+Volume UP.
  3. Now in recovery mode choose to apply update from sdcard.
  4. Now select the update.zip file.
  5. Now wait until the process complete and then Reboot the phone.
  6. Done!

Method 3

  1. First, enable the USB debugging option from setting ->developer option. To enable Developer Options, go to About phone and tap the Build Number 7 times.
  2. Download ADB and Fastboot and install it on your PC.
  3. Download Zenfone 5 v17.0615.2003.20 FOTA from above Copy ROM to a folder where adb installed.
  4. Now Turn Off your phone and boot into the recovery mode.
  5. Choose Apply update from ADB
  6. Now Connect your phone to your Laptop/PC
  7. On ROM folder press shift+right click and click on open command here.
  8. Now check your connection status by typing the below command
    adb devices
    if your device is listed, you’re ready to flash the ROM
  9. Now Install Android 10 OTA on Zenfone 5 by typing below command
    adb sideload File-Name.zip 
  10. Now, wait until the process completes and then Reboot the phone.
  11. Done!

Wrapping Up:

This is the easiest way to Download Asus Zenfone 5 Android 10 Firmware Update and flash it manually. If you have any questions, comment below.

Good news for Nokia users, latest stable Android 10 update for Nokia 9 PureView starts rolling out. HMD’s team “The latest Android 10 update has made its way to your phones. Tap into an upgraded experience and access the latest features today. Make sure that your phone has Security Patch installed to upgrade your phone to Android 10 ”. via Twitter. You can Download Nokia 9 PureView Android 10 OTA Zip from below to Update Nokia 9 PureView to Android 10.

The new Android 10 OTA Update for Nokia 9 PureView brings all Android 10 features like a system-wide dark theme, Smart reply, full-screen gesture navigation, additional controls for privacy and location, along with March 2020 security patch. You can manually update Nokia 9 PureView to Android 10 by downloading the OTA file from below.

The new Nokia 9 PureView Android 10 update has the software version v5.31D and rolling out in a phase-wise manner. Means maybe you will get the update tomorrow or maybe next 1-2 weeks. If you don’t want to wait, you could just go to Settings and manually check or follow the below guide. Download Nokia 9 PureView Android 10 OTA zip file from below.

Changelogs of Nokia 9 PureView Android 10 update:

  • Software upgrade – Android 10 (V5.31D)
  • Dark Mode – Take it easy on your eyes
  • Smart reply – Save more time with recommended actions
  • Gesture navigation – Get around with a swipe and pull
  • Additional controls for privacy and location
  • Google security patch (2019-11)

Before You Begin

  • This method is only for Nokia 9 PureView. Don’t try this on any other device.
  • Follow the steps correctly otherwise, you may brick your device. We Guidegeekz.com is not responsible for any damage to your phone.
  • Charge your device to 60- 70% to prevent it from the accidental shutdown.
  • Take a complete backup of everything important.

Download Android 10 Update for Nokia 9 PureView

  • Nokia 9 PureView Android 10 OTA Zip – Download
  • Nokia 3.2 Android 10 Update – Download
  • Nokia 7.2 Android 10 Update – Download

How to Install Android 10 Update on Nokia 9 PureView –

Method 1 –

1) Download Nokia 9 PureView Android 10 OTA Zip from above and save it to internal memory.

2) Reboot Nokia 9 PureView to Recovery mode by using the command adb reboot bootloader or by using the below steps.

  • Turn Off your device
  • Press and hold the ‘Vol Up+Power’ button. Release the power button upon vibration, but keep the volume key pressed.
  • If you will see no command with dead Android
  • Now press Volume Up + power to enter into recovery mode.

3) In recovery mode select Apply update from SD Card.

4) Choose the zip file and wait.

5) Done! Reboot your phone after the process complete.

Method 2 –

  1. Download Nokia 9 PureView v5.31D Android 10 OTA zip file from above and save it on your device.
  2. Go to download folder and rename the file to update.zip
  3. Place it to the root directory of internal storage.
  4. Open Phone app and dial *#*#874#*#* to update.
  5. Wait for the update to finish and restart when prompted.

Method 3 – 

  1. First, enable the USB debugging option from setting ->developer option. To enable Developer Options, go to About phone and tap the Build Number 7 times.
  2. Download ADB and Fastboot and install it on your PC.
  3. Download Android 10 OTA zip for Nokia 9 PureView from above Copy ROM to a folder where adb installed.
  4. Now Turn Off your phone and boot into the recovery mode.
  5. Choose Apply update from ADB
  6. Now Connect your phone to your Laptop/PC
  7. On ROM folder press shift+right click and click on open command here.
  8. Now check your connection status by typing the below command
    adb devices
    if your device is listed, you’re ready to flash the ROM
  9. Now Install Android 10 OTA on Nokia 9 PureView by typing below command
    adb sideload File-Name.zip 
  10. Now, wait until the process completes and then Reboot the phone.
  11. Done!

Wrapping Up:

Nokia 9 PureView brings all Android 10 features and will soon be available for all via OTA but if you’re the impatient type then you could follow the above procedure to Download and Install Android 10 Update for Nokia 9 PureView. If you have any questions related to this post, feel free to leave that in the comment section.
Latest Android 10 based MIUI 11.0.2.0 for Mi 9 SE starts rolling. The MIUI 11.0.2.0 Update for Mi 9 SE is based on Android 10 and bring all MIUI 11 features like improved UI design, Dynamic Clock on the lock screen, creative always-on display, dynamic video wallpapers, Quick replies, among other things. Follow the below guide to Download MIUI 11.0.2.0 Global Stable ROM for Mi 9 SE.

MIUI 11.0.2.0 Global Stable ROM for Mi 9 SE is a stable version and can be flashed via Recovery or via Fastboot. You can wait for the OTA or download MIUI 11.0.2.0 for Mi 9 SE from below to update Mi 9 SE to Android 10 manually.

The new update is MIUI V11.0.2.0.QFBMIXM and soon will be released and available for all users. You can Download Mi 9 SE MIUI 11.0.2.0.QFBMIXM ROM from below and also manually check for the update by going to Settings -> About Phone -> System updates -> Check for update. Download MIUI 11.0.2.0 Stable ROM for Mi 9 SE from below.

Note:-

  • This Firmware file is only for Mi 9 SE. Don’t try this on any other device.
  • Follow the steps correctly otherwise you may brick your device. We are not responsible for any damage to your phone.
  • It may erase your data, so it is advisable to take a complete backup of your phone for a safer side.
  • Ensure that your phone has at least 50-60% charged to prevent the accidental shutdown in-between the process.

Download MIUI 11.0.2.0 Global Stable ROM for Mi 9 SE

  • MIUI 11.0.2.0 Recovery ROM for Mi 9 SE – Download
  • MIUI 11.0.2.0 Fastboot ROM for Mi 9 SE – Download

How to Install MIUI 11.0.2.0 Global Stable ROM on Mi 9 SE –

To install MIUI 11.0.2.0 update for Mi 9 SE download either Recovery ROM or Fastboot ROM from above and use the below method to install this on your device.

Method 1 – Recovery Mode

Recovery Mode

  1. Download MIUI 11 Recovery ROM for Mi 9 SE from above and save it on your device.
  2. Now launch the ‘Updater‘ app on your device.
  3. Click on the three-dot menu (‘…’ icon) at the top-right corner, and select the ‘choose update package‘.
  4. Browse through the files and select the package ending with .zip extension.
  5. Done. Your device will reboot on the latest version.

Method 2 – Fastboot Mode

1) First, Download Mi Flash Tool, extract it and install it on your PC.

2) Now download MIUI 11 Fastboot ROM for Mi 9 SE for your device.

3) Now boot your device into Fastboot mode by pressing the ‘Volume Down + Power‘ button.

4) Connect your device to PC via micro USB cable.

5) Now extract the Fastboot ROM and copy its path on the PC.

6) Now open MI Flash Tool and Paste the address bar of the ROM file folder path copied from above.

Mi Flash

7) First, click on the ‘Refresh‘ button (It will automatically recognize your device) and then click on the ‘Flash‘ button to flash MIUI 11 ROM on your Devices.

Mi Flash

8) Wait for some time to complete the process.

9) Done. Your device will boot on the latest version.

Wrapping Up:

If you want to update Mi 9 SE to Android 10 based MIUI 11, then you can follow the above process. Download MIUI 11.0.2.0 Global Stable ROM for Mi 9 SE and flash it to update it manually. Comment below if you have any doubts.

Here we share a direct link to Download Asus Zenfone 6 Android 10 Firmware Update. The new Android 10 update for ZenFone 6/6z is rolling out via OTA which brings all Android 10 features along with several new features, UI enhancements, and March 2020 Security update. Download Asus Zenfone 6 WW-17.1810.2003.144 Firmware Update from below.

The Android 10 update for Asus ZenFone 6 is an Incremental update that rolls out in a phase-wise manner. The update is rolling out via OTA (over-the-air) which comes with build number 17.1810.2003.144. You can wait for the OTA updates, or you can Download Asus ZenFone 6 WW-17.1810.2003.144 OTA to update it manually with the below method. Download Asus ZenFone 6 Android 10 firmware update file from below.

We provide you the Asus ZenFone 6 Android 10 OTA zip which you can flash on your device. You can check for the by going to Settings > About > System Update > and check for update. Download Asus Zenfone 6 Android 10 Firmware Update from below.

Asus ZenFone 6 Android 10 Changelogs

  1. Updated Android security patch(2020/3/1)
  2. Optimized system stability
  3. Enabled Reliance VoWiFi in India
  4. Enabled Tele2 VoLTE and VoWiFi in Sweden
  5. Added pop-up confirmation when 3rd-party apps request for front camera in the background

Note:-

  • This method is only for the Asus ZenFone 6 (ZS630KL) For WW SKU only.
  • Follow the steps correctly otherwise, you may brick your device. We Guidegeekz.com is not responsible for any damage to your phone.
  • Charge your device to 60- 70% to prevent it from the accidental shutdown.
  • Take a complete backup of everything important.

Download Asus Zenfone 6 Android 10 Firmware Update

  • Download Zenfone 6 Android 10 update (17.1810.2002.137 –> 17.1810.2003.144 Incremental OTA) – Download
  • Download Asus ZenFone 6 Android 10 FOTA (Full OTA) – Download

How to Install Android 10 on Asus ZenFone 6

Method 1

  1. Download the files from above and rename it to update.zip.
  2. Now Turn Off your phone and boot into recovery mode by pressing Power+Volume UP.
  3. Now in recovery mode choose to apply update from sdcard.
  4. Now select the update.zip file.
  5. Now wait until the process complete and then Reboot the phone.
  6. Done!

Method 2

  1. First, enable the USB debugging option from setting ->developer option. To enable Developer Options, go to About phone and tap the Build Number 7 times.
  2. Download ADB and Fastboot and install it on your PC.
  3. Download Zenfone 6 v17.1810.2003.144 FOTA from above Copy ROM to a folder where adb installed.
  4. Now Turn Off your phone and boot into the recovery mode.
  5. Choose Apply update from ADB
  6. Now Connect your phone to your Laptop/PC
  7. On ROM folder press shift+right click and click on open command here.
  8. Now check your connection status by typing the below command
    adb devices
    if your device is listed, you’re ready to flash the ROM
  9. Now Install Android 10 OTA on Zenfone 6 by typing below command
    adb sideload File-Name.zip 
  10. Now, wait until the process completes and then Reboot the phone.
  11. Done!

Wrapping Up:

This is the easiest way to Download Asus Zenfone 6 Android 10 Firmware Update and flash it manually. If you have any questions, comment below.

Source

Good news for Nokia users, latest stable Android 10 update for Nokia 4.2 starts rolling out. HMD’s head Juho Sarvikas quoting “Nokia 4.2 owners, your device just got even better! You can now update to Android 10 with all-new features available!”. via Twitter. You can Download Nokia 4.2 Android 10 OTA Zip from below to Update Nokia 4.2 to Android 10.

The new Android 10 OTA Update for Nokia 4.2 brings all Android 10 features like a system-wide dark theme, Smart reply, full-screen gesture navigation, additional controls for privacy and location, along with March 2020 security patch. You can manually update Nokia 4.2 to Android 10 by downloading the OTA file from below.

The new Nokia 4.2 Android 10 update has the software version v2.290 and rolling out in a phase-wise manner. Means maybe you will get the update tomorrow or maybe next 1-2 weeks. If you don’t want to wait, you could just go to Settings and manually check or follow the below guide. Download Nokia 4.2 Android 10 OTA zip file from below.

Changelogs of Nokia 4.2 Android 10 update:

  • Dark Mode – Take it easy on your eyes
  • Smart reply – Save more time with recommended actions
  • Gesture navigation – Get around with a swipe and pull
  • Additional controls for privacy and location
  • Google Security Pach (2020-03 / March 2020)

Before You Begin

  • This method is only for Nokia 4.2. Don’t try this on any other device.
  • Follow the steps correctly otherwise, you may brick your device. We Guidegeekz.com is not responsible for any damage to your phone.
  • Charge your device to 60- 70% to prevent it from the accidental shutdown.
  • Take a complete backup of everything important.

Download Android 10 Update for Nokia 4.2

  • Nokia 4.2 Android 10 OTA Zip – Download
  • Nokia 3.2 Android 10 Update – Download
  • Nokia 7.2 Android 10 Update – Download

How to Install Android 10 Update on Nokia 4.2 –

Method 1 –

1) Download Nokia 4.2 Android 10 OTA Zip from above and save it to internal memory.

2) Reboot Nokia 4.2 to Recovery mode by using the command adb reboot bootloader or by using the below steps.

  • Turn Off your device
  • Press and hold the ‘Vol Up+Power’ button. Release the power button upon vibration, but keep the volume key pressed.
  • If you will see no command with dead Android
  • Now press Volume Up + power to enter into recovery mode.

3) In recovery mode select Apply update from SD Card.

4) Choose the zip file and wait.

5) Done! Reboot your phone after the process complete.

Method 2 –

  1. Download the Nokia 4.2 Android 10 OTA zip file from above and save it on your device.
  2. Go to download folder and rename the file to update.zip
  3. Place it to the root directory of internal storage.
  4. Open Phone app and dial *#*#874#*#* to update.
  5. Wait for the update to finish and restart when prompted.

Method 3 – 

  1. First, enable the USB debugging option from setting ->developer option. To enable Developer Options, go to About phone and tap the Build Number 7 times.
  2. Download ADB and Fastboot and install it on your PC.
  3. Download Android 10 OTA zip for Nokia 4.2 from above Copy ROM to a folder where adb installed.
  4. Now Turn Off your phone and boot into the recovery mode.
  5. Choose Apply update from ADB
  6. Now Connect your phone to your Laptop/PC
  7. On ROM folder press shift+right click and click on open command here.
  8. Now check your connection status by typing the below command
    adb devices
    if your device is listed, you’re ready to flash the ROM
  9. Now Install Android 10 OTA on Nokia 4.2 by typing below command
    adb sideload File-Name.zip 
  10. Now, wait until the process completes and then Reboot the phone.
  11. Done!

Wrapping Up:

Nokia 4.2 brings all Android 10 features and will soon be available for all via OTA but if you’re the impatient type then you could follow the above procedure to Download and Install Android 10 Update for Nokia 4.2. If you have any questions related to this post, feel free to leave that in the comment section.

Latest MIUI 11.0.3.0 for Redmi 6 starts rolling. The MIUI 11.0.3.0 Update for Redmi 6 is based on Android 9 and bring all MIUI 11 features like improved UI design, Dynamic Clock on the lock screen, creative always-on display, dynamic video wallpapers, Quick replies, among other things. Follow the below guide to Download MIUI 11.0.3.0 Global Stable ROM for Redmi 6.

MIUI 11.0.3.0 Global Stable ROM for Redmi 6 is a stable version and can be flashed via Recovery or via Fastboot. You can wait for the OTA or download MIUI 11.0.3.0 for Redmi 6 from below to update Redmi 6 to MIUI 11 manually.

The new update is MIUI 11.0.3.0.PCGMIXM and soon will be released and available for all users. You can Download Redmi 6 MIUI 11.0.3.0.PCGMIXM ROM from below and also manually check for the update by going to Settings -> About Phone -> System updates -> Check for update. Download MIUI 11.0.3.0 Stable ROM for Redmi 6 from below.

Note:-

  • This Firmware file is only for Redmi 6. Don’t try this on any other device.
  • Follow the steps correctly otherwise you may brick your device. We are not responsible for any damage to your phone.
  • It may erase your data, so it is advisable to take a complete backup of your phone for a safer side.
  • Ensure that your phone has at least 50-60% charged to prevent the accidental shutdown in-between the process.

Download MIUI 11.0.3.0 Global Stable ROM for Redmi 6

  • MIUI 11.0.3.0 Recovery ROM for Redmi 6 – Download
  • MIUI 11.0.3.0 Fastboot ROM for Redmi 6 – Download

How to Install MIUI 11.0.3.0 Global Stable ROM on Redmi 6 –

To install MIUI 11.0.3.0 update for Redmi 6 download either Recovery ROM or Fastboot ROM from above and use the below method to install this on your device.

Method 1 – Recovery Mode

Recovery Mode

  1. Download MIUI 11 Recovery ROM for Redmi 6 from above and save it on your device.
  2. Now launch the ‘Updater‘ app on your device.
  3. Click on the three-dot menu (‘…’ icon) at the top-right corner, and select the ‘choose update package‘.
  4. Browse through the files and select the package ending with .zip extension.
  5. Done. Your device will reboot on the latest version.

Method 2 – Fastboot Mode

1) First, Download Mi Flash Tool, extract it and install it on your PC.

2) Now download MIUI 11 Fastboot ROM for Redmi 6 for your device.

3) Now boot your device into Fastboot mode by pressing the ‘Volume Down + Power‘ button.

4) Connect your device to PC via micro USB cable.

5) Now extract the Fastboot ROM and copy its path on the PC.

6) Now open MI Flash Tool and Paste the address bar of the ROM file folder path copied from above.

Mi Flash

7) First, click on the ‘Refresh‘ button (It will automatically recognize your device) and then click on the ‘Flash‘ button to flash MIUI 11 ROM on your Devices.

Mi Flash

8) Wait for some time to complete the process.

9) Done. Your device will boot on the latest version.

Wrapping Up:

If you want to update Redmi 6 to MIUI 11, then you can follow the above process. Download MIUI 11.0.3.0 Global Stable ROM for Redmi 6 and flash it to update it manually. Comment below if you have any doubts.